Revision 8.21 • 5/5/2022
© MHD Tuning

Table of Contents
Overview 5
Supported Vehicles 5
MHD Flasher N54 5
MHD Flasher N55-E 5
MHD Flasher F+G 6
Hardware Requirements 7
Mobile Device 7
Supported Adapters and Cables 7
MHD Black Wifi Adapter 7
MHD E-Series Wifi Adapter 7
K+DCan Cable 8
ENET Cable 8
Getting Started 8
Logging In 9
Social Login Options 10
MHD Account 10
Existing Licenses 11
Cross Platform Licenses 11
Purchase New Licenses 12
Activate License Keys 12
Connecting to Car 14
WiFi Adapter (Orange or Black) 14
Keeping Cellular Data - Android 14
Keeping Cellular Data - iOS 15
Connection Permission with iOS 14 and up 16
K+DCan Cable 16
ENET Cable 17
Flashing your Car 18
OTS Maps 18
Navigating the OTS Maps Screen 18
OTS Maps Process Overview 19
Custom Tunes 21
Flash a Custom Tune Process Overview 22
© 2022 MHD Tuning
2

Flash Options 24
Linear Throttle 25
Adjust Throttle Sensitivity 25
Minimum Idle RPM 25
OEM Catted Downpipe(s) 25
VMax Delete 25
Exhaust Burble Customization 26
Cold Star t Delete 26
Exhaust Flap Open In Spor t 26
Star tup Roar 26
OPF Delete 26
Boost per Gear 27
Torque per Gear 27
Kickdown Prevention 27
Shift Bog Fix (Tq Lim 2048 - hard limiter) 27
6MT Launch RPM 27
Rev Match Disable 27
T-Map Sensor 27
Ignition Coils 28
ADV O2 Sensors 28
XDI HPFP 28
Dorch HPFP 28
Spor t cooling mode for intercooler 28
Motiv FlexFuel Kit 28
Coolant Mode 29
PI Safety (coil cut) 29
Wastegate Rattle Fix 29
Desensitize Knock Sensors 29
Flash Counter Reset / Freeze 29
Overrun BRAP 29
MSA Disable 29
Flash Options - Engine Char t 30
Return to Stock 32
Flash Back to Stock 32
Flash Stage 0 (stock power) 32
Generate Updated Backup 32
Data Logging 33
© 2022 MHD Tuning
3

Gauge Interaction 34
Changing Gauge Parameter 34
Reset Min/Max Display 34
Changing Gauge Style / Appearance 34
Monitor Options 35
Gauge Alerts 36
Graph a Log 37
CSV File Actions 38
Share to SpoolStreet 39
Read DME Codes 40
Reset Adaptations 41
MHD+ Suite 42
Antilag 42
Rolling Start 42
DCT Launch Control Start 43
Map Switching 43
Instructions 44
General Info 44
FlexFuel 45
Requirements 45
Useful Logging Parameters 45
MHD+ Menu System 46
Page 1 - Mapswitch 46
Page 2 - Exhaust Flap Control 46
Page 3 - Ethanol Content Quick View 46
MHD Backend Flash + JB4 Flowchart 47
FAQ 47
Revision History 49
© 2022 MHD Tuning
4
Overview
MHD Flasher is the first mobile application to bring ECU tuning and monitoring to multiple BMW
platforms. The MHD Flasher reveals the immense margin of power BMW left on the table with
these engines while still retaining the sophistication, smoothness, and safety of the original
engine management program.
MHD Flasher is not only very simple to install, it also makes it easy to keep an eye on the tuning
and your engine. You can flash your ECU back to stock at any time, and as often as you need.
With support for mostly all Android and iOS devices, download MHD Flasher from their
respective app store and get started today!
Supported Vehicles
MHD Flasher is available as three separate mobile
applications depending on the engine and platform
of your vehicle. Details are as follows:
MHD Flasher N54
● 2007 - 2010 135i, 335i / xi, 535i / xi
● 2011 - 2013 335is
● 2009 - 2016 Z4 35i / is
● 2011 - 2012 1M
● 2008 - 2010 X6 35i
MHD Flasher N55-E
● 2010 - 2013 135i N55, 335i / xi N55
● 2010 - 2013 X5 35i N55
● 2011 - 2014 X6 35i N55
© 2022 MHD Tuning
5

MHD Flasher F+G
N55:
● M135i F2x N55 2012 - 2016
● M235i F2x N55 2013 - 2016
● M2 F87 N55 2015 - 2018
● 335i N55 F3x 2011 - 2015
● 435i N55 F3x 2013 - 2016
● 535i N55 F1x 2010 - 2017
● 640i N55 F0x 2011 - 2017
● 740i N55 F0x 2012 - 2015
● X3 35i N55 F25 2010 - 2017
● X4 35i / M40i N55 F26 2014 - 2018
● X5 35i / 40i N55 F15 2013 - 2018
● X6 35i / 40i N55 F16 2014 - 2018
● X-Drive is supported on all cars.
S55:
● M3 S55 F80 2014 - 2019
● M4 S55 F82 2014 - 2020
● M4 S55 F83 2014 - 2020
● M2 S55 Competition 2018 -
● All Comp, GTS, CS Variants
S63:
● M5/6 F1x 2012-2016
● X5M F85 2015 - 2019
● X6M F86 2015 - 2019
● M5 F90 2017 -
● M8 F9x 2019 -
● X5M F9x 2020 -
● X6M F9x 2020 -
B58:
● M140i F2x B58 2016 - 2019
● M240i F2x B58 2016 - 2021
● 340i B58 2015 - 2019
● M340i G2x 2019 -
● M440i G2x 2019 -
● 440i F3x 2016 - 2020
● 540i G3x 2017 -
● 640i GT G23 2017 -
● 740i G1x 2015 -
● X3 M40i G01 2017 -
● X4 M40i G01 2017 -
● X5 40i G05 2018 -
● X6 40i G06 2018 -
● Z4 M40i G29 2019 -
● Toyota Supra A90 2020 -
● X-Drive is supported on all cars.
N13:
● 114i, 116i, 118i F2x N13
● 316i F3x N13
S58:
● X3M F97 2019 -
● X4M F98 2019 -
© 2022 MHD Tuning
6
Hardware Requirements
After identifying your vehicle and determining which MHD series app it falls under, you next must
make sure you have the right hardware. There are two pieces to this puzzle: the mobile device,
and the wireless adapter or cable which will connect with the car.
Mobile Device
The only mobile device requirement is the version of iOS or Android that the device is running.
To find the version on Apple devices, open Settings > General > About. To find the version on
Android devices, open Settings > About Phone (or About Device) > Android Version. Your
version must be at least:
● Apple iOS 10.2+
● Android 6+
Supported Adapters and Cables
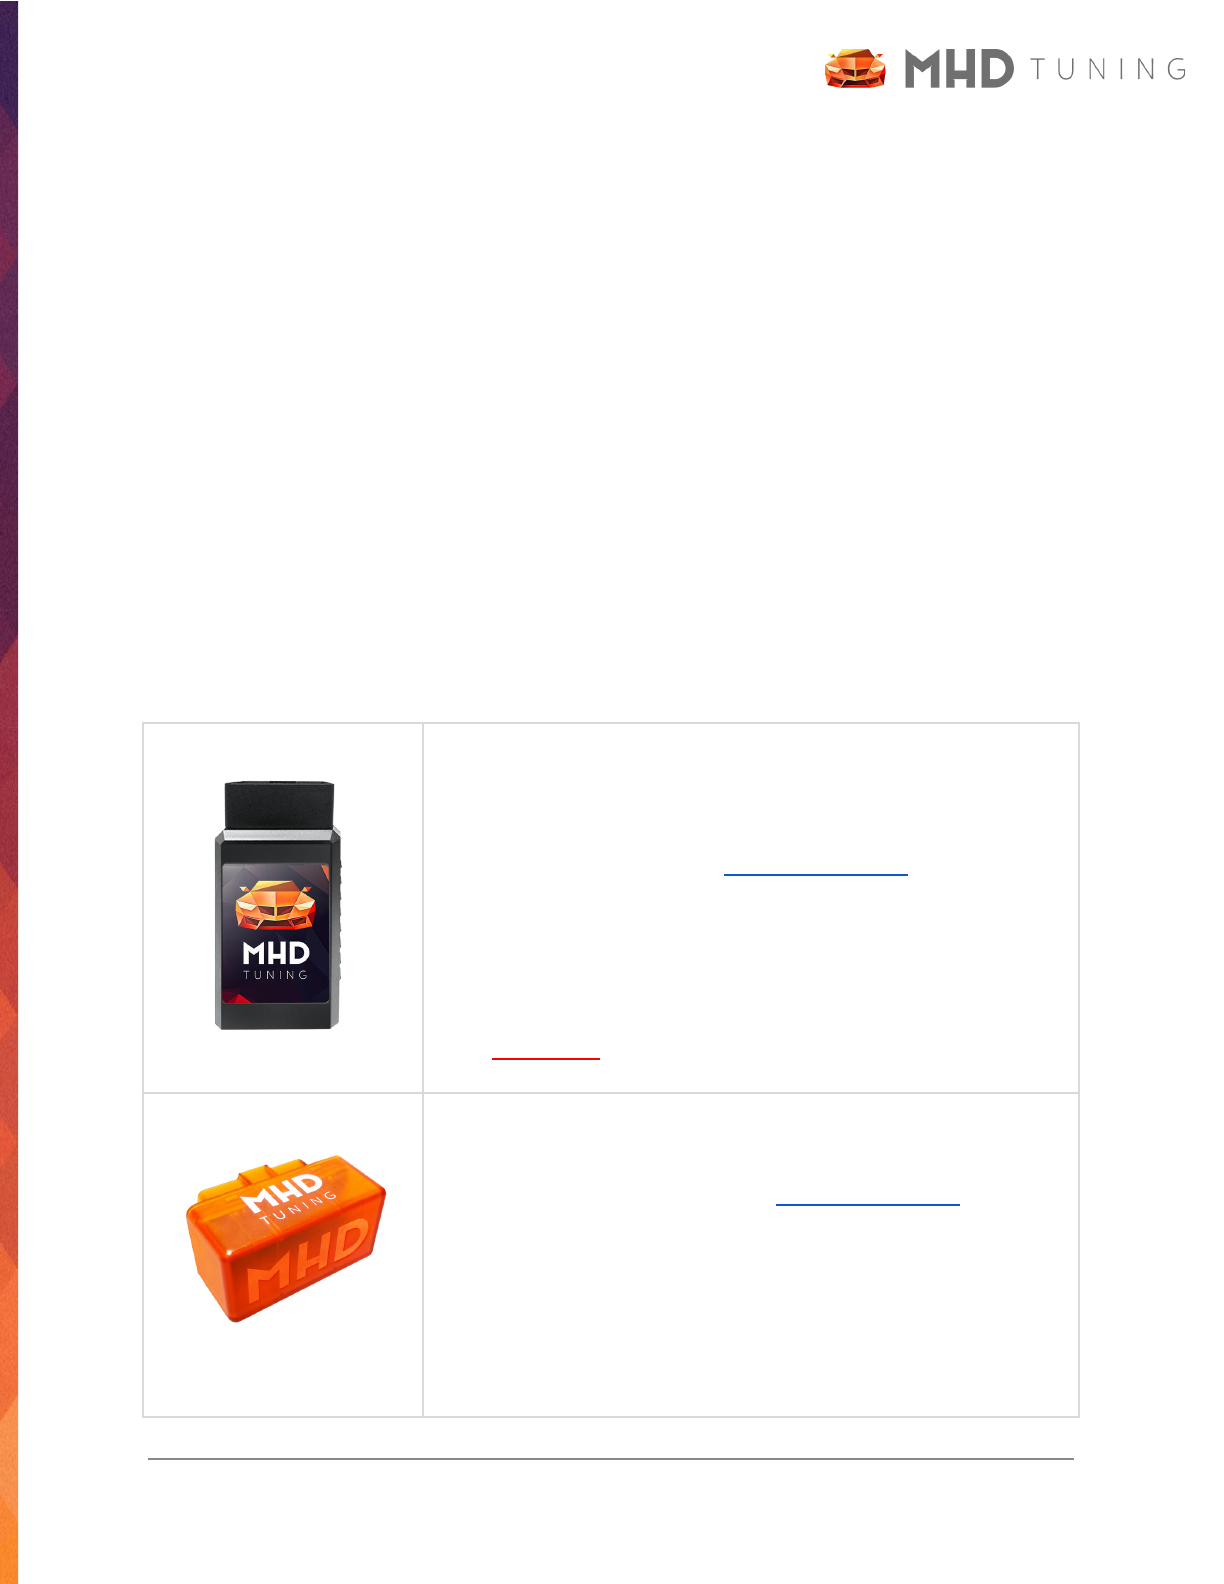
MHD Black Wifi Adapter
Details:
The ultimate adapter for F/G Series and Supra! Faster and more
reliable than K+DCan cables. Where to Purchase
Vehicle Support:
● All F Series BMW, G Series BMW, and Supra
Mobile Device Support:
● Android and iOS
*ATTENTION: this adapter cannot be used on E-Series cars!*
MHD E-Series Wifi Adapter
Details:
Faster than regular K+DCan cable. Where to Purchase
Vehicle Support:
● All E Series BMW, compatible with F series (except B58),
but not as fast as the F/G Series black adapter above.
Mobile Device Support:
● Android and iOS
© 2022 MHD Tuning
7
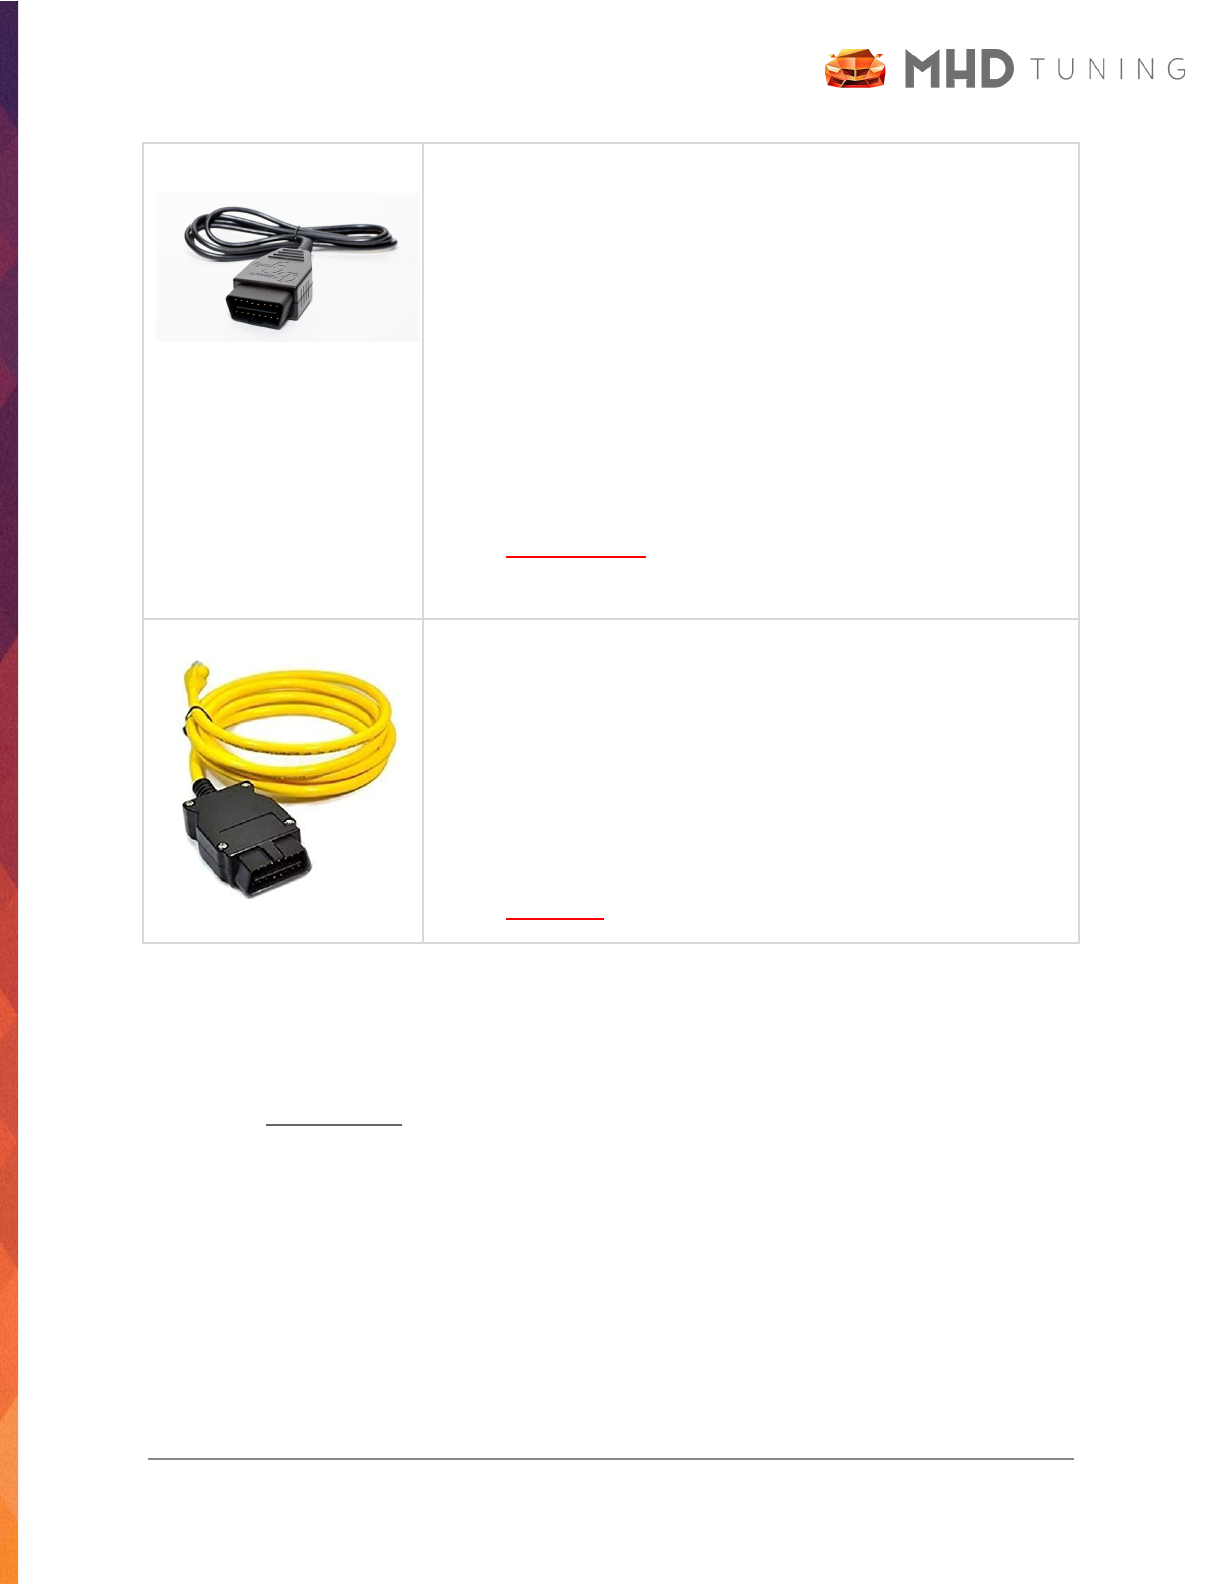
K+DCan Cable
Details:
This connection method for Android devices also requires an
OTG adapter. We recommend the BimmerGeeks Pro or Expert
Cable, as cheaper EBay / Amazon cables have 50/50 chance of
working.
Vehicle Support:
● All E/F Series (except B58), but slower than both WiFi
adapters
Mobile Device Support:
● Android ONLY! Devices must support “OTG.” Please
research your device details to confirm.
ENET Cable
Details:
This connection method for iOS devices also requires a lightning
to ethernet adapter.
Vehicle Support:
● All F Series BMW, G Series BMW, and Supra
Mobile Device Support:
● iOS ONLY!
Getting Started
After downloading and installing MHD Flasher for your vehicle, the next step is to open the app
and sign in. Android Note: the first time you launch the app you will see a permissions popup
window which you must hit OK for (this grants MHD file permissions, which is required for
saving logs and DME info, as well as loading custom tunes, etc).
If you are a new user, the login process is very straightforward and there is nothing you need to
do prior. However, if you previously had MHD licenses and want to ensure they get transferred
correctly, some preliminary steps for this will be detailed in the “Existing Licenses” sub section
below.
© 2022 MHD Tuning
8
Logging In
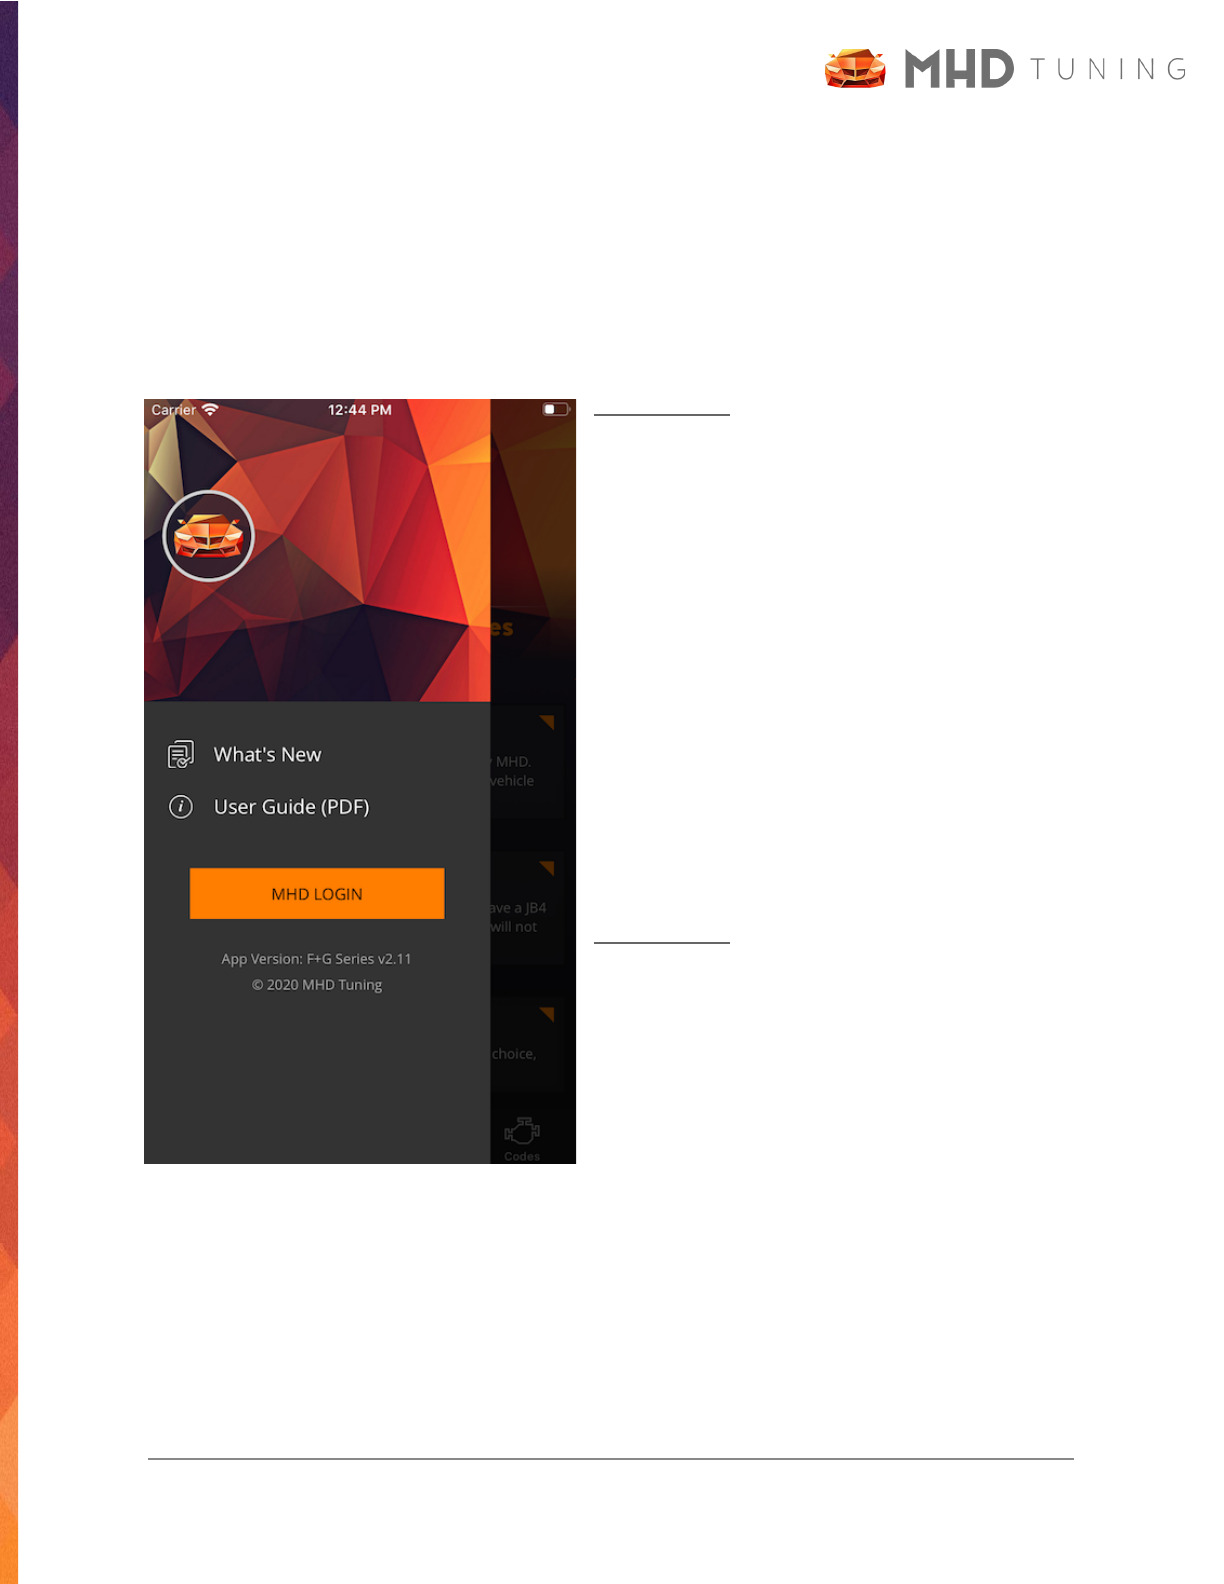
The first time launching the MHD app, you will be greeted with the following screen. We
automatically open the side navigation slide out for you to show that you should want to log in.
If you accidentally close this slide out menu, you can open it again by clicking the “hamburger
icon” in the top left corner of the app home screens. The icon looks like this: ☰
Android Note: Google Chrome is required to be
installed and NOT deactivated on your device.
Without it, the login process will not work
correctly and you will be unable to log in. Please
ensure it is installed and active before
proceeding.
Make sure you are connected to the internet, and
then click the MHD LOGIN button. Please read
the text carefully in the popup prompt, and click
OK to proceed to the browser window.
Android Note: If you have multiple browsers
installed, your device should prompt you to
choose which one you would like to proceed with.
Make sure to select Google Chrome.
© 2022 MHD Tuning
9
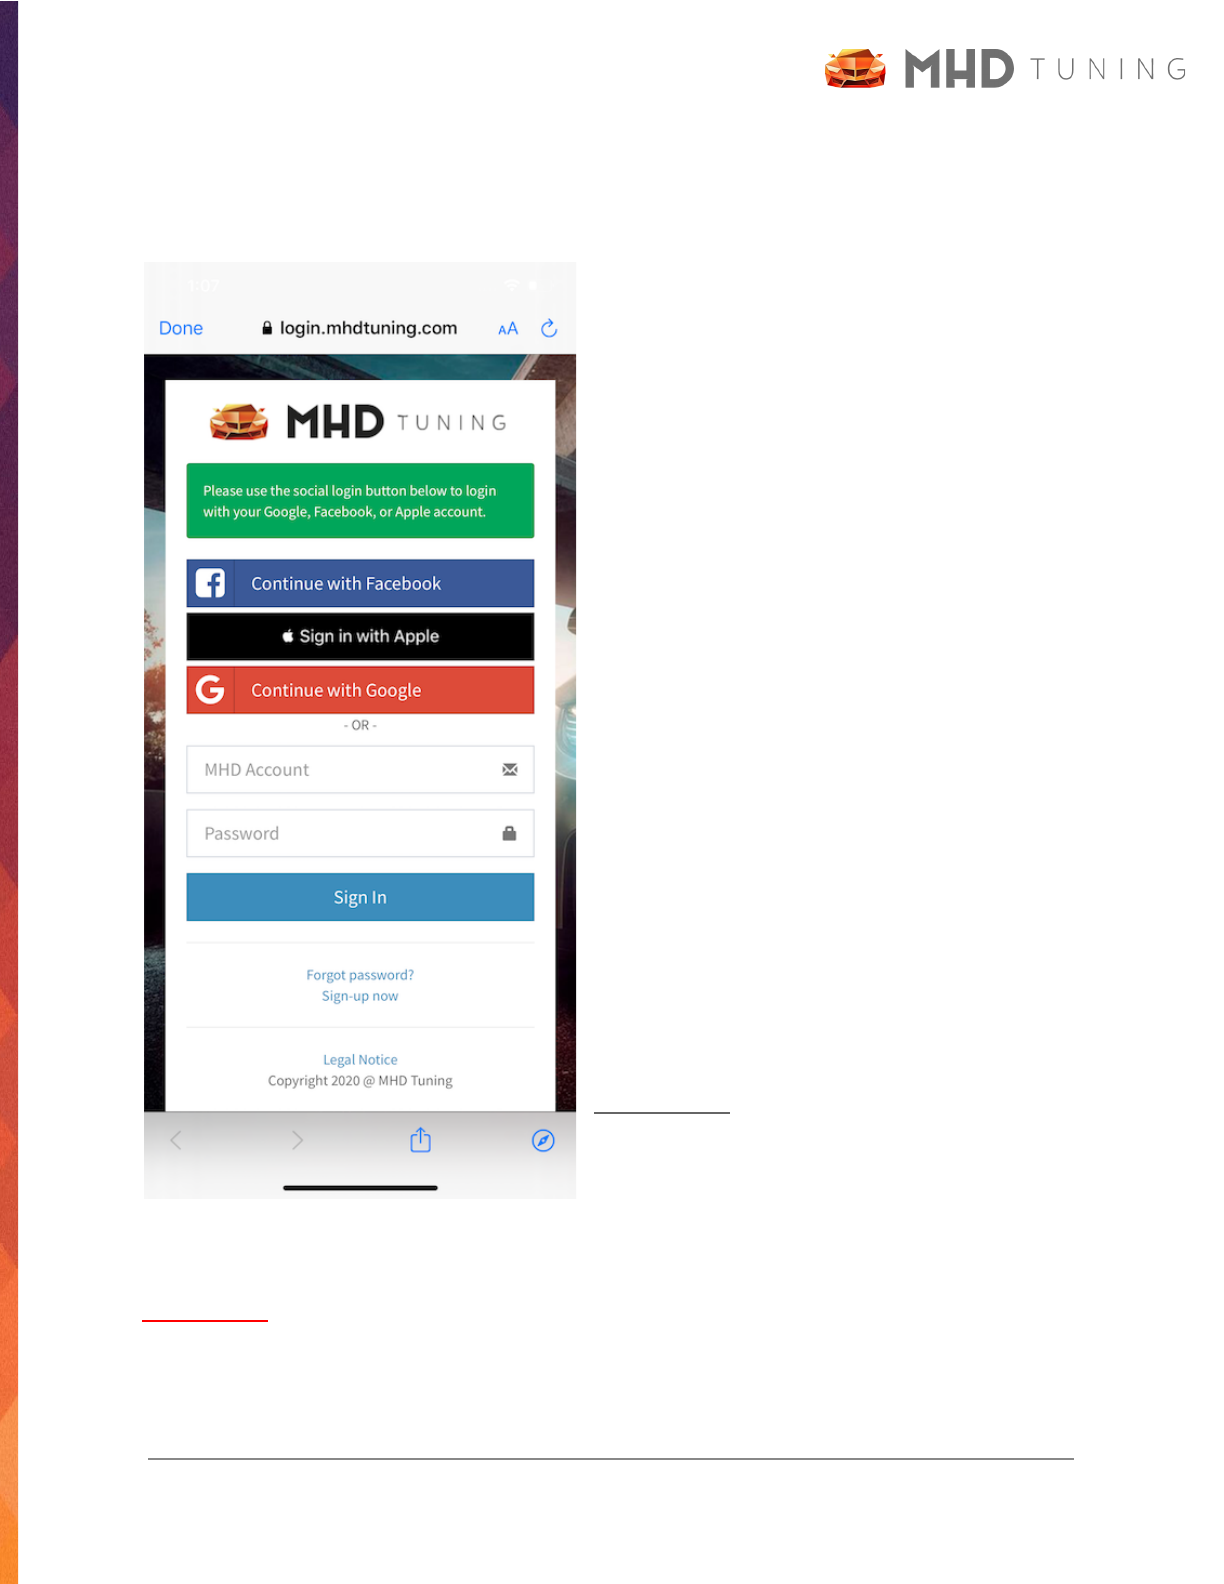
On the login screen, you will see a few different options. What you choose is entirely up to you,
but there are some advantages to each. The choices can be broken into two groups:
Social Login Options
These are the top three buttons you see:
“Continue with Facebook”, “Sign in with Apple”,
and “Continue with Google”. If you already use
any of these services and do not want to have to
create / remember another username and
password combo, then you will want to choose
this option.
MHD Account
This is an entirely new account you will create on
our servers. This login method is convenient if
you wish to later share your login with a
Pro-Tuner. To create an account, click the
“Sign-up now” link at the bottom and follow the on
screen instructions.
After completing the sign up form, you will get a
confirmation email sent to the email address you
used. You must open this email and click the
“verify email” link before you will be able to log in
with it.
Android Note: If you were a previous user of the
old Android app, this is NOT the same as your
Google login. Do not try to enter those
credentials into these MHD Account textboxes as
it will not work.
ATTENTION: All of your licenses will be tied to the login method you choose here, so please
select carefully! If you log out and log back in with a different method, you will not see your
licenses and may lose them!
© 2022 MHD Tuning
10

After logging in, you will be taken back to the MHD app home screen, with a loading image
indicating that your licenses are being updated. If you did not have any existing licenses, this
should quickly close. If you did, you can see the progress as it transfers each license one by one
to our new license server.
Existing Licenses
If you previously used the old MHD Android app and your licenses did not transfer properly to
our new license server (for use with the updated app), please follow these steps very closely on
an Android device:
1. Uninstall MHD App
2. Go to Settings > Accounts and ensure there is only one Google account present
a. This Google account must be the one you originally purchased your MHD
licenses with
b. Remove all other Google accounts
3. Long press on Play Store icon > Info > Storage > Clear Cache
4. Open the Play Store app, and ensure the Google account pictured in the search bar is the
account you originally purchased your MHD licenses with
5. Install MHD App
6. Launch MHD App and login
Cross Platform Licenses
Thanks to the switch over to our new custom license server, all of your MHD licenses will be
accessible on any device you own, whether it be Android or iOS. Just make sure you login with
the same method you used when initially setting up the new MHD app.
© 2022 MHD Tuning
11
Purchase New Licenses
All new license purchases are now done through our online webshop / store, available here:
MHD Tuning > Shop > then select the car series / engine you wish to purchase a license for.
This will land you on the “Super License” page for that engine / vehicle. The Super License
includes ALL current individual licenses available for that engine / vehicle at a discounted price.
If you do not wish to purchase the Super License, and instead are just looking for an individual
product like Flasher, Logger, or a Map Pack, simply scroll to the bottom of the Super License
page and click on the one you want. After adding all the items you want, proceed to the cart and
purchase!
ATTENTION: Your license keys will be emailed to the email address you enter during checkout.
Please ensure that you typed the email address correctly and that your mailbox is not full. There
is also a chance the email you receive will go to the SPAM folder or PROMOTIONS on Gmail, so
be sure to check those as well.
Activate License Keys
In order to activate one of your newly purchased license keys, you must have connected at least
once previously to your car so MHD can read your VIN. If you use MHD for multiple vehicles,
make sure the last vehicle you connected to is the one you wish to activate the license key for.
For more information on this process, see the section “Connecting to Car” below.
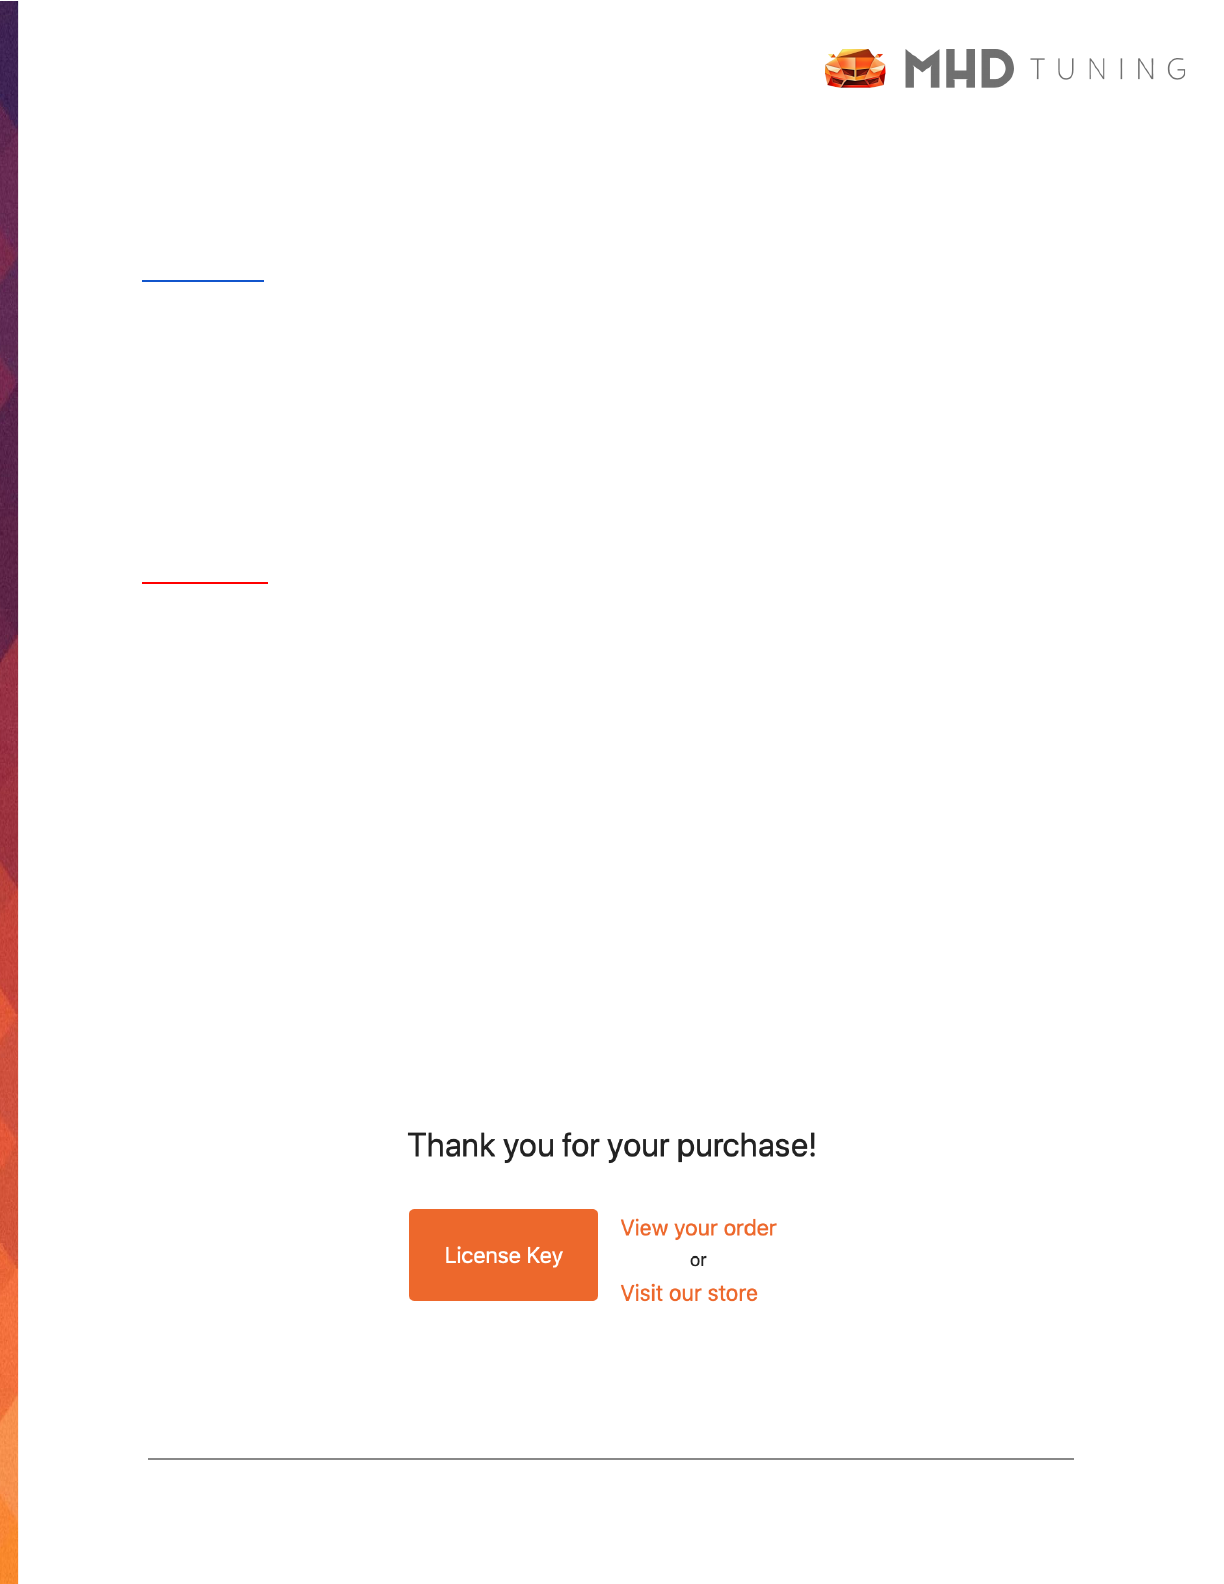
Your order confirmation email will contain a section at the top that looks like this. You must
click the “License Key” button.
© 2022 MHD Tuning
12
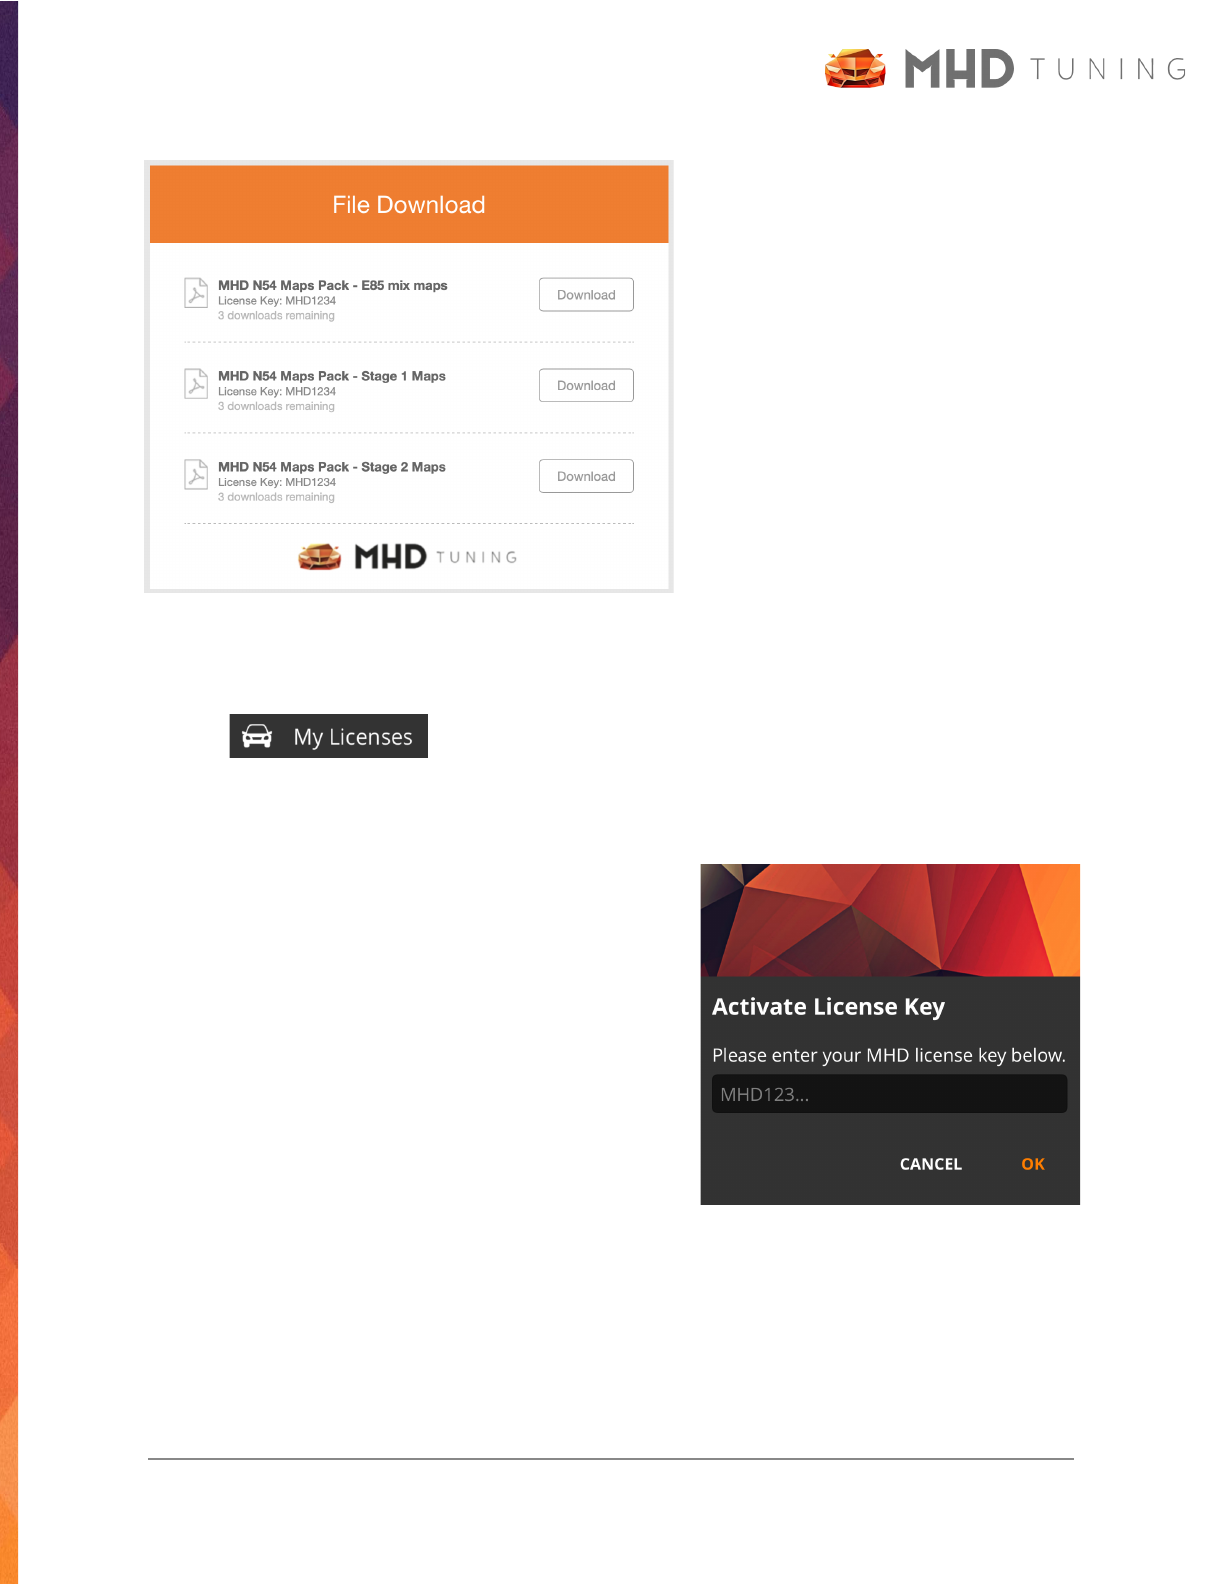
After that, you will be taken to a new
page that lists the License Keys from
your purchase. In addition to showing
each license key for the products you
purchased, you are also able to
download PDF copies of each for safe
keeping. Be careful though, as each
can only be downloaded a limited
number of times.
With the license keys in hand, you now will want to open MHD, make sure you are logged in, and
click the ☰ icon to expand the side menu.
Click on followed by “Activate License Key” once the My Licenses screen
loads
You will see the following popup appear. Copy and
paste or type your license key into this textbox and then
press OK.
Success! Press OK to close the popup. The My
Licenses page will refresh and you should then see the
product added to the list of your license.
Repeat this process for however many products you
purchased and have license keys for.
Once you have finished, you should see all of your licenses, grouped by vehicle VIN. If you have
licenses for a vehicle of a different series (like E series N54), but have the F+G series app open,
you will still see them all listed here.
© 2022 MHD Tuning
13
Connecting to Car
Due to the variety of connection options available to MHD app users, these instructions to
connect to the car are broken down according to connection type. Sub sections for iOS or
Android specifics are provided below where applicable.
Additionally, while it is recommended to always place your device in Airplane mode when
flashing, if your device does have a cellular data plan and you wish to keep it active while data
logging, we have provided steps that work on most common devices. We cannot possibly cover
all particular devices though (especially Android), so if it does not work for your device you may
need to research online or simply keep the device in Airplane mode when using MHD.
WiFi Adapter (Orange or Black)
The connection process for our two different MHD WiFi adapters is the same, and it is also the
same process for Android and iOS.
Connecting: first, plug in your MHD WiFi adapter to your vehicle’s OBD-II port. Wait a few
seconds, and then open your devices WiFi network list. Look for the WiFi network titled like
“MHD_xxxx” (if you have not changed the SSID), and tap it to connect. If using the Black F/G
adapter, you will be prompted for a network password. The password can be found on the back
label on the adapter.
Once you are connected to the MHD WiFi network, open MHD. You can confirm your connection
by clicking the “Codes” tab, and then pressing the “Read DME Codes” button with the vehicle
running or ignition on.
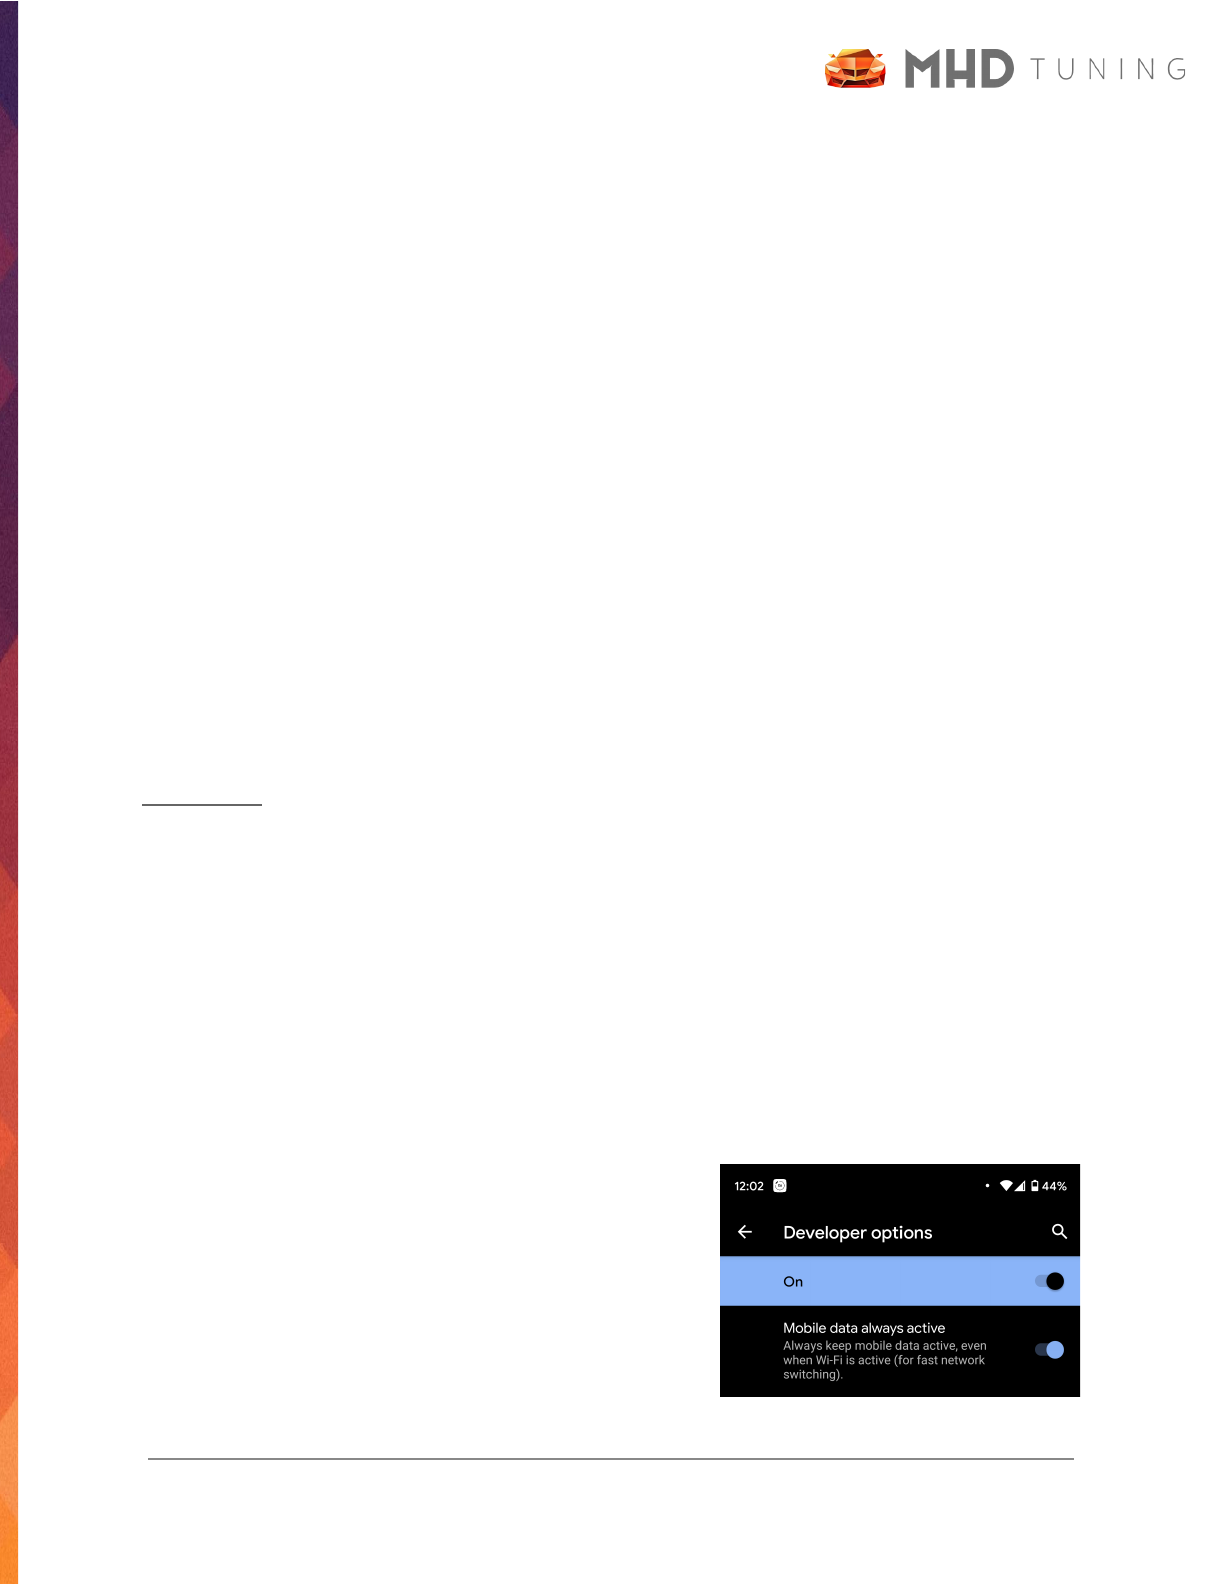
Keeping Cellular Data - Android
Open your device Settings > About Phone. Scroll to the
bottom and locate “Build Number.” Tap on this quickly 7
times. This will cause a new menu option to appear
called “Developer Options,” at the main Settings page,
usually near or above “About Phone.” Other versions of
Android hide it under Settings > System > Advanced >
© 2022 MHD Tuning
14
Developer Options. Tap Developer Options, and scroll down until you see “Cellular Data Always
Active,” and tap to enable this setting.
ATTENTION: Be careful using other developer options in that menu, as they can cause issues
and unexpected behavior with the MHD app. We can recommend the “Cellular Data Always
Active” option as the only safe option.
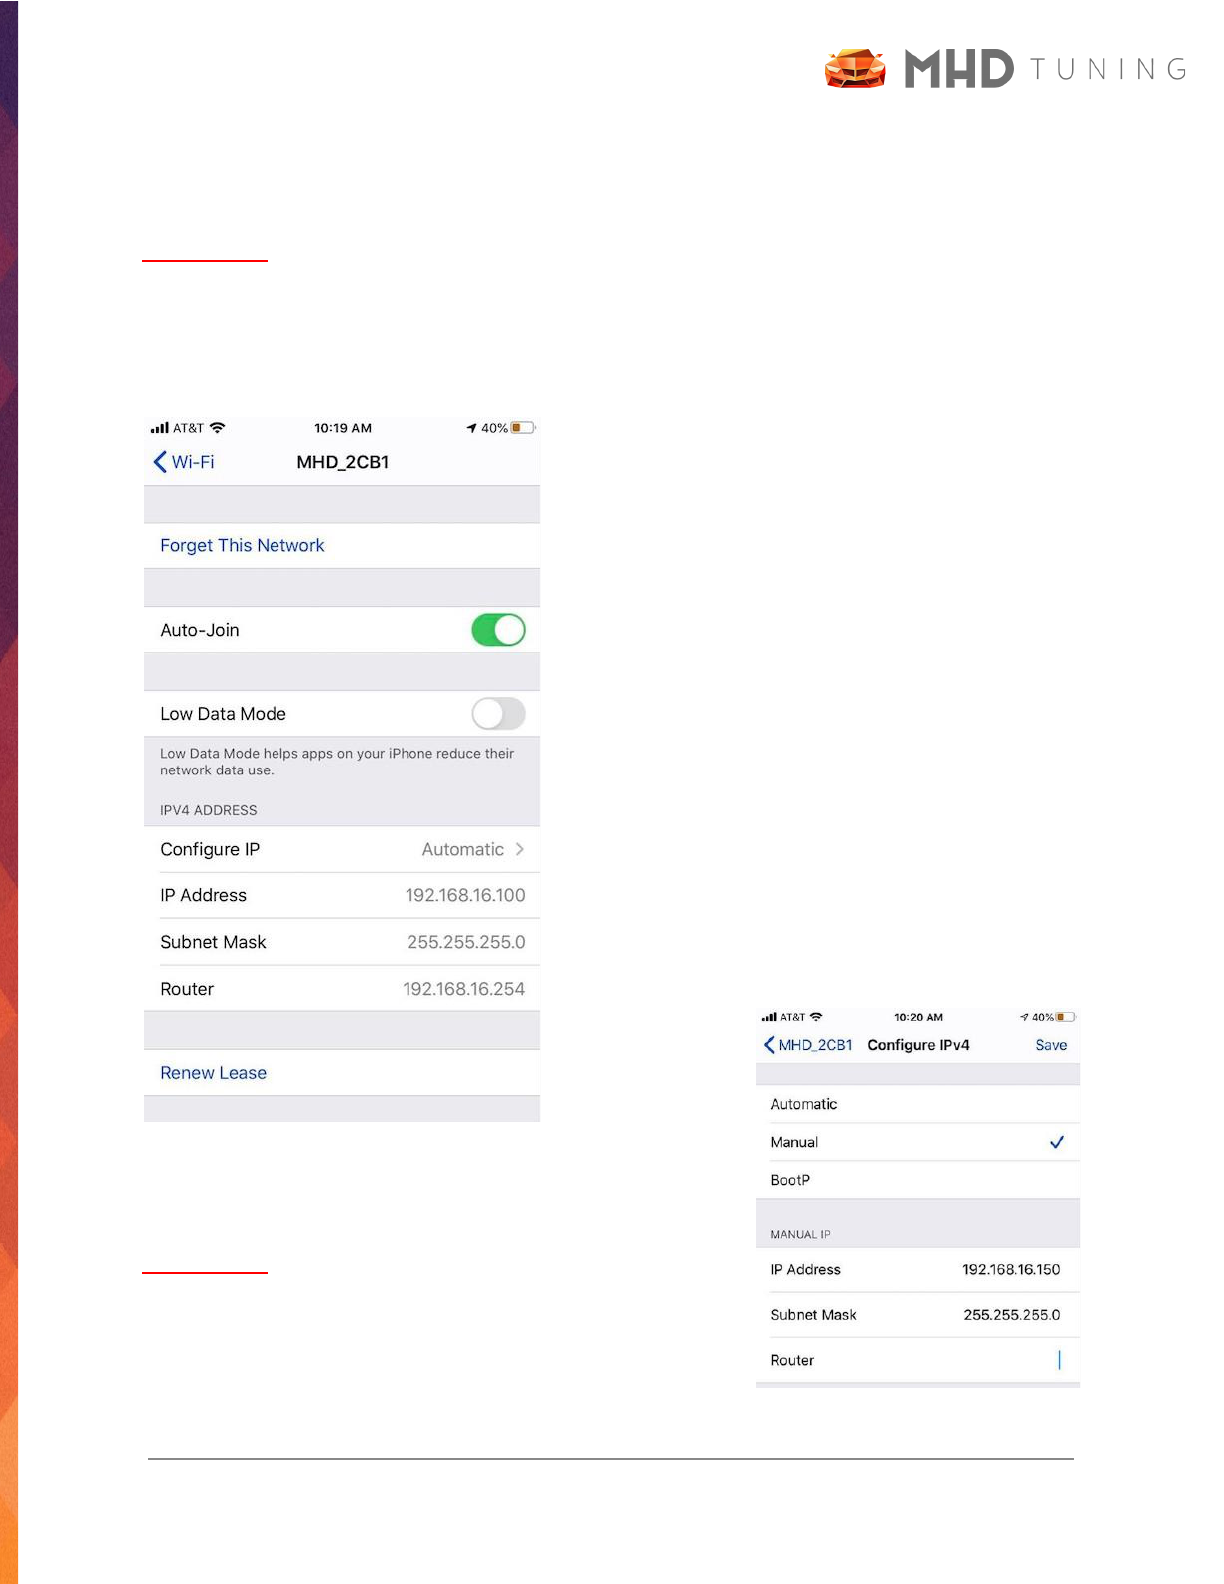
Keeping Cellular Data - iOS
Open your device Settings > WiFi > MHD_xxxx WiFi
Network. You should see a screen like this. Please
make note of your current IP Address, as we will use
it in the next step.
Tap on “Configure IP.” You will see three possible
selections at the top, from which you will Select
“Manual.”
This will make the fields at the bottom editable. Enter
the following in each of the fields:
● IP Address: enter your IP Address you made
note of above
● Subnet Mask: 255.255.255.0
● Router: leave blank!
If you have entered all info correctly, it should look like this.
Press save and then close the Settings app, and you are all set.
ATTENTION: If you are later (weeks later) unable to connect to
your car or WiFi adapter, you may need to revert back to
Automatic IP, get a new IP Address, then repeat these steps.
© 2022 MHD Tuning
15
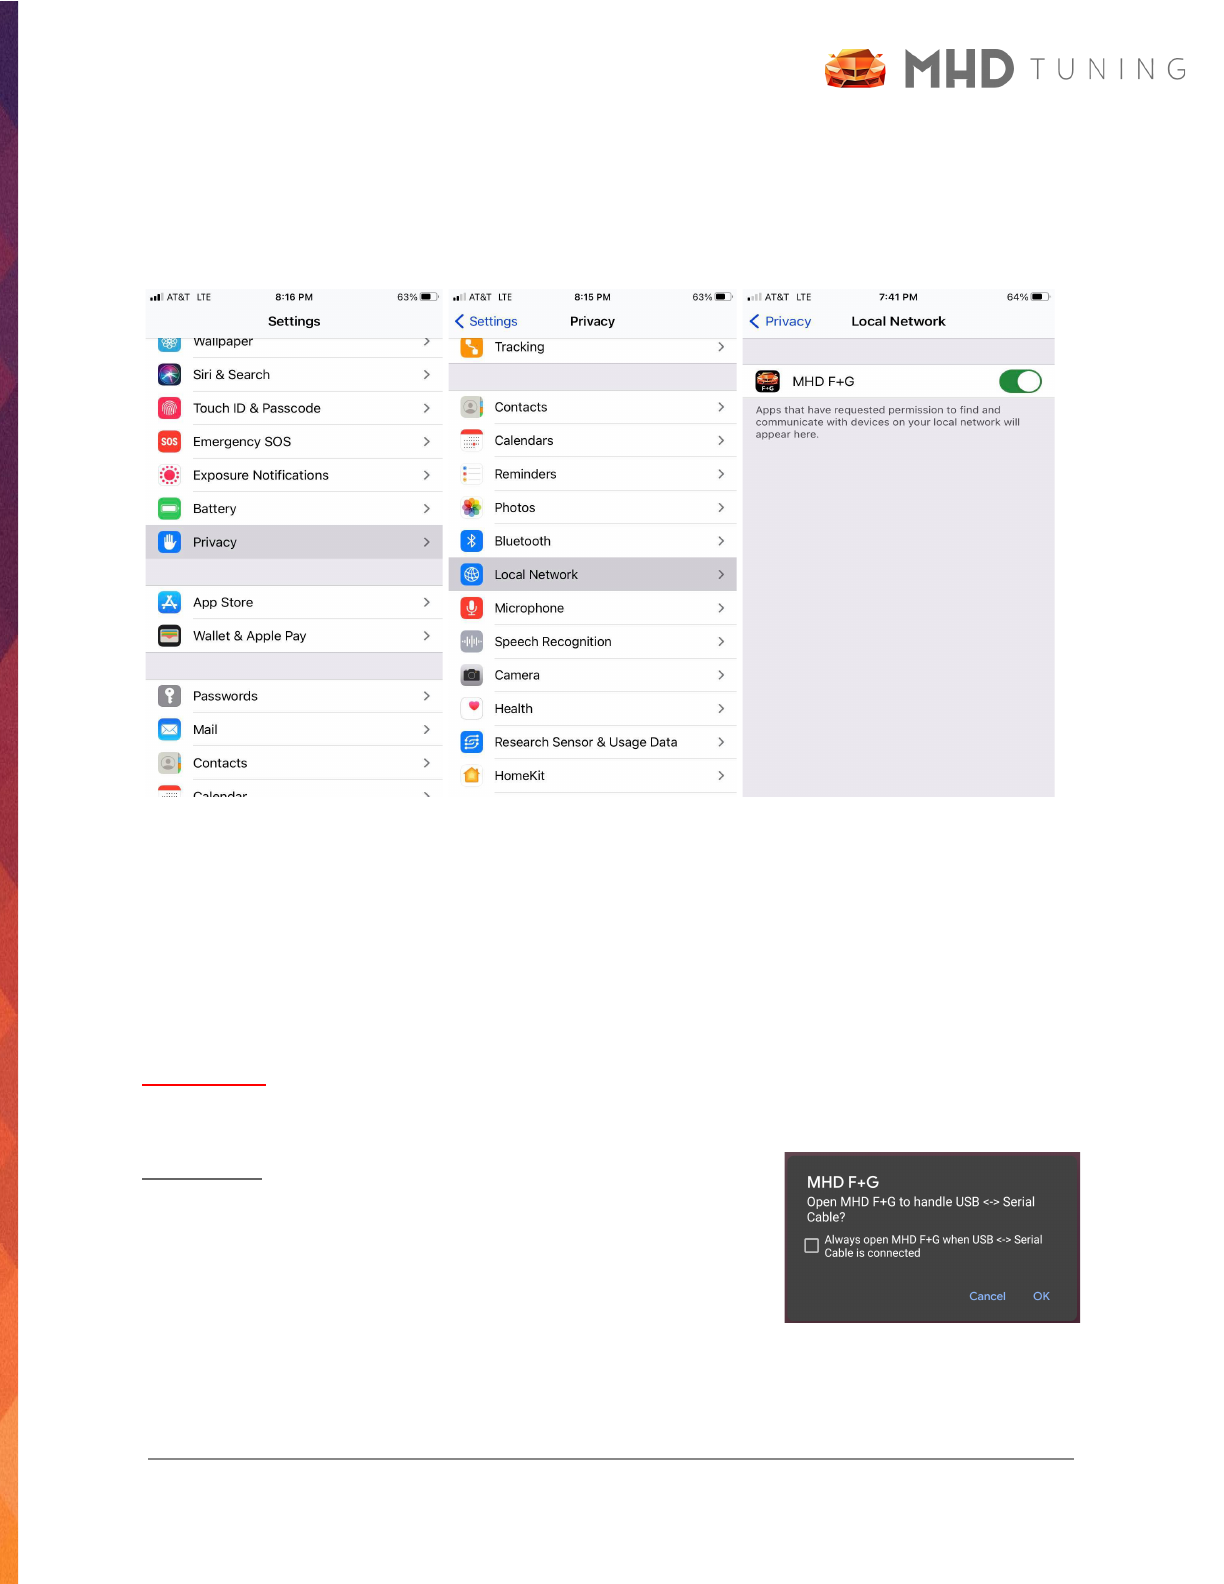
Connection Permission with iOS 14 and up
Since iOS 14, It is necessary to grant the MHD app local network access permission, you can do
this in Settings -> Privacy -> Local Network.
K+DCan Cable
This connection method is only compatible with Android devices. In addition to the K+DCan
cable, an OTG (on-the-go) adapter is also required. This adapts your device’s Micro-USB or USB
Type-C port to the full sized USB Type-A used on the K+DCan cable. Please make sure your
specific Android device supports OTG.
ATTENTION: it is not uncommon for the OTG adapter piece itself to go bad, so if you rely on this
connection method we recommend keeping an extra on hand.
Connecting: simply plug the K+DCan cable into your vehicle’s
OBD-II por t, the USB end into the OTG adapter, and then plug the
OTG adapter into your phone. You should see the following
popup appear (or it will skip immediately to opening an MHD
app if you’ve previously set it to “Always open...”
© 2022 MHD Tuning
16
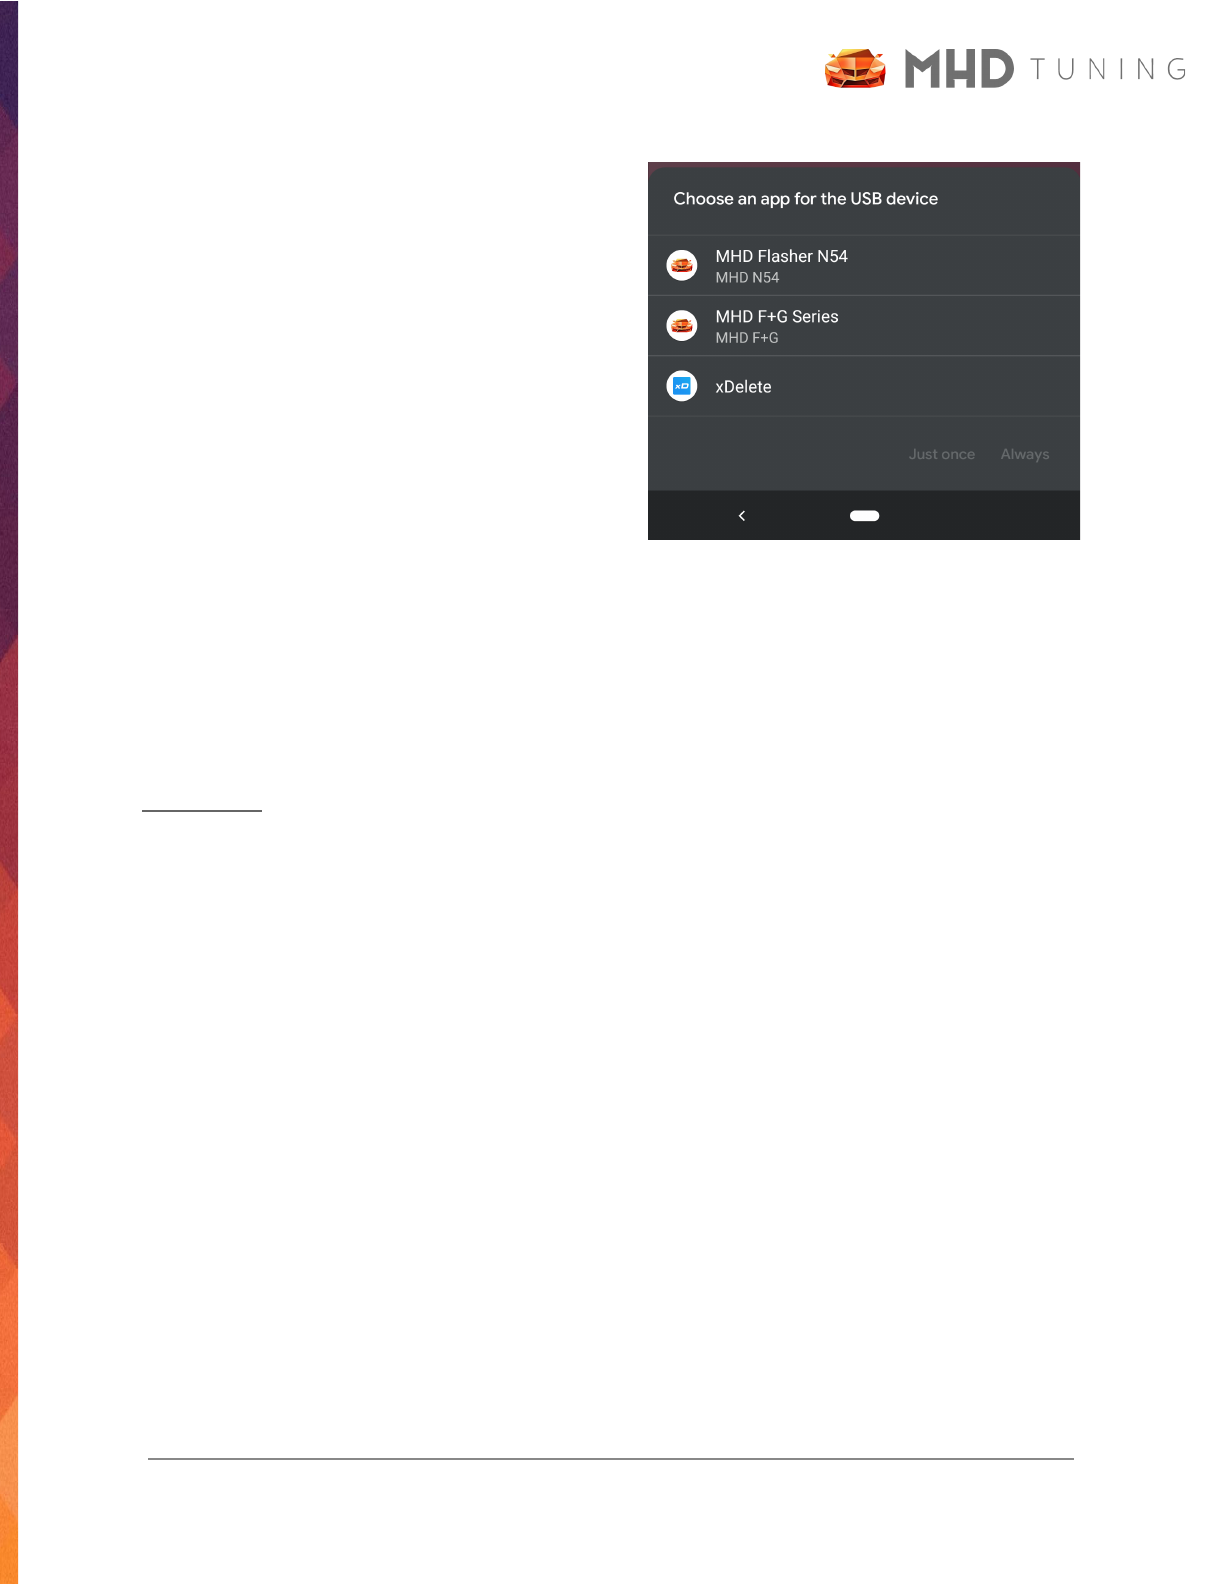
If you have multiple apps installed that can use
the K+DCan cable, then instead you will see a
window appear that looks like this. You should
not select “Always” in this scenario as it could
cause issues with getting the cable to work with
one of the other apps later.
After the app launches, you can confirm your
connection by clicking the “Codes” tab, and then
pressing the “Read DME Codes” button with the
vehicle running or ignition on.
ENET Cable
This connection method is only compatible with iOS devices. In addition to the ENET cable, a
lightning to ethernet adapter is also required.
Connecting: first, plug the lighting adapter into your iOS device, and then the ethernet plug of
your ENET cable into the adapter. Before connecting the OBD-II end to your vehicle, make sure
to turn WiFi off, and also turn on airplane mode. Next, connect the OBD-II end to your vehicle,
open iOS Settings > Ethernet and ensure you see an IP address. If not, make sure IP
Configuration is set to “Automatic IP”.
Open MHD, and you can confirm your connection by clicking the “Codes” tab, and then pressing
the “Read DME Codes” button with the vehicle running or ignition on.
© 2022 MHD Tuning
17
Flashing your Car
At this point, you should be logged in to the app, have activated the appropriate licenses you will
need, and have successfully tested your WiFi adapter or cable’s connection to your car. You then
have three possible options: flash one of our built-in OTS maps, work with a tuner of your choice
and flash a custom map, or return your vehicle to stock (dealer service, selling car, etc). Each of
these is detailed below.
OTS Maps
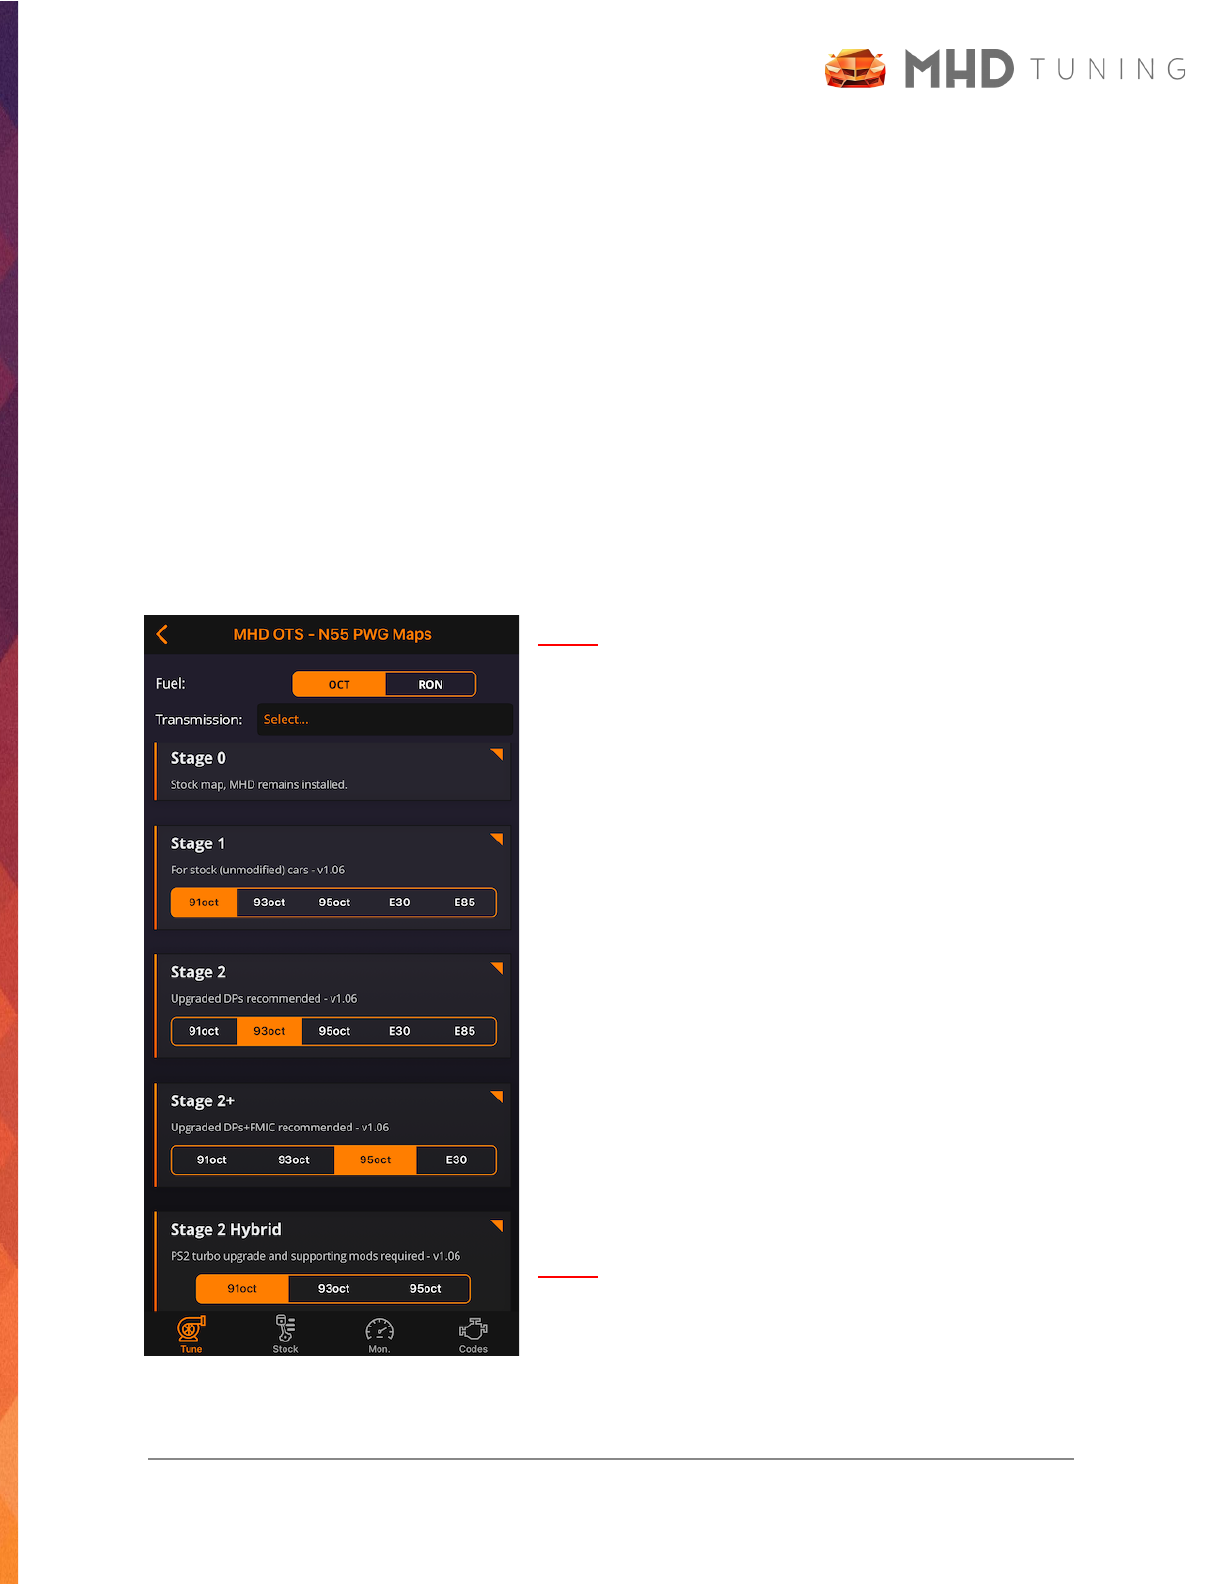
To flash an OTS map, select the tab Tune > Flash an MHD Map > Version (if applicable). You will
then see a screen like the following. There are a few important parts to this screen.
NOTE: the available OTS stages vary per vehicle /
engine. If your modifications fall outside the common
Stages, a custom tune may be necessary.
Navigating the OTS Maps Screen
● Fuel: this toggle simply switches the fuel ratings
you see from the USA Octane scale to the RON scale.
● Transmission: if visible, a selection is required.
This will apply the appropriate torque scaling for your
vehicle’s transmission.
● Stage: you should select the appropriate stage
for the level of modification of your vehicle. The
recommended mods for each are always listed
underneath the stage name.
● Stage Fuel: this bar is tappable separate from
the Stage button itself. Use this to select the actual
octane / RON fuel you will be using with the Stage map.
NOTE: available fuel options will var y between stages.
© 2022 MHD Tuning
18

OTS Maps Process Overview
1. At the top of the OTS Maps screen you should first set the OCT/RON toggle to the format
you are used to.
2. Next, if the Transmission selection is visible, a choice is
required (you will not be able to proceed past this screen
without choosing one). Tap it and you will see a popup
appear similar to this one. The available transmission
options specific to the vehicle you are flashing, so your
list may vary. This choice is remembered within MHD going forward.
3. Next, determine the correct Stage in the list per your vehicle’s modifications. You must
also own the Map Pack license for this Stage (or the Super License).
4. Now, in the Stage Fuel bar, tap the appropriate fuel type
that you will be using in the vehicle. If you do not see a
cer tain fuel (like full E85) available, it is likely because
the OEM fuel system would not suppor t it.
5. Next, tap the Stage button itself (anywhere outside the Stage Fuel bar works) to proceed
to the next screen, the MHD Flash screen.
6. Once at the MHD Flash screen, you can either flash
the map as-is, or tap Options to adjust the available
Flash Options (these are detailed in their respective
section below). There are three different flash lengths
you will see:
a. Full Write: this is the longest initial write, which
installs MHD for the first time. NOTE: a
battery charger is recommended for this! (if
not using MHD Black Wifi adapter)
b. Long Write: this is triggered when you are
adding or removing a flash option that
contains custom code / logic we have
developed at MHD. It is shorter than a full
write but depending on your connection, a
battery charger is recommended.
c. Map Write: this is a very short write, like changing from Stage 1 to Stage 2, etc.
© 2022 MHD Tuning
19

7. Once your flash options are configured, PLEASE DOUBLE CHECK THE FOLLOWING:
a. Ignition is in the “Ignition On”, but “Engine Off” state. To achieve this, press the
engine start button without pressing the brake / clutch, until the dashboard
shows the fuel level.
i. G-Series and later vehicles must press the “engine start” button 3x quickly
to enter into diagnostic mode as displayed on the dashboard. Do not
press the brake / clutch to ensure the car does not start.
b. All cabin accessories, climate controls, and headlights are turned off.
c. Battery charger is connected if doing a Full or Long write.
d. Device is in Airplane Mode + WiFi enabled! (if using WiFi adapter)
e. Ensure CarPlay is turned off completely. (iOS)
8. Tap the Write button and MHD will begin to flash the vehicle!
a. During this time, do not open the windows, do not open the doors, do not turn on
anything else in the vehicle as it may interrupt the flashing process.
b. During this time, you may hear a series of chimes as well as the fuel pump
running. You may also see a few iDrive error messages. Do not worry, as this is
normal.
9. Once the map is flashed, MHD will put the car into “Normal Operation”, clear codes, and
restore coding. After this, it will ask you to turn the ignition off.
10. Turn off ignition completely, remove key FOB from slot (if applicable), and wait a
minimum of 30 seconds before starting the car! The “Ser vice Car” icon may be
illuminated for part of this, that is fine.
Congratulations! You have just flashed your first MHD OTS Tune!
© 2022 MHD Tuning
20
Custom Tunes
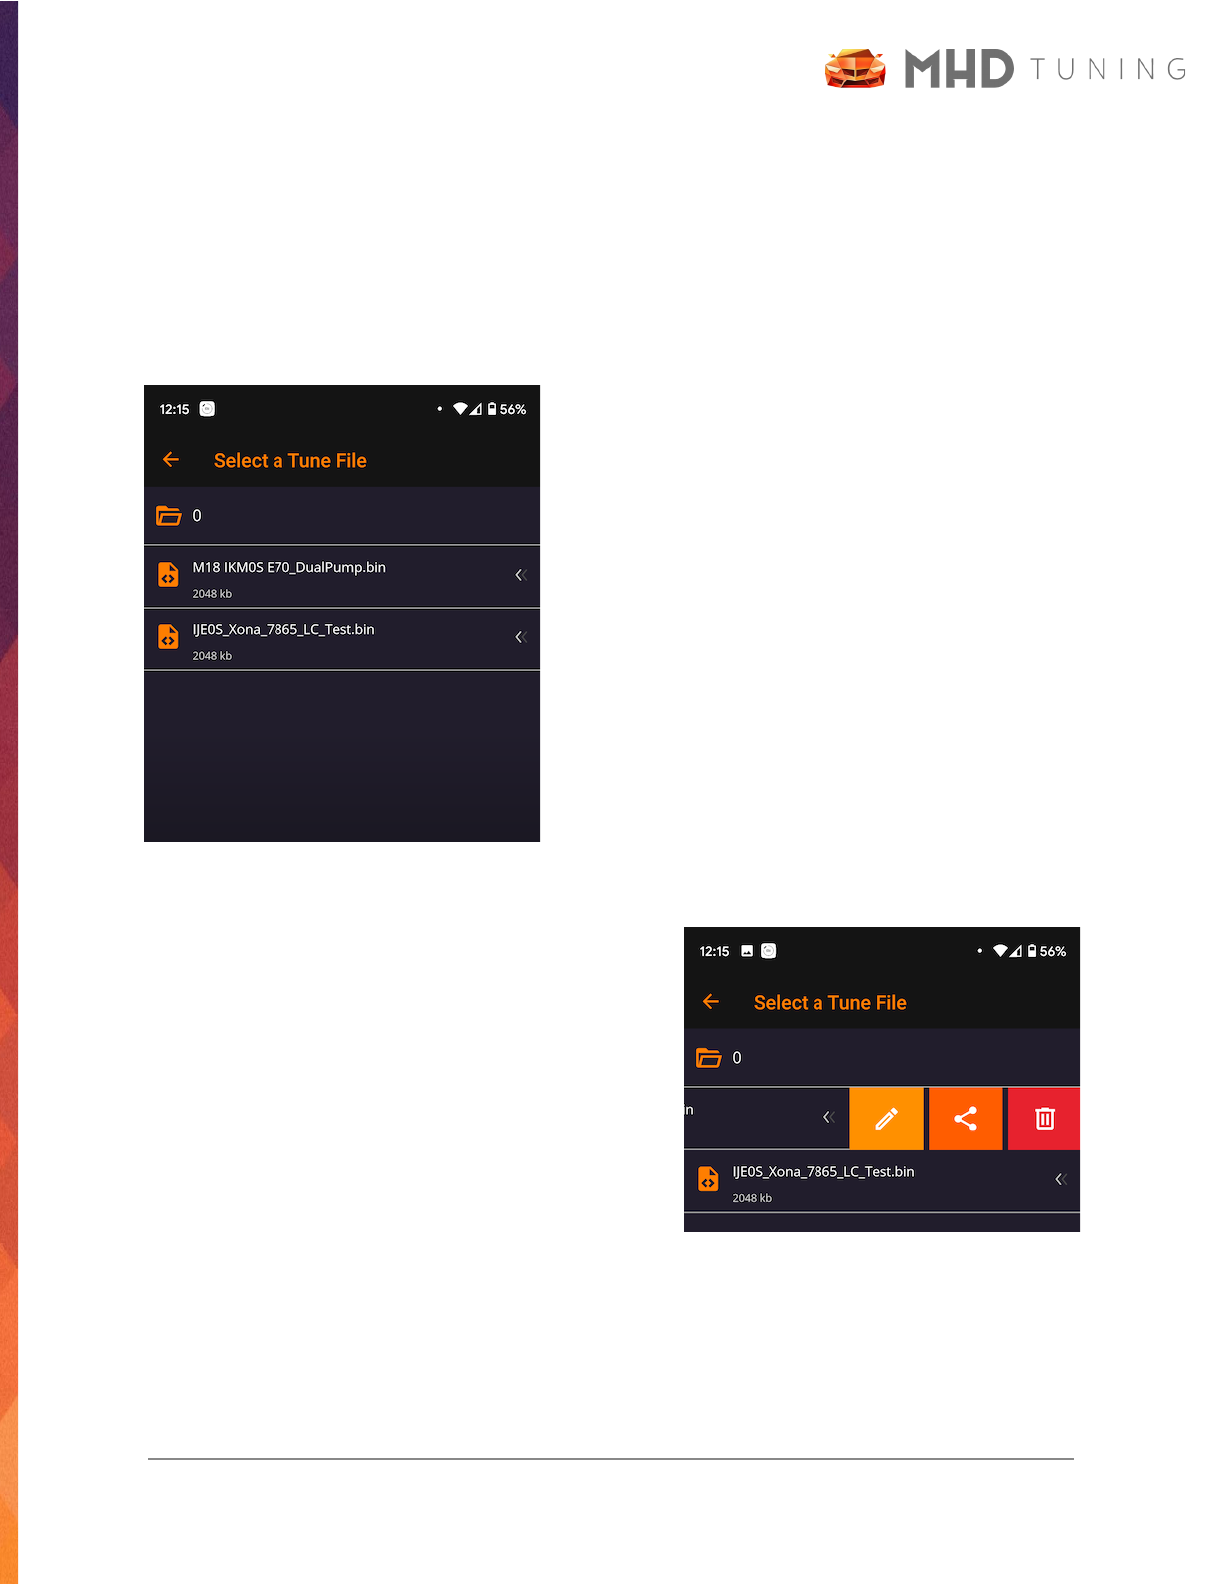
To flash an OTS map, select the tab Tune > Flash a Custom Map. You will then see a file select
screen similar to below. The file select screen defaults to a specific location for Android and
iOS. In order to make finding your custom map files easier, you should save them there for easy
access.
● Android: the file select screen opens at your
device’s Download folder. If you are transferring your
files from PC via USB, or saving from an email
attachment, you should save them there. Most
Android OS also have a file browser app for moving
files around on your device.
● iOS: the file select screen opens at the MHD
root folder (you will see the debugging and
datalogging sub folders). You can use the “Files” app
that comes with iOS to move them to this folder, save
them there directly from an email attachment, or if
using the PC to transfer, the iTunes PC app.
On this screen, you can also << swipe left on any tune
file (*.bin or *.mhd file extensions), and will be
presented with some additional file options. From
left to right, they are Rename, Share, and Delete.
Each option is detailed below.
© 2022 MHD Tuning
21
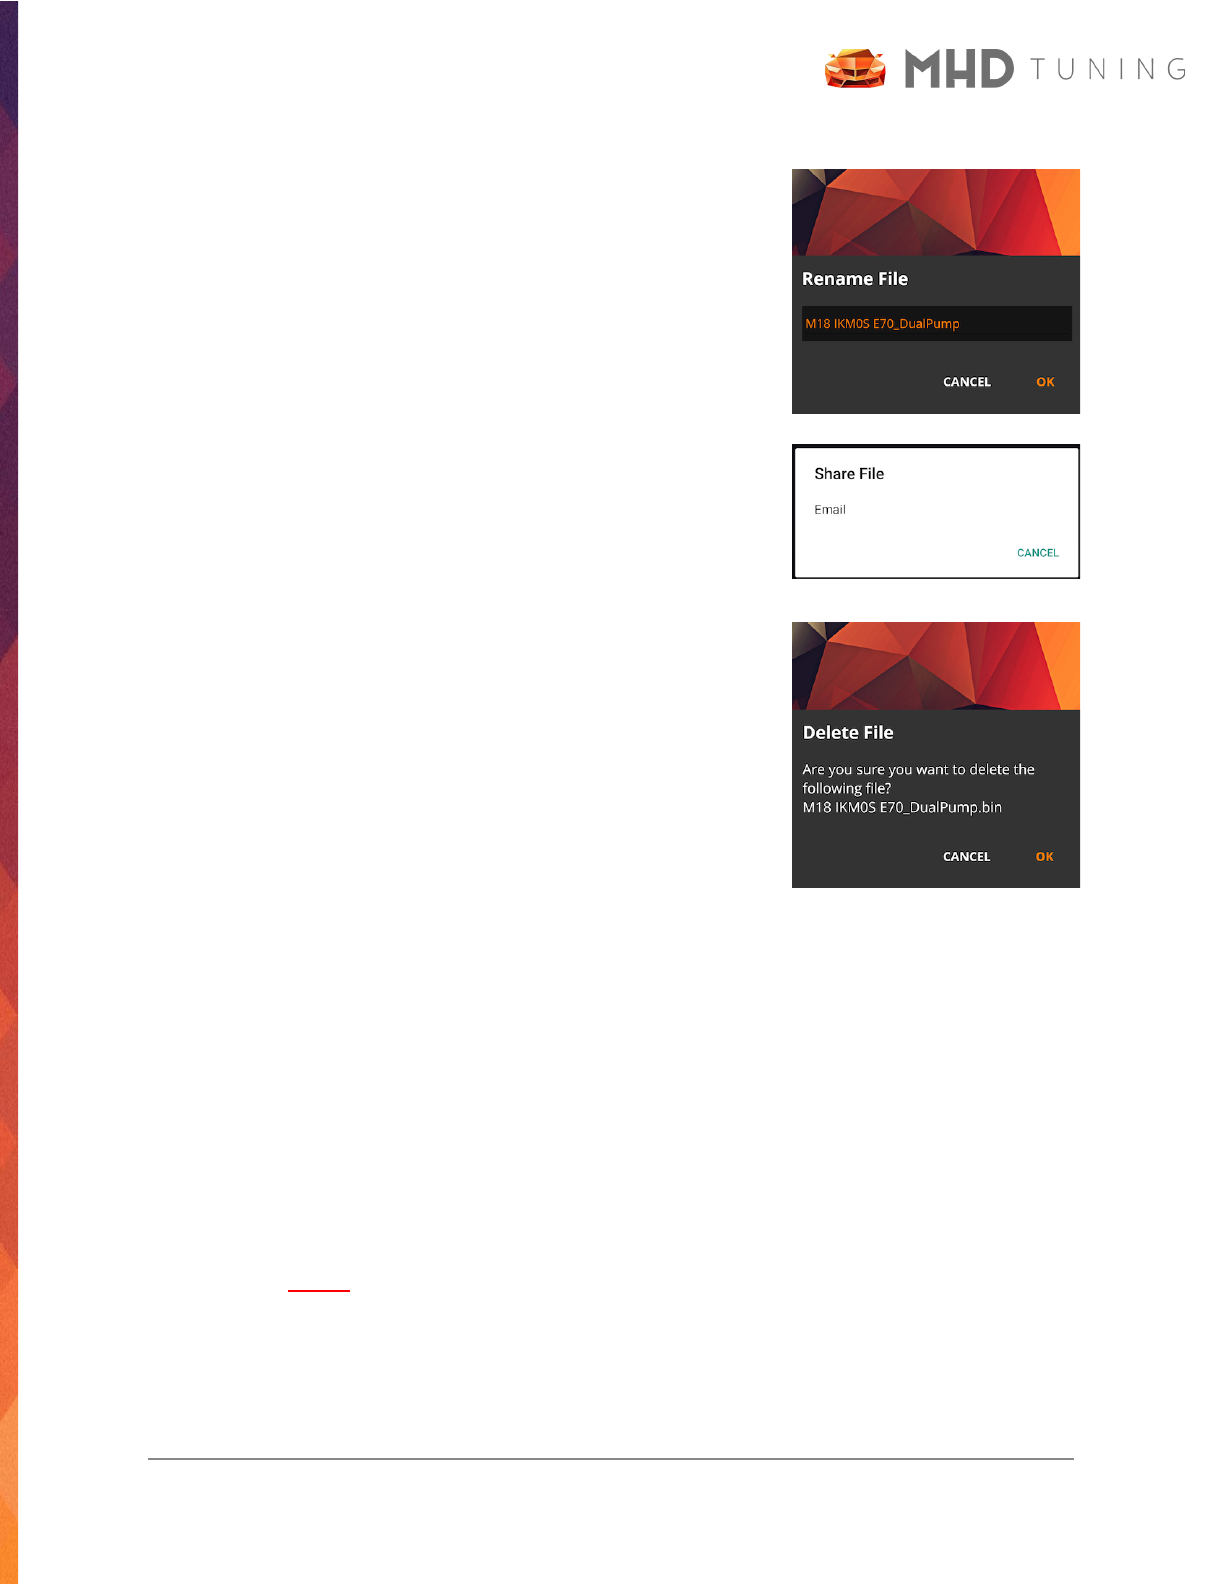
● Rename: if you select the Pencil icon to rename your file,
you will see a popup in which you can change the file
name to something easier to remember, or add details
about what was changed in the tune.
● Share: if you select the Share icon, you will see a popup
asking what sharing method to use. For tune files, the
only option is Email. If selected, this will open up your
device’s preferred email app with the tune file
automatically attached.
● Delete: if you select the Trash Can icon, you will see a
popup confirming if you would like to delete the tune file.
Be careful, as this will permanently delete it from your
device!
Flash a Custom Tune Process Overview
1. On the File Select screen detailed above, tap the tune file you would like to flash. This
will take you to the next screen, the MHD Flash screen.
2. Once at the MHD Flash screen, you can either flash the map as-is, or tap Options to
adjust the available Flash Options (these are detailed in their respective section below).
There are three different flash lengths you will see:
a. Full Write: this is the longest initial write, which installs MHD for the first time.
NOTE: a battery charger is recommended for this! (if not using MHD Black Wifi
Adapter)
© 2022 MHD Tuning
22

b. Long Write: this is triggered when you are adding or removing a flash option that
contains custom code / logic we have developed at MHD. It is shorter than a full
write but depending on your connection, a battery charger is recommended.
c. Map Write: this is a very short write, like changing from Stage 1 to Stage 2, etc.
3. Once your flash options are configured, PLEASE DOUBLE CHECK THE FOLLOWING:
a. Ignition is in the “Ignition On”, but “Engine Off” state. To achieve this, press the
engine start button without pressing the brake / clutch, until the dashboard
shows the fuel level.
i. G-Series and later vehicles must press the “engine start” button 3x quickly
to enter into diagnostic mode as displayed on the dashboard. Do not
press the brake / clutch to ensure the car does not start.
b. All cabin accessories, climate controls, and headlights are turned off.
c. Battery charger is connected if doing a Full or Long write.
d. Device is in Airplane Mode + WiFi enabled! (if using WiFi adapter)
e. Ensure CarPlay is turned off completely. (iOS)
4. Tap the Write button and MHD will begin to flash the vehicle!
a. During this time, do not open the windows, do not open the doors, do not turn on
anything else in the vehicle as it may interrupt the flashing process.
b. During this time, you may hear a series of chimes as well as the fuel pump
running. You may also see a few iDrive error messages. Do not worry, as this is
normal.
5. Once the map is flashed, MHD will put the car into “Normal Operation”, clear codes, and
restore coding. After this, it will ask you to turn the ignition off.
6. Turn off ignition completely, remove key FOB from slot (if applicable), and wait a
minimum of 30 seconds before starting the car! The “Ser vice Car” icon may be
illuminated for part of this, that is fine.
Congratulations! You have just flashed your first Custom Tune!
© 2022 MHD Tuning
23
Flash Options
MHD currently features a wide array of flash-time options that you are able to adjust to your
liking. These can be applied to any map (OTS or custom). Below are details on each of the
possible options. Check back often, as we are constantly adding to and improving these
options!
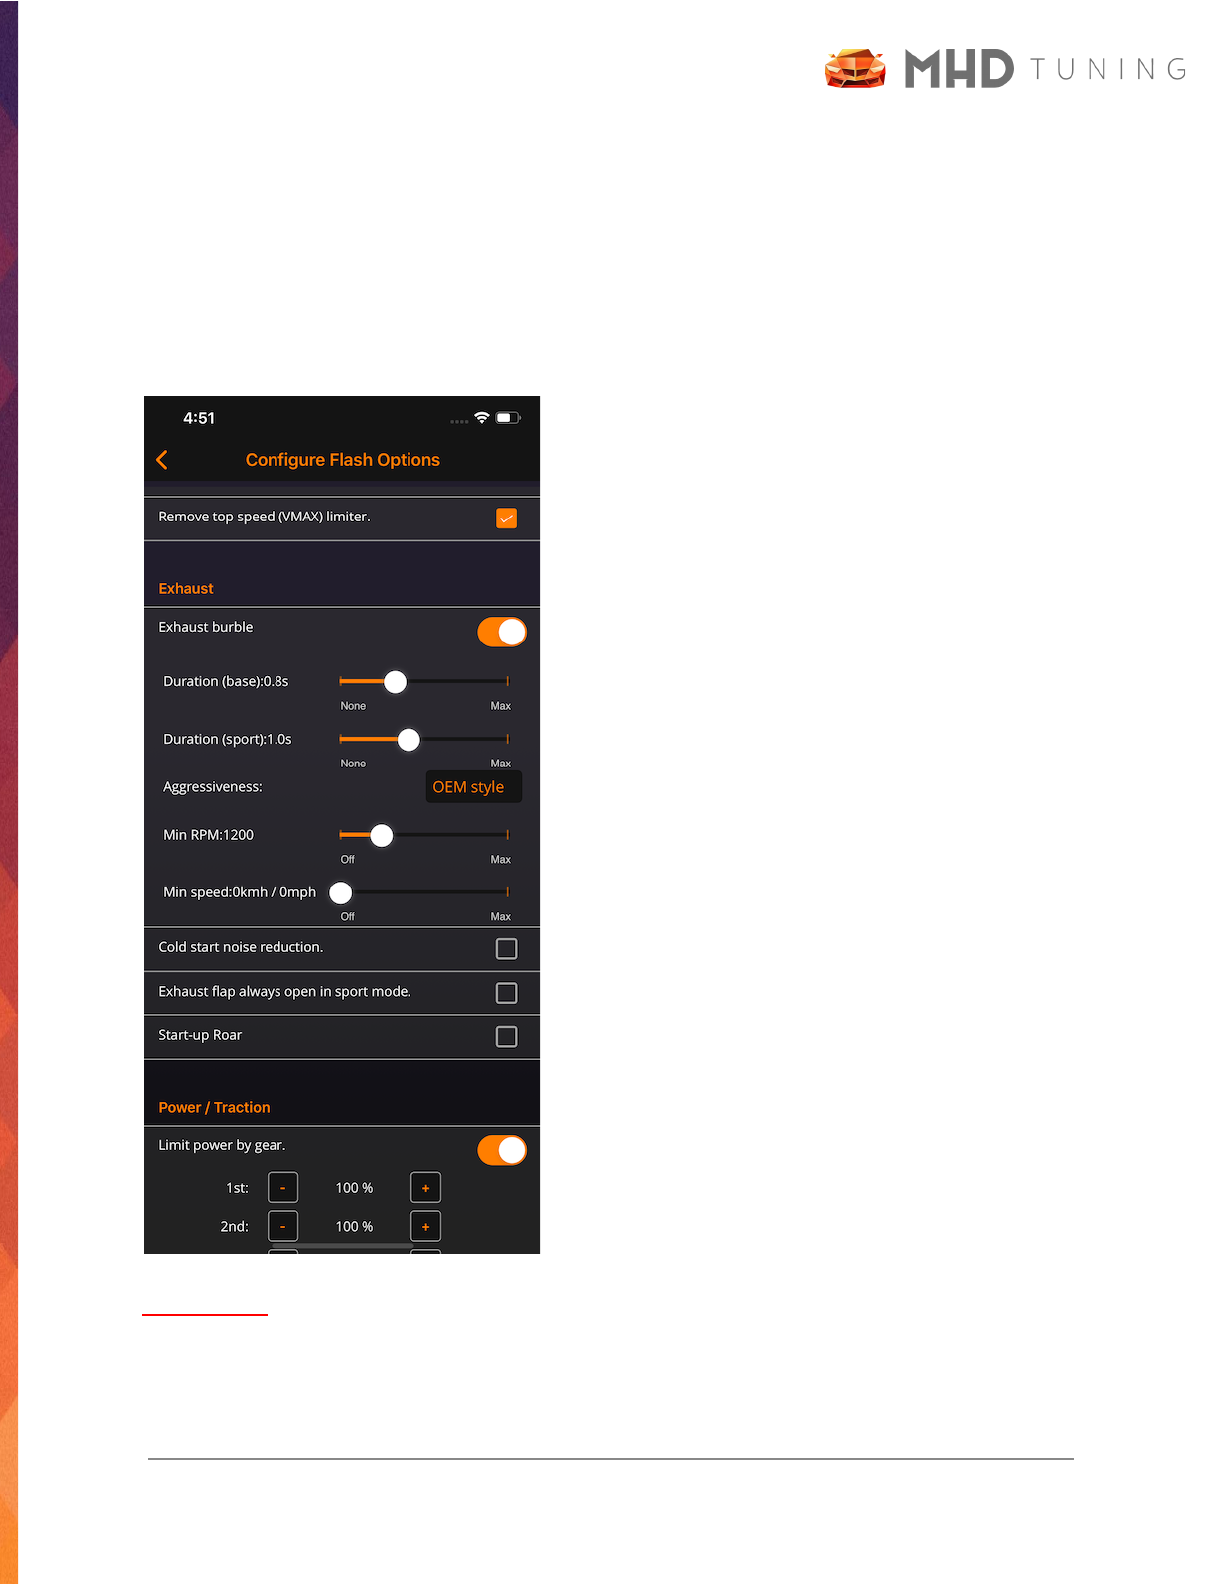
The screenshot to the left shows a sample of some
of the available flash options. These can be broken
down into a few different categories based on the
setting. Our terminology is as follows:
● Checkbox: this is a simple enable / disable of
the flash option. See “Remove Top Speed” or
“Star t-up Roar” in the screenshot.
● Toggle: this toggles the flash option on, and
then expands to show additional configuration
options related to it. See “Exhaust Burble” or “Limit
Power by Gear” in the screenshot.
● Picker: this functions similar to a dropdown
list, in which a selection must be made from the
possible options. See “Aggressiveness” within burble
settings in the screenshot.
● Slider: this is used to set a value to your
liking, keeping it within the defined minimum and
maximum range. See “Duration (base)” or “Min RPM”
within burble settings in the screenshot.
● Stepper: this is used to increase or decrease
a value by a set increment with each button press.
See “1st” and “2nd” gear with +/- buttons within
power per gear settings in the screenshot.
ATTENTION: Not all flash options are available for all vehicles / engines. For flash option
support for your specific engine / vehicle, please see the section titled “Flash Options - Engine
Char t” located below the flash option descriptions.
© 2022 MHD Tuning
24

Linear Throttle
This flash option changes the throttle mapping to linear as opposed to the stock BMW pedal
mapping which is set to give a false sense of torque (40% throttle = 80% of torque). Instead,
40% throttle = 40% torque with the linear mapping.
Adjust Throttle Sensitivity
In stock form, all N54 except for the 1M contain a lag / signal filtering which gives a small delay
from when you press the throttle until the DME starts acting upon your input. This flash option
allows you to decrease or fully remove this delay, depending on your personal preference. To
fully remove it, simply move the slider all the way to the right to the "More reactive (1M)"
position. If you find that too touchy for your liking, try out a middle position on the slider. NOTE:
this is different from "Linear Throttle," which changes the accel pedal % to throttle opening %
mapping. Both can be used together, or individually to fit your preference.
Minimum Idle RPM
This flash option raises the idle RPM of your vehicle. This is useful for 6MT cars with a SMFW
(single mass flywheel), as it can reduce or eliminate the chatter.
OEM Catted Downpipe(s)
This flash option should be selected if you still have the OEM downpipe(s) installed. It removes
the logic to suppress the CEL so that the OBD readiness tests can run successfully.
VMax Delete
This flash option removes the speed limiter (typically 155mph).
© 2022 MHD Tuning
25

Exhaust Burble Customization
This flash option delays the fuel cut-off when decelerating or free-revving to induce burbles and
crackling in the exhaust. There are several possible customization options:
● Duration (base): changes the burble duration in efficient mode. If you don’t want burbles in this
mode, set to 0.
● Duration (sport): changes the burble duration in sport/sport+ and dsc off modes. If you don’t
want burbles in these modes, set to 0.
● Aggressiveness: changes how loud / aggressive the burbles are.
● Minimum RPM: changes the min RPM at which burbles will be active.
● Maximum RPM: changes the max RPM at which burbles will be active. (note: not for N54)
● Minimum Speed: changes the min speed at which burbles will be active. If you would like burbles
in neutral / park, set to 0. (note: not for N54)
● Maximum Speed: changes the max speed at which burbles will be active. (note: not for N54)
● Burble in Standstill: N54 specific setting to enable / disable burbles when revving while the
vehicle is stopped and in neutral, clutch-in, or in park.
Additionally, when flashing an MHD OTS MultiMap or custom mapswitch tune, we provide
adjustable burble duration and aggression per map slot. This can be seen via Map 1 / 2 / 3 etc
“tabs” at the bottom of the flash options screen. The number of tabs depends on the number of
map slots setup in your tune (always 4 for OTS MultiMap).
Cold Start Delete
This flash option prevents the initial ~45 second start-up process with raised idle and timing
retard intended to quickly heat the catalytic converters. Select this option to reduce noise at
star t-up.
Exhaust Flap Open In Sport
This flash option sets the exhaust flap to always be open in sport mode.
Startup Roar
This flash option adds the initial RPM rev or “roar ” like GTS cars upon starting.
OPF Delete
This flash option suppresses the CEL for Euro cars that have switched to an aftermarket exhaust
without the OPF filter.
© 2022 MHD Tuning
26

Boost per Gear
This flash option is now utilized for ALL N54 powered cars. Use this to reduce power output in
lower gears to help with traction. To use, take a log and note the current boost levels in the
gears you wish to limit. Then use the flash option to reduce the boost value for that gear and
retest until you are not spinning tires.
Torque per Gear
This flash option uses a torque based strategy to reduce power output in lower gears to help
with traction. 100% reflects max power available. Set it lower to reduce power.
Kickdown Prevention
This flash option prevents the AT / DCT transmission from downshifting when pressing the
accelerator pedal 100%.
Shift Bog Fix (Tq Lim 2048 - hard limiter)
This flash option cures the 1-2 second power limitation when shifting fast on 6MT N54 cars, or
when utilizing a higher than factory rev limit on AT / DCT N54 cars. This would commonly be
seen in logs as Torque Lim 2048. This flash option also changes the RPM limiter from a “soft
limiter” (throttle closure) to a “hard limiter” (fuel cut).
6MT Launch RPM
This flash option enables a standing rev limiter at a user defined RPM for when the clutch is
pressed in at a stop. This helps to consistently launch your car at the same RPM. This should
be combined with the Shift Bog Fix for best results.
Rev Match Disable
This flash option allows you to disable the “rev match” feature per driving mode
(eco/sport/sport+). This is useful for 6MT drivers that like to rev-match themselves.
T-Map Sensor
This flash option provides support for users who have installed a 3.5 bar (N20) or 4 bar MAP
sensor. These allow the DME to be able to read a wider range of boost pressures. It DOES NOT
increase boost on its own.
© 2022 MHD Tuning
27

Ignition Coils
This flash option provides support for users who have installed a higher performance ignition
coil kit, such as Precision Race, BimmerLife or Nexsys Motorsport.
ADV O2 Sensors
This flash option provides support for users who have installed the ADV O2 sensors (typically
used for N54 Single Turbo kits).
XDI HPFP
This flash option provides support for users who have installed an XDI HPFP.
Dorch HPFP
This flash option provides support for users who have installed a Dorch Engineering HPFP.
Sport cooling mode for intercooler
This flash option runs the pump for W2A (water to air) intercooler cars more in order to improve
cooling of IAT’s, especially useful when sitting in the staging lanes waiting to race.
Motiv FlexFuel Kit
Now that MHD+ is available for N54, the selection of the Motiv FlexFuel kit is done under the
MHD+ Suite flash options. For OTS FlexFuel legacy users of this kit, you will want to select the
Motiv FlexFuel kit from the ECA preset drop-down, and then check the FlexFuel checkbox that
appears after the ECA selection has been made.
That additional FlexFuel checkbox will only be visible if you have all of the license requirements
fulfilled and are flashing an appropriate OTS map. When selected, it will automatically blend
your selected stage pump gas map with the related ethanol map and results in a fully featured
TRUE flex fuel setup. See the Motiv installation guide for additional details.
NOTE: Custom tunes will not see the FlexFuel checkbox option, as it is not necessary, but they
will be able to make an ECA preset selection.
© 2022 MHD Tuning
28

Coolant Mode
This flash option changes the oil and coolant temperature targets to give improved cooling
during spirited driving or for use in hot climates.
PI Safety (coil cut)
This flash option will cut power to an ignition coil if that cylinder’s fuel injector is cut. This is
necessary for a completely safe PI (port injection) setup.
Wastegate Rattle Fix
This flash option changes the position of the wastegate arms during idle and deceleration in
order to reduce the rattle noise they can have as they age.
Desensitize Knock Sensors
This flash option is for professional use only. It should only be used after validating a built
motor has false knock using det-cans or similar.
Flash Counter Reset / Freeze
This flash option will reset your DME flash counter to 1, and also freeze it so that future flashes
do not increment it any further.
Overrun BRAP
This flash option will enable the BRAP sound on throttle lift (if sufficient boost has been built),
exactly like the M2 N55 and S55 cars have from the factory. There are two options, short or long
duration, which affect the length of the sound. An aftermarket exhaust is recommended for best
sound. Full factory exhaust on some vehicles may be too quiet to hear the BRAP, especially on
5-series / 6-series vehicles and some SUV’s.
MSA Disable
This flash option allows you to disable the Automatic Motor Start/Stop function. It affects all
drive modes.
© 2022 MHD Tuning
29
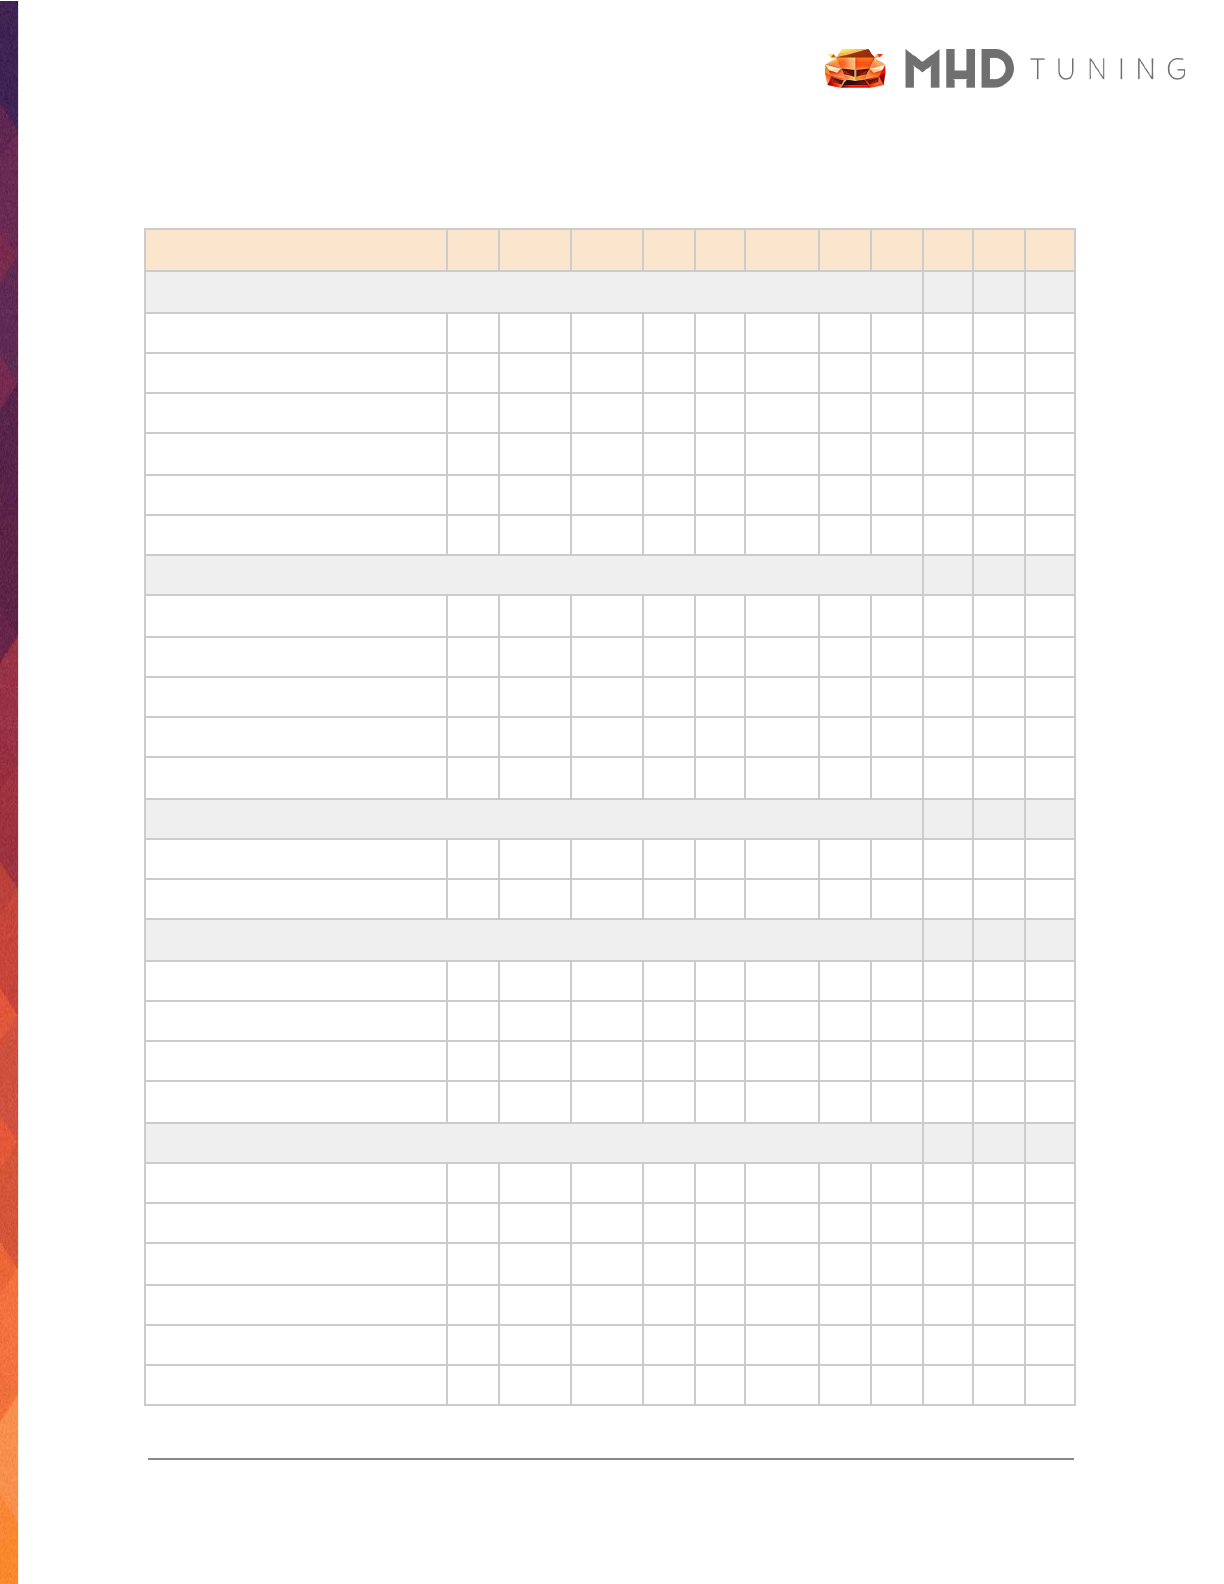
Flash Options - Engine Chart
N54
N55-E
N55-F
S55
B58
B58o1
N13
S63
S58
-
-
General
Linear Throttle
•
•
•
Adjust Throttle Sensitivity
•
Raise Minimum Idle RPM
•
•
OEM Catted Downpipe
•
•
•
•
•
•
•
•
•
VMax Delete (speed limiter)
•
•
•
•
•
•
•
•
MSA Disable
•
•
•
•
•
Exhaust
Exhaust Burble Customization
•
•
•
•
•
•
•
•
•
Cold Start Delete
•
•
•
•
•
•
•
•
•
Exhaust Flap Open In Sport
•
•
•
•
•
•
•
Startup Roar
•
•
•
•
•
•
OPF Delete
•
•
•
•
•
Power / Traction
Boost per Gear
•
Torque per Gear
•
•
•
•
Transmission
Kickdown Prevention
•
•
Shift Bog Fix (hard limiter)
•
6MT Launch RPM
•
6MT Rev Match Enable
M2 N55
•
•
Hardware Support
T-Map Sensor
•
•
•
•
Ignitions Coils
•
•
•
•
ADV O2 Sensors
•
XDI HPFP
Late E
•
•
•
Dorch HPFP
Late E
•
•
•
Nostrum HPFP
•
© 2022 MHD Tuning
30
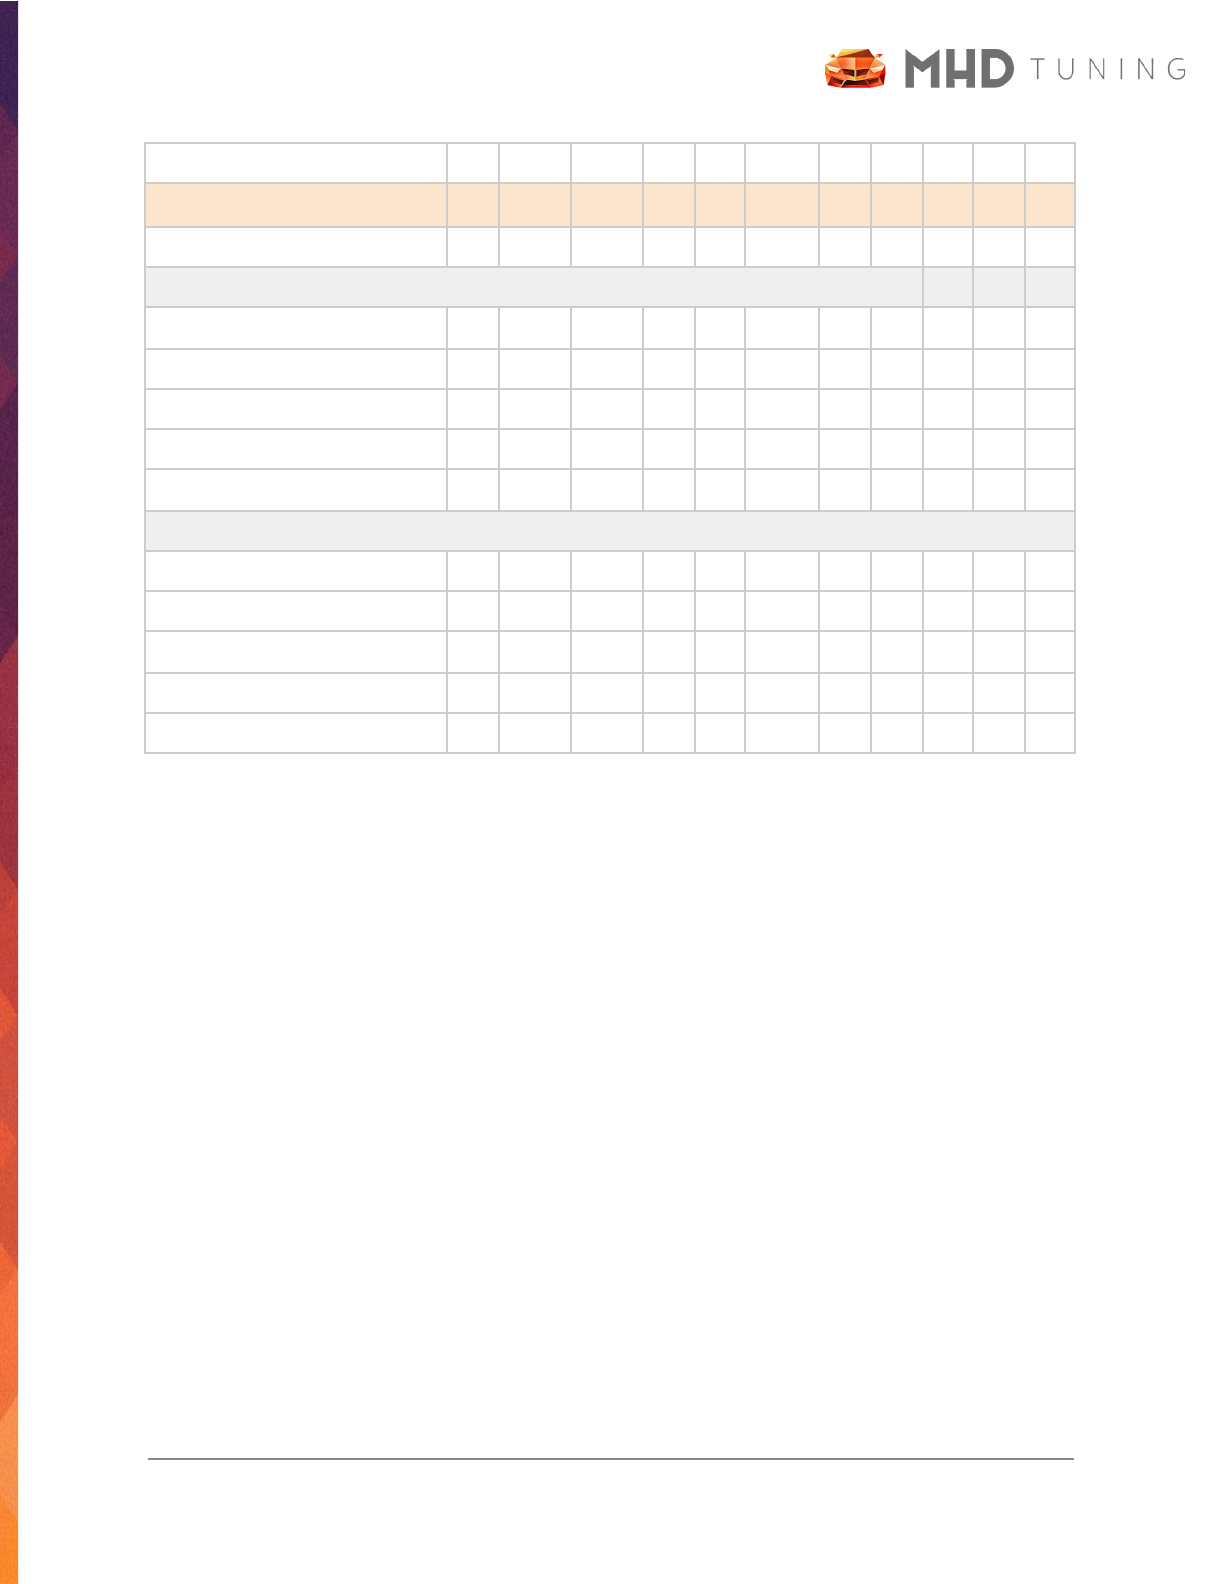
Intercooler sport cooling mode
•
•
N54
N55-E
N55-F
S55
B58
B58o1
N13
S63
S58
-
-
Motiv FlexFuel Kit
•
Advanced
Coolant Mode
•
•
•
•
•
PI Safety (coil cut)
•
Wastegate Rattle Fix
•
Desensitize Knock Sensors
•
Flash Counter Reset / Freeze
•
•
•
MHD+ Suite
Antilag
•
•
•
•
•
Map Switching
•
•
•
•
•
Flex Fuel
•
•
•
•
•
CANBUS ECA
•
•
•
•
•
Overrun BRAP
•
•
•
© 2022 MHD Tuning
31

Return to Stock
If you click the “Stock” tab, you will see three possible options.
Flash Back to Stock
To flash back to stock, select the tab Stock > Flash back to stock. This option will uninstall
MHD and completely revert your DME back to its original factory state. This can be useful if you
wish to return your vehicle to stock before selling it, etc. An original backup file is not necessary
for this process as MHD can intelligently generate one exactly for you based on unique
identifiers in your DME.
ATTENTION: flashing back to stock requires a long write, so a battery charger is highly
recommended!
Flash Stage 0 (stock power)
There are two paths to access this function, either through Stock > Flash stage 0, or Tune >
Flash an MHD Map > Version (if applicable) > Stage 0. Both paths through the MHD application
will do the exact same thing.
With this flash option, the tune and power level will be exactly as it was stock, however MHD will
remain installed so you are able to customize flash options if you wish. Additionally, you will be
able to data log enhanced parameters specific to MHD. This is useful if you are trying to
troubleshoot an issue but still want the enhanced logging abilities.
NOTE: if MHD is already installed and no flash option change triggers a Long Write, this flash
should be a short Map Write. As with the above section’s instructions for OTS / Custom map
flashes, you should use a battery charger if doing a Long Write or Full Write (first MHD install).
Generate Updated Backup
To generate an updated backup, select the tab Stock > Generate updated backup. This option
will create a *.bin file in the MHD root folder which is exactly your OEM software. While this is
not necessary for flashing back to stock, it can be useful if you or your tuner needs an original
file to start from for your custom tuning.
© 2022 MHD Tuning
32
Data Logging
MHD features comprehensive logging / monitoring abilities. It can be used to keep a close eye
on the condition of your vehicle, the quality of the tune being used, and much more. MHD
includes a vast list of loggable parameters, and the list is constantly expanding as we add more
valuable parameters for helping calibrate the perfect tunes.
After connecting to your vehicle, you can access the data logging screen by selecting the tab
Mon > Data Logging.
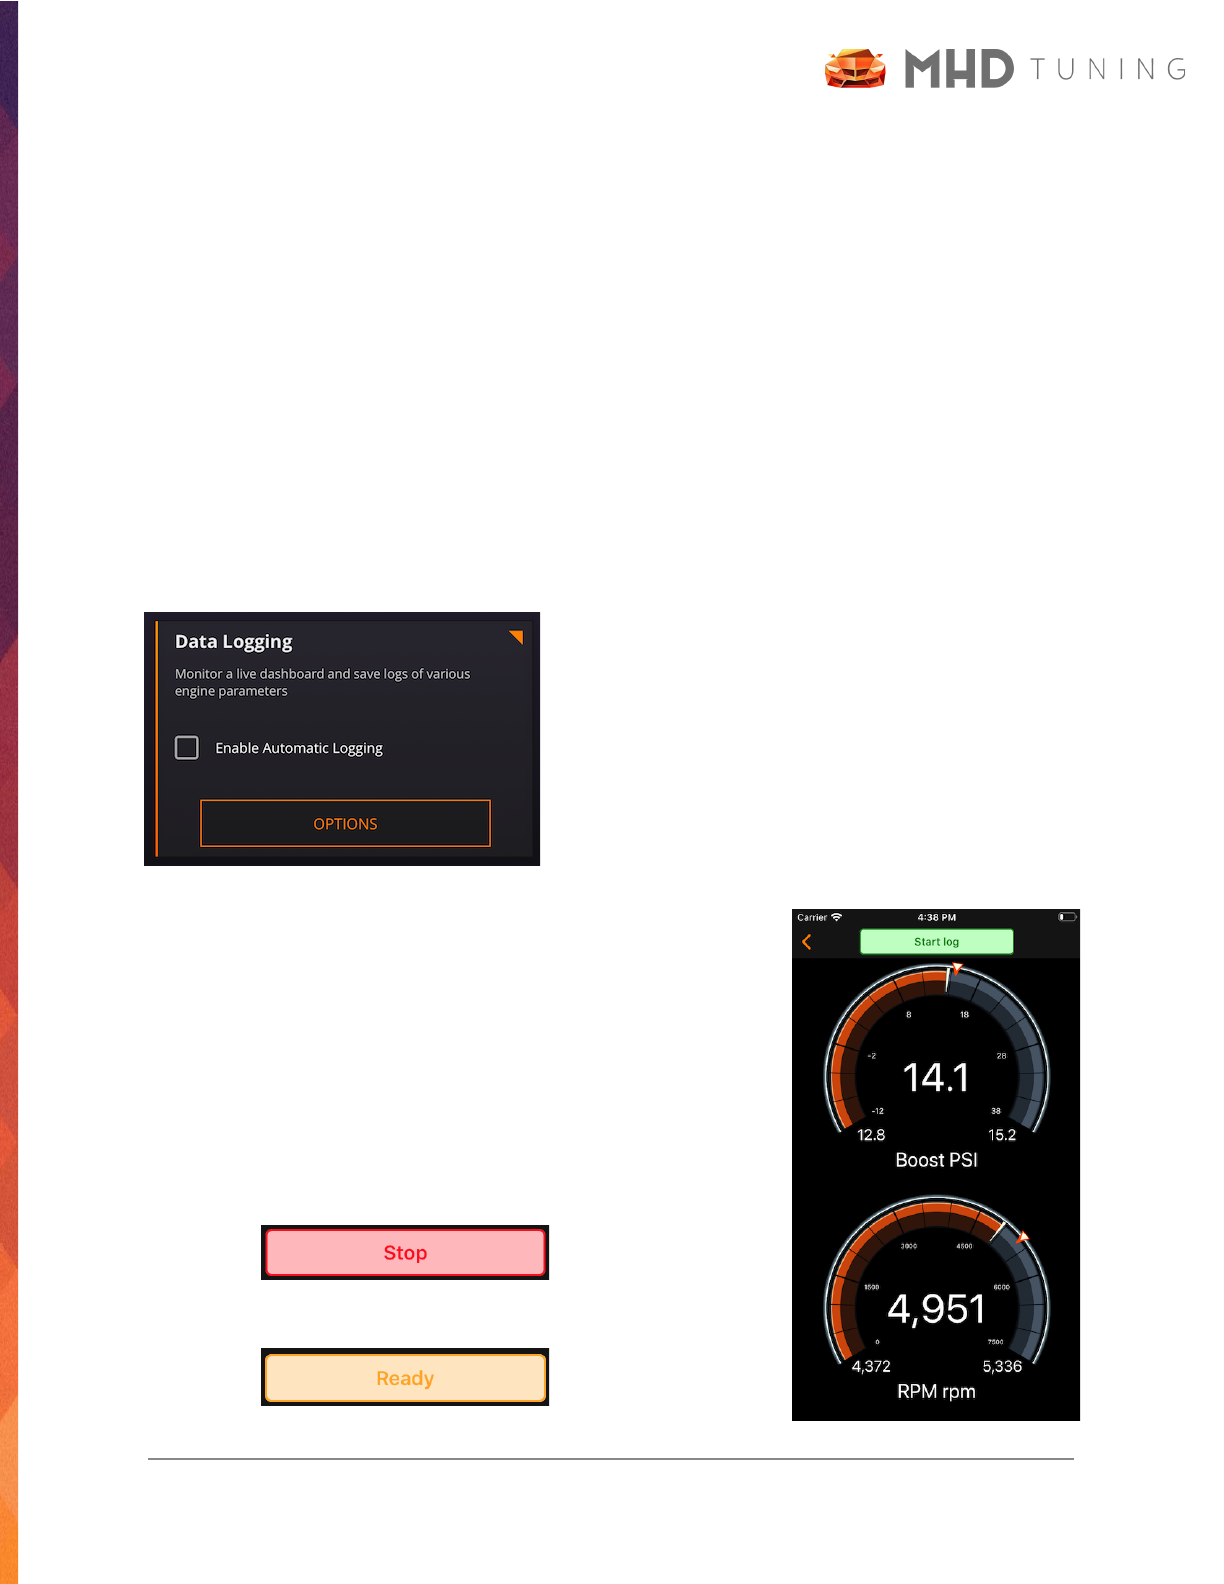
You are able to constantly monitor up to 8 “live gauges” on your device while data logging many
many more to a CSV file saved on your device. By default, you have manual control over data
logging to file start/stop. If you do not want to
manually start / stop the logging and would rather it
star t automatically, tick the checkbox for “Enable
Automatic Logging.” In this mode, the data logging to
file is automatically started once the accelerator
pedal is pressed past a user defined threshold. This
percentage is set on the Monitor Options screen,
detailed in its section below.
After tapping the Data Logging button, you will see a screen like
this. There will be anywhere from 1-8 gauges present, depending
on how many you configured in Monitor Options. You will either
see the start button if using manual logging, or the Ready button
if you ticked the box to enable automatic logging. This simply
indicates auto logging mode is active and ready for recording to
file one your pedal threshold is met.
© 2022 MHD Tuning
33
Gauge Interaction
There are a few ways to interact with the individual gauges while the monitoring screen is
displayed. Currently you can change the gauge parameter and also reset the displayed
minimum / maximum. The setting to show or hide the gauge minimum / maximum is
configurable on the Monitor Options screen.
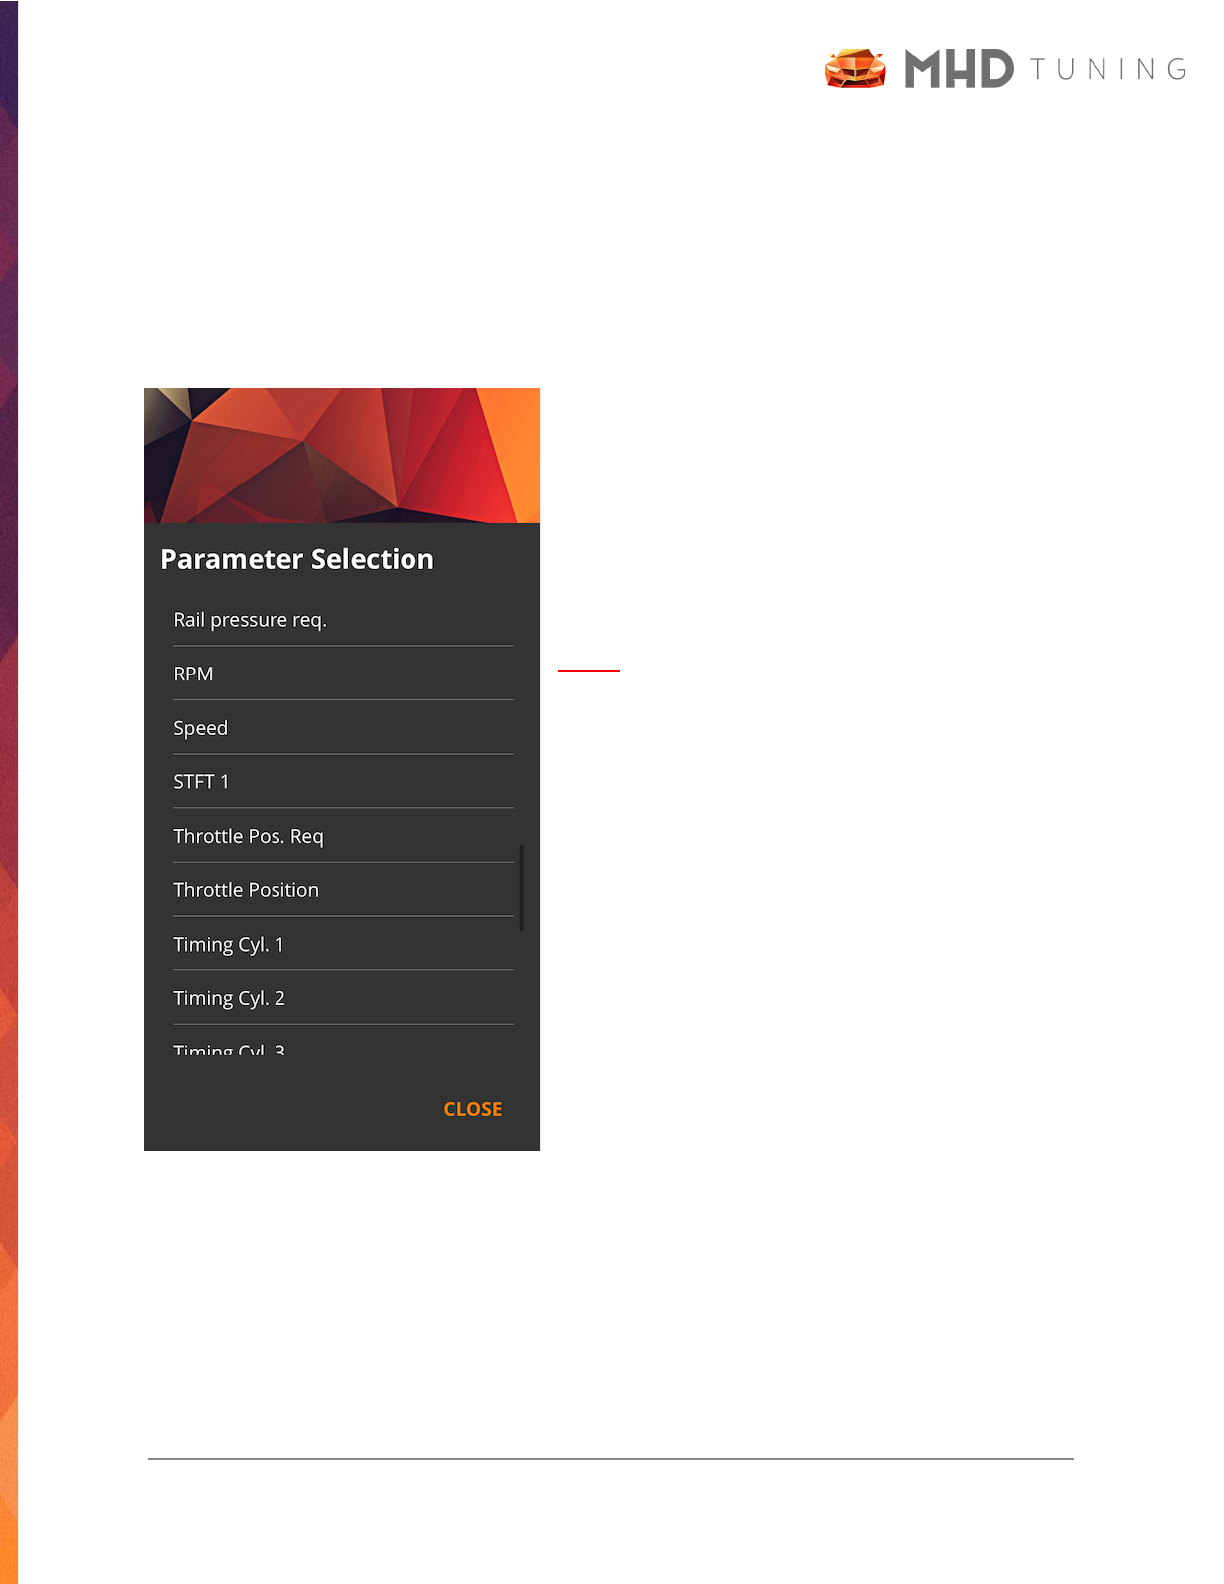
Changing Gauge Parameter
To change the parameter that is being displayed by a
gauge, simply tap once on the gauge itself. You will
see a popup like this. Simply tap the new parameter
you would like the gauge to display. If you decide not
to change the parameter, press Close instead.
NOTE: If when selecting a new parameter you
receive an alert that the maximum number of
parameters has been reached, you must go to the
Monitor Options screen and deselect a few from the
parameter checkbox list that you do not need.
Reset Min/Max Display
If you would like to reset the displayed min/max that
has been recorded while the gauge has been active,
you can simply swipe up or down on the gauge face
itself.
Changing Gauge Style / Appearance
This functionality is coming soon! Please check back for a future update.
© 2022 MHD Tuning
34
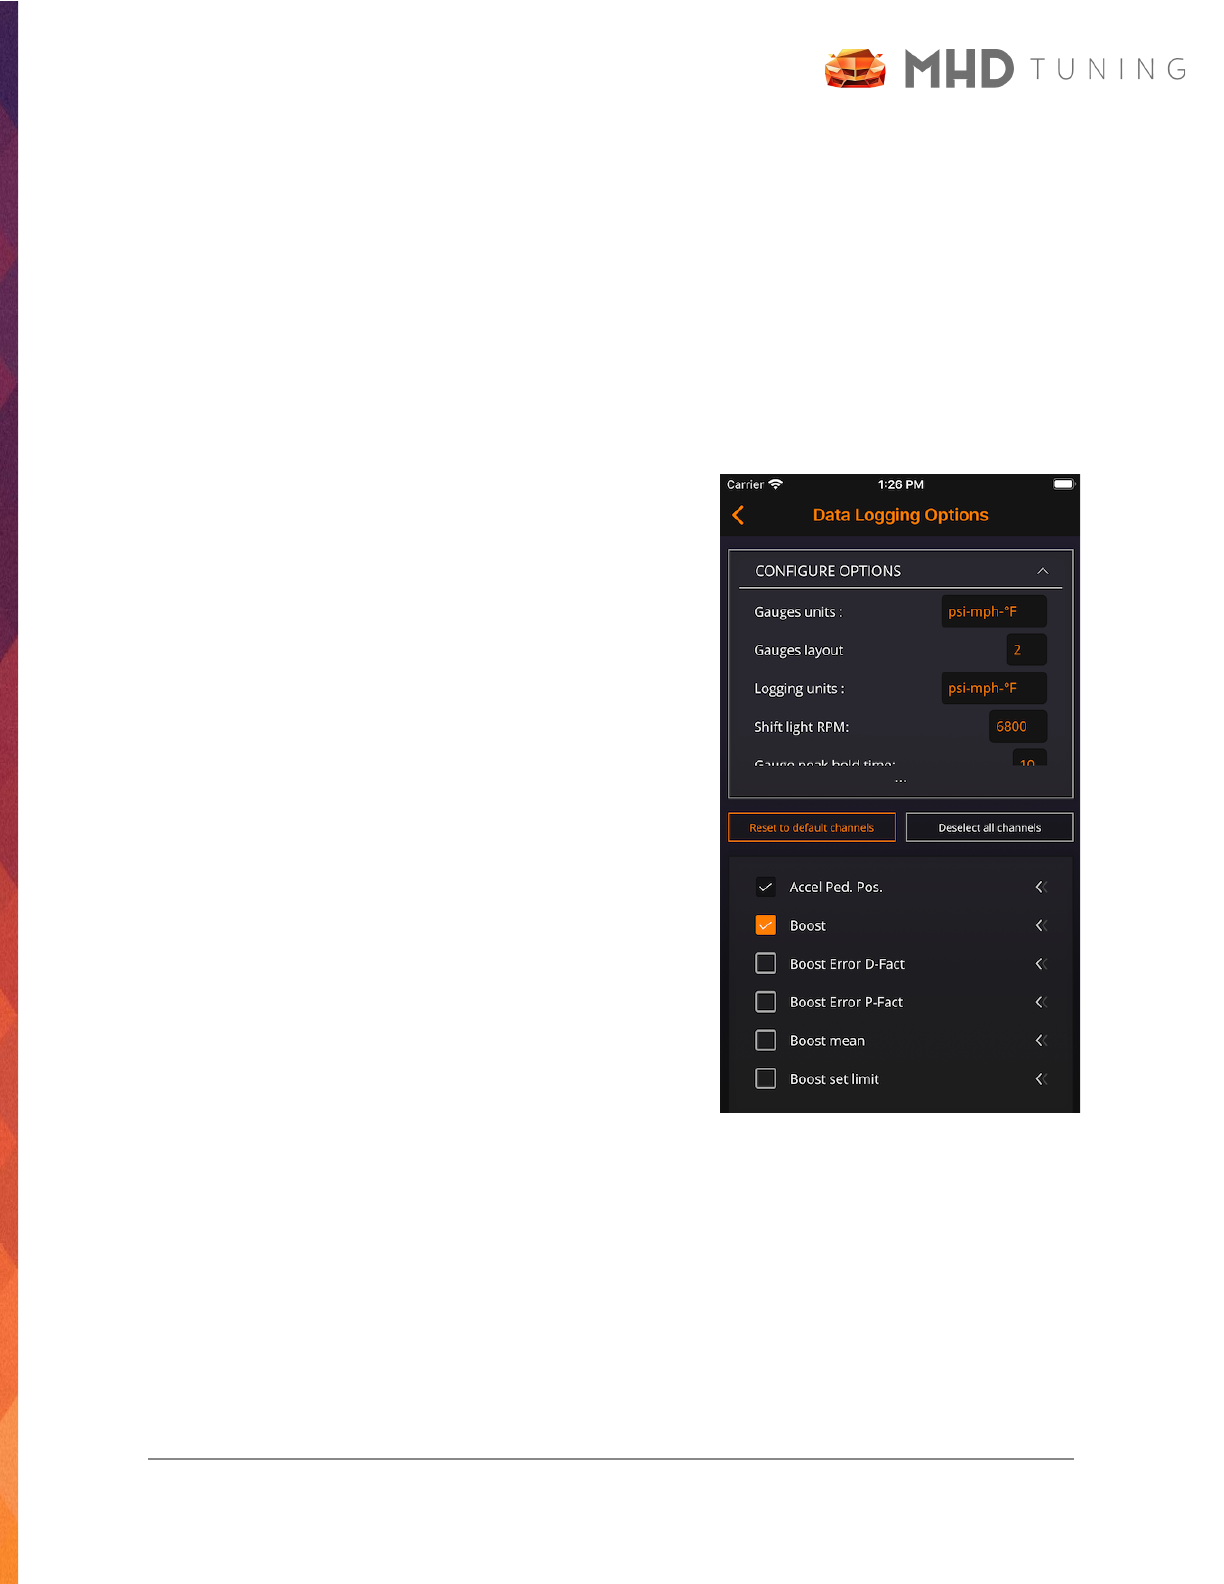
Monitor Options
Before you can view and edit the Monitor Options screen, you must either be currently
connected to your vehicle, or have connected to it at least once before. You can access the
Monitor Options screen by selecting the tab Mon > Options. Once the screen loads, you will
notice the top section titled Configure Options. This is an expand/collapse area. Tap it once to
expand, and you can tap it again (on the Configure Options header text) to close. When
expanded, you can scroll through more options within that area. Once expanded, you can
configure the following options:
● Gauge units: changes the units used for the
values displayed on the gauges
● Gauges layout: changes the numbered of gauges
shown when monitoring
● Logging units: changes the units used for the
values recorded to CSV data logs
● Shift light RPM: the RPM at which the screen will
flash white, indicating
● Gauge peak hold time: a timer for how long the
“triangle” pointer on the sport style gauges will
remain at the peak value
● Min pedal for alerts: accel pedal position
threshold that must be exceeded for gauge alerts
to be active
● Play alert beep: will play an audible beep when a
gauge aler t threshold is exceeded (in addition to
gauge turning red)
● Show overall min/max: will show the persistent min/max of a gauge parameter in the
lower corners of the gauge
Below the Configure Options section are two buttons which apply to the parameter list at the
bottom of the screen. They will reset the list to its default selections, or deselect all parameters.
You can also select or deselect parameters manually, up to an engine-specific maximum.
© 2022 MHD Tuning
35
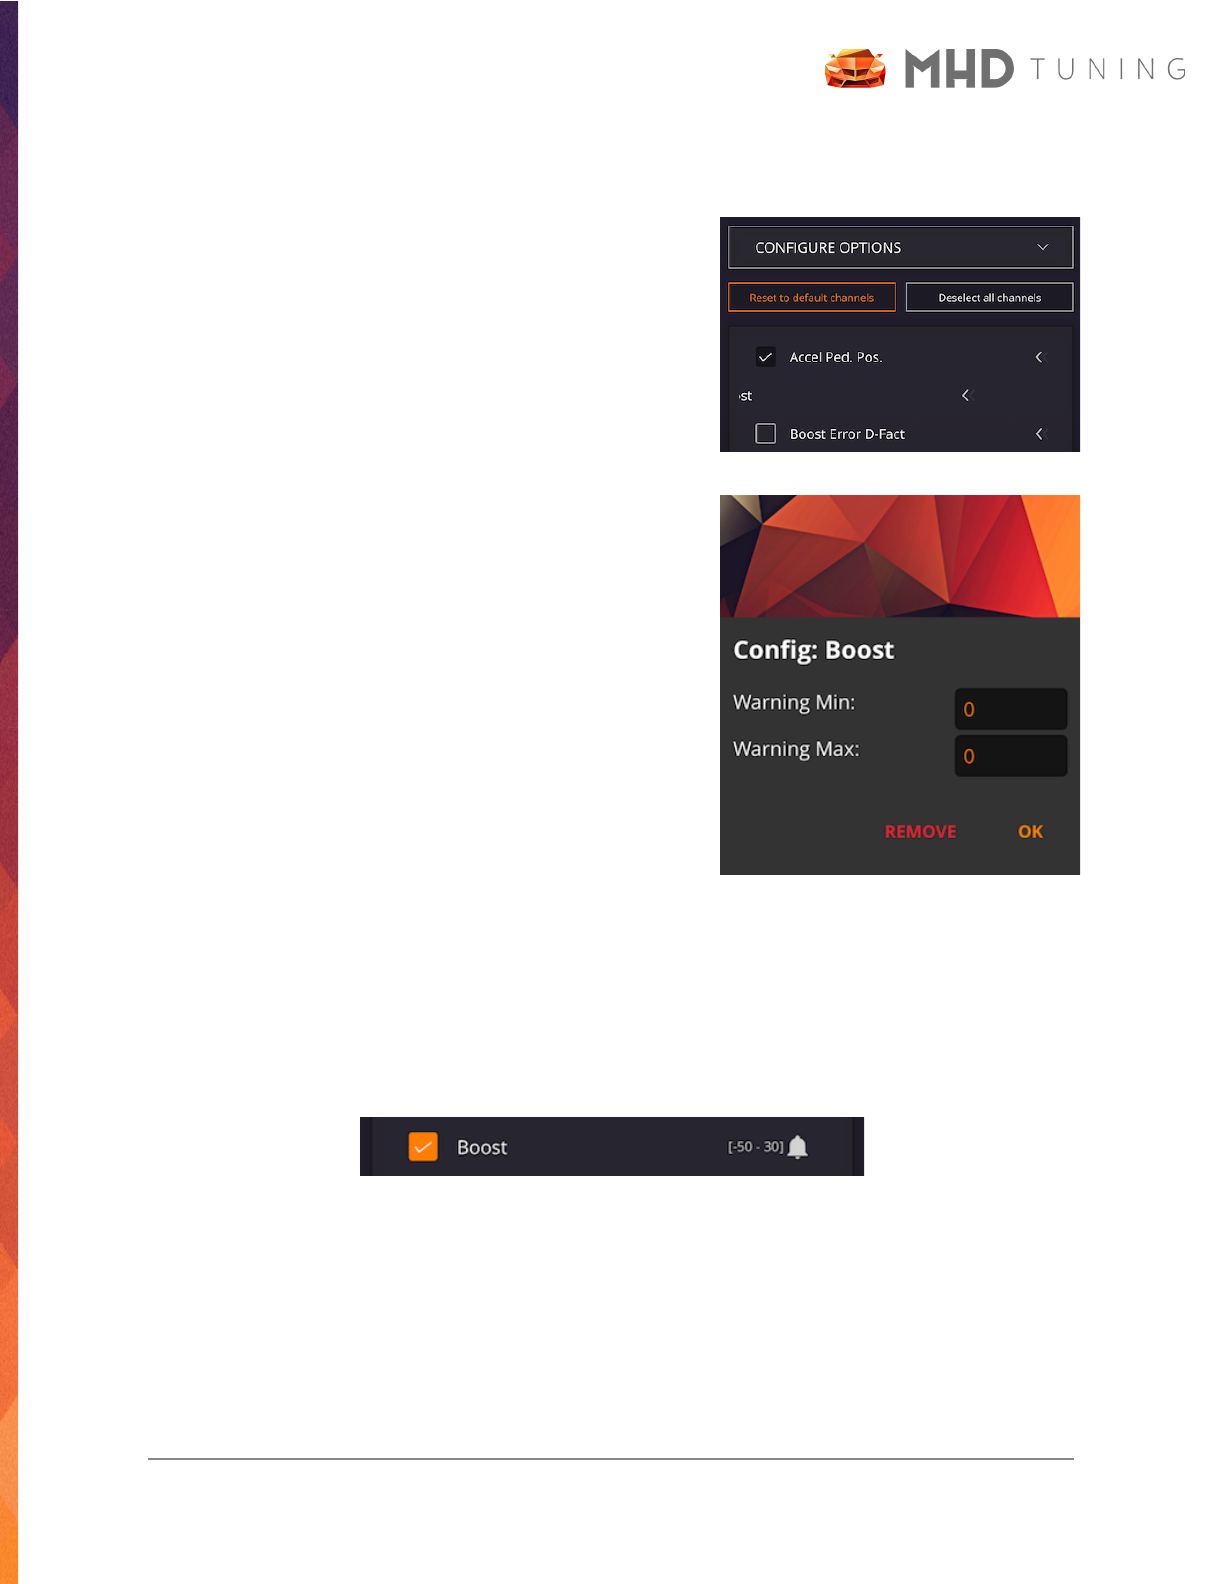
Gauge Alerts
1. To set up a gauge alert for a specific parameter,
<< swipe left on the name of the parameter in the
Monitor Options param list. This can be seen
here on the Boost parameter.
2. You will then see a popup like this appear. Enter
the values you wish to be your min and max for
aler ts, then press OK. If you press Remove, the
aler t for this parameter will be removed and both
fields set back to 0 (no alert).
a. If you do not want an alert on the Min
(boost, for example), enter a very low
value.
b. If you do not want an alert on the Max (rail
pressure, for example), enter a very high
value.
3. In this example, we entered for Boost: -50 Min and 30 Max. This will prevent an alert
when in decel and Boost param is reading vacuum, but it will give an alert when Boost
exceeds 30 (psi in this case, units depend on your configured Gauge Units from above).
© 2022 MHD Tuning
36
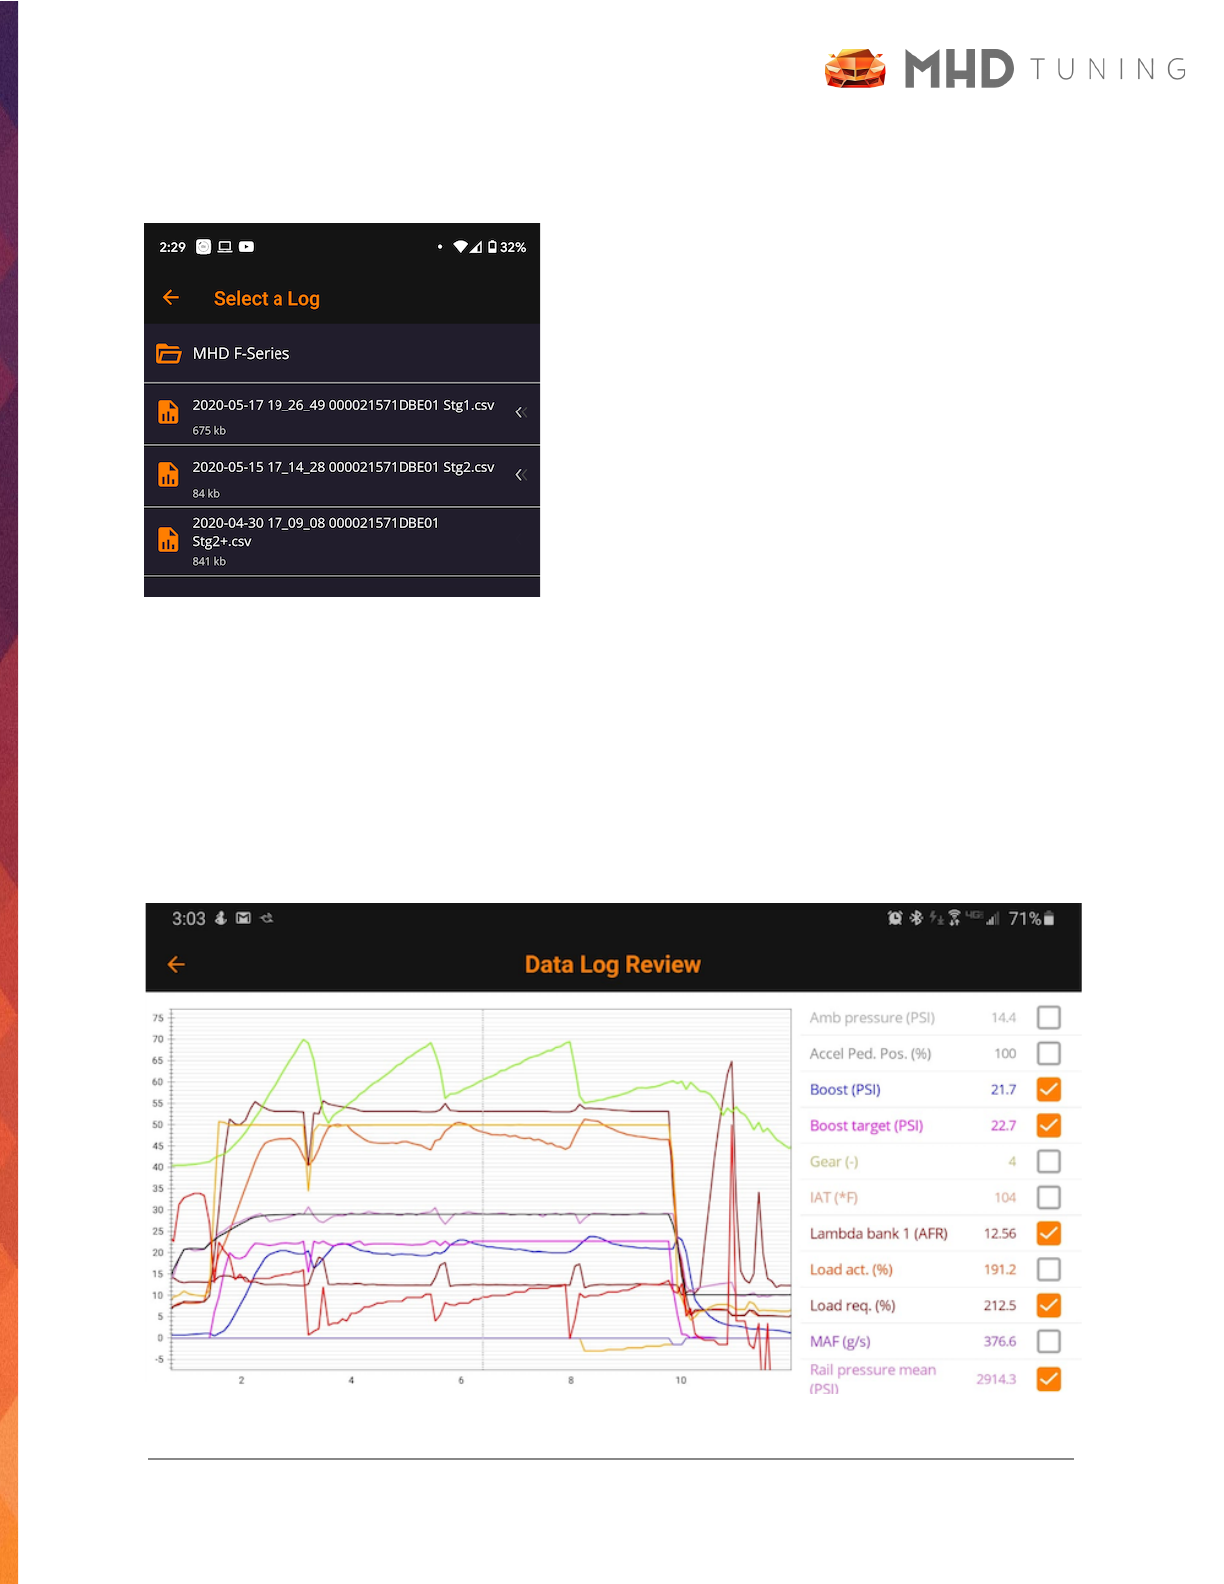
Graph a Log
To graph a log you have previously saved, select the
tab Mon > Graph a Log. You will then see a file select
screen similar to this. This file select screen defaults
to the MHD DataLogging folder, which is where the
CSV log files are saved.
Tapping on a log file will bring you to the graph view
of your log. On this screen, you can view the graph in
either por trait or landscape view.
You can also show or hide additional parameters by toggling the checkbox next to the parameter
name. Finally, you can scroll up and down, pan side to side, and zoom in on the graph itself.
Panning the graph side to side will update the values on the parameter list with their value at
that given point in time!
© 2022 MHD Tuning
37

CSV File Actions
On the log file select screen, you can also << swipe
left on any log file (*.csv file extension), and will be
presented with some additional file options. From
left to right, they are Rename, Share, and Delete.
Each option is detailed below.
● Rename: if you select the Pencil icon to rename your log
file, you will see a popup in which you can change the file
name to something easier to remember, or add details
about something specific you noticed while taking the
log.
● Share: if you select the Share icon, you will see a popup
asking what sharing method to use. For log files, the
options are Email, SpoolStreet, and DataZap. If Email is
selected, this will open up your device’s preferred email
app with the tune file automatically attached.
SpoolStreet is detailed in its own section below. DataZap
direct upload is coming soon (as soon as they have it
available for us).
● Delete: if you select the Trash Can icon, you will see a
popup confirming if you would like to delete the log file.
Be careful, as this will permanently delete it from your
device!
© 2022 MHD Tuning
38
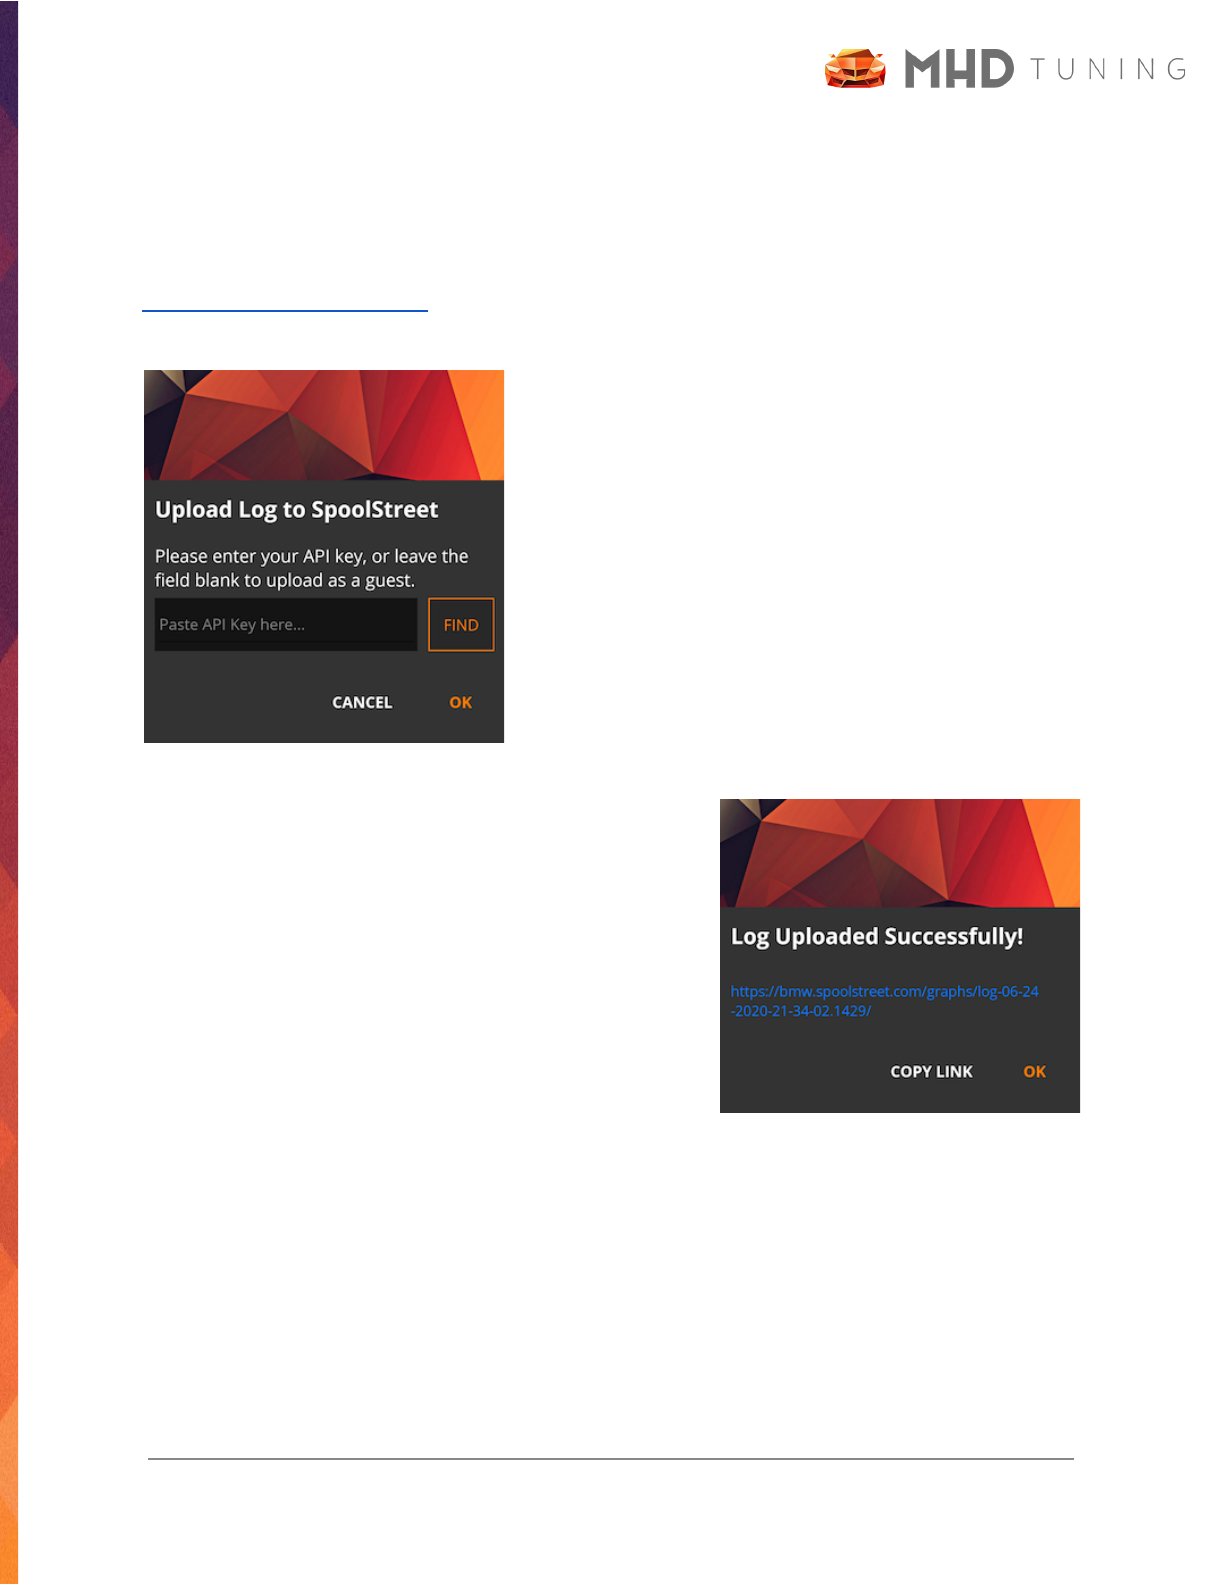
Share to SpoolStreet
After selecting the SpoolStreet option in the Share dialog above, you will be presented with this
popup. If you are a member of the SpoolStreet forum or wish to sign up (visit
https://www.spoolstreet.com), you can get your own API key (lookup using the FIND button).
Leaving the API Key field blank will still allow you to
upload the log as a guest, but the log will not be
guaranteed to be hosted forever. If you would like
permanent storage of your logs, you should sign up and
enter your user specific API Key into the textbox.
Clicking OK will begin to upload the log. Once the upload
is complete, you will see the following success message
in the popup. You can click the link to open your device’s
browser and view your log on the website, or you can
press Copy Link to copy it to your device’s clipboard for
later use.
© 2022 MHD Tuning
39
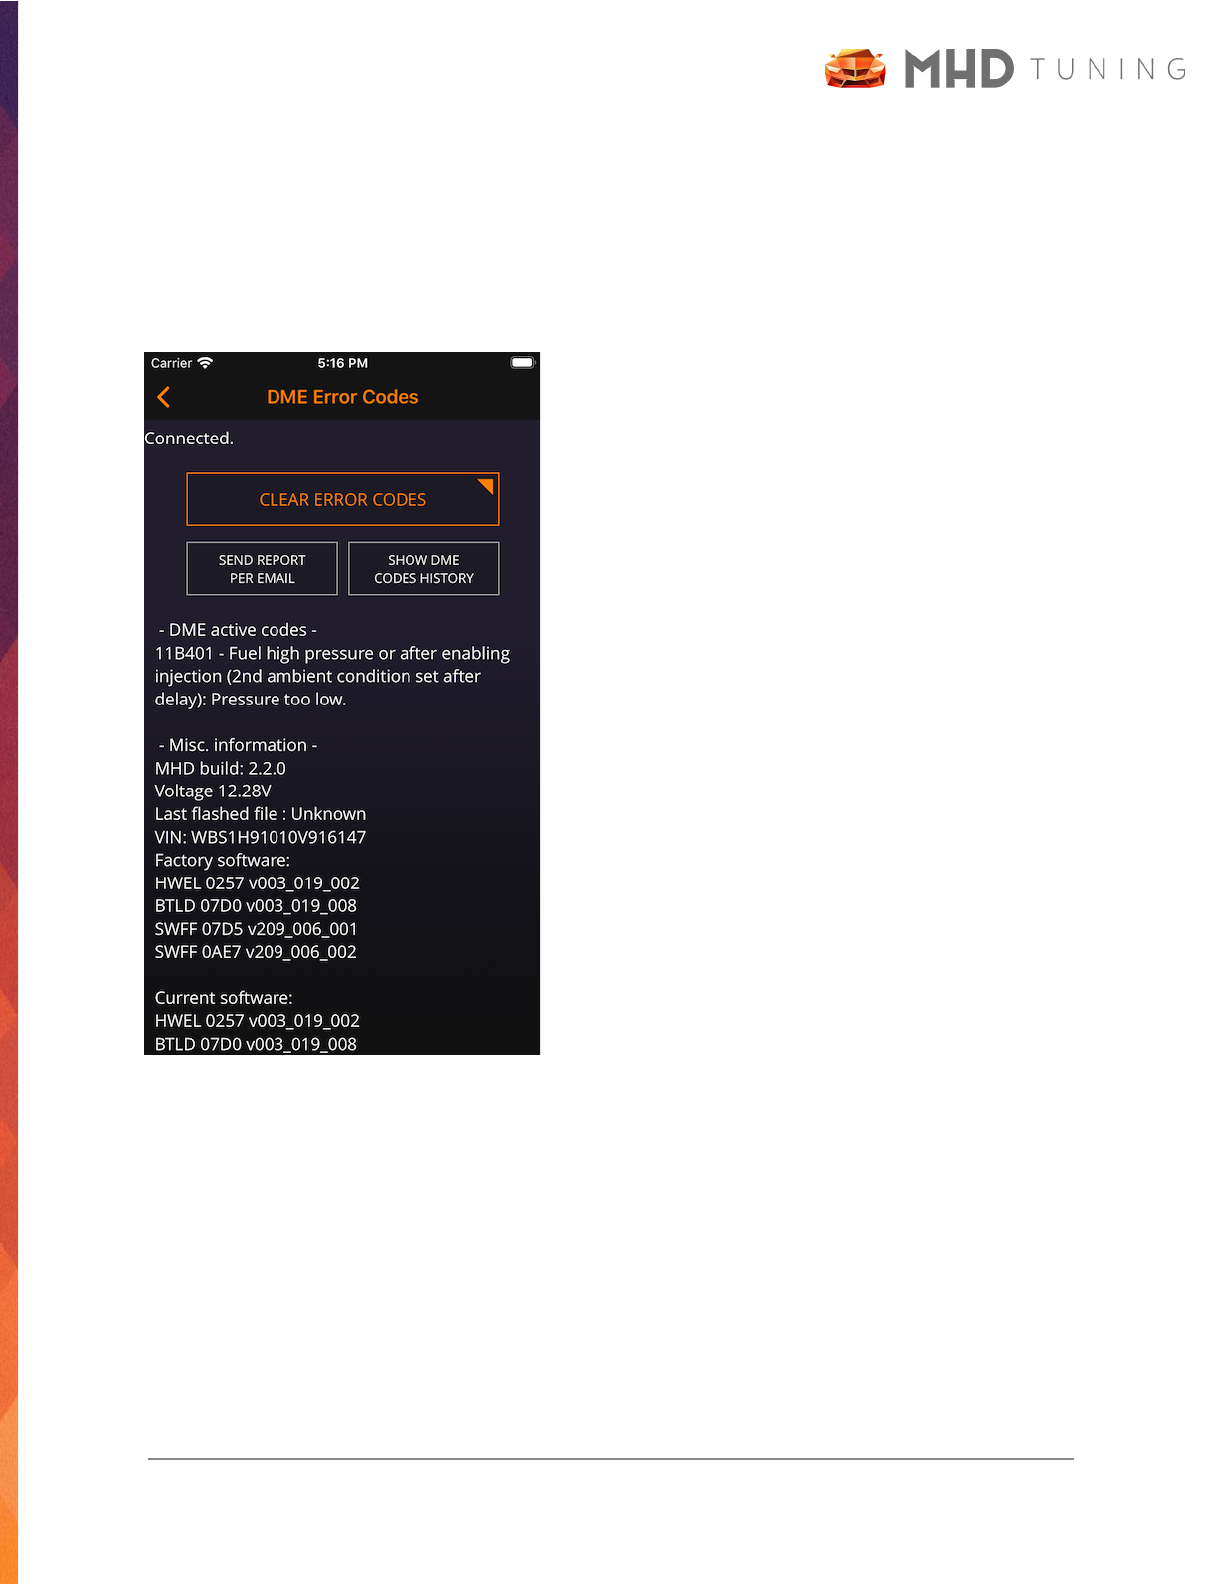
Read DME Codes
In order to read DME codes, you first must connect to your car. Next select the tab Codes >
Read DME Codes. This will query the DME for a variety of information, including:
● active error codes
● software versions (current and factory OEM)
● VIN
● MHD information
● battery voltage
● ecu status
● OBD readiness information
● flash counter (available on F series and later)
To clear the error codes, press Clear Error Codes.
Other actions on this screen include sharing this
screen’s details via email (to yourself or your tuner),
and also viewing DME code history. This is an
aggregate list of error codes stored on your device
each time you visit the Read DME Codes screen. It is
useful to see if you have a history of a troublesome
code continuing to pop up from time to time.
© 2022 MHD Tuning
40
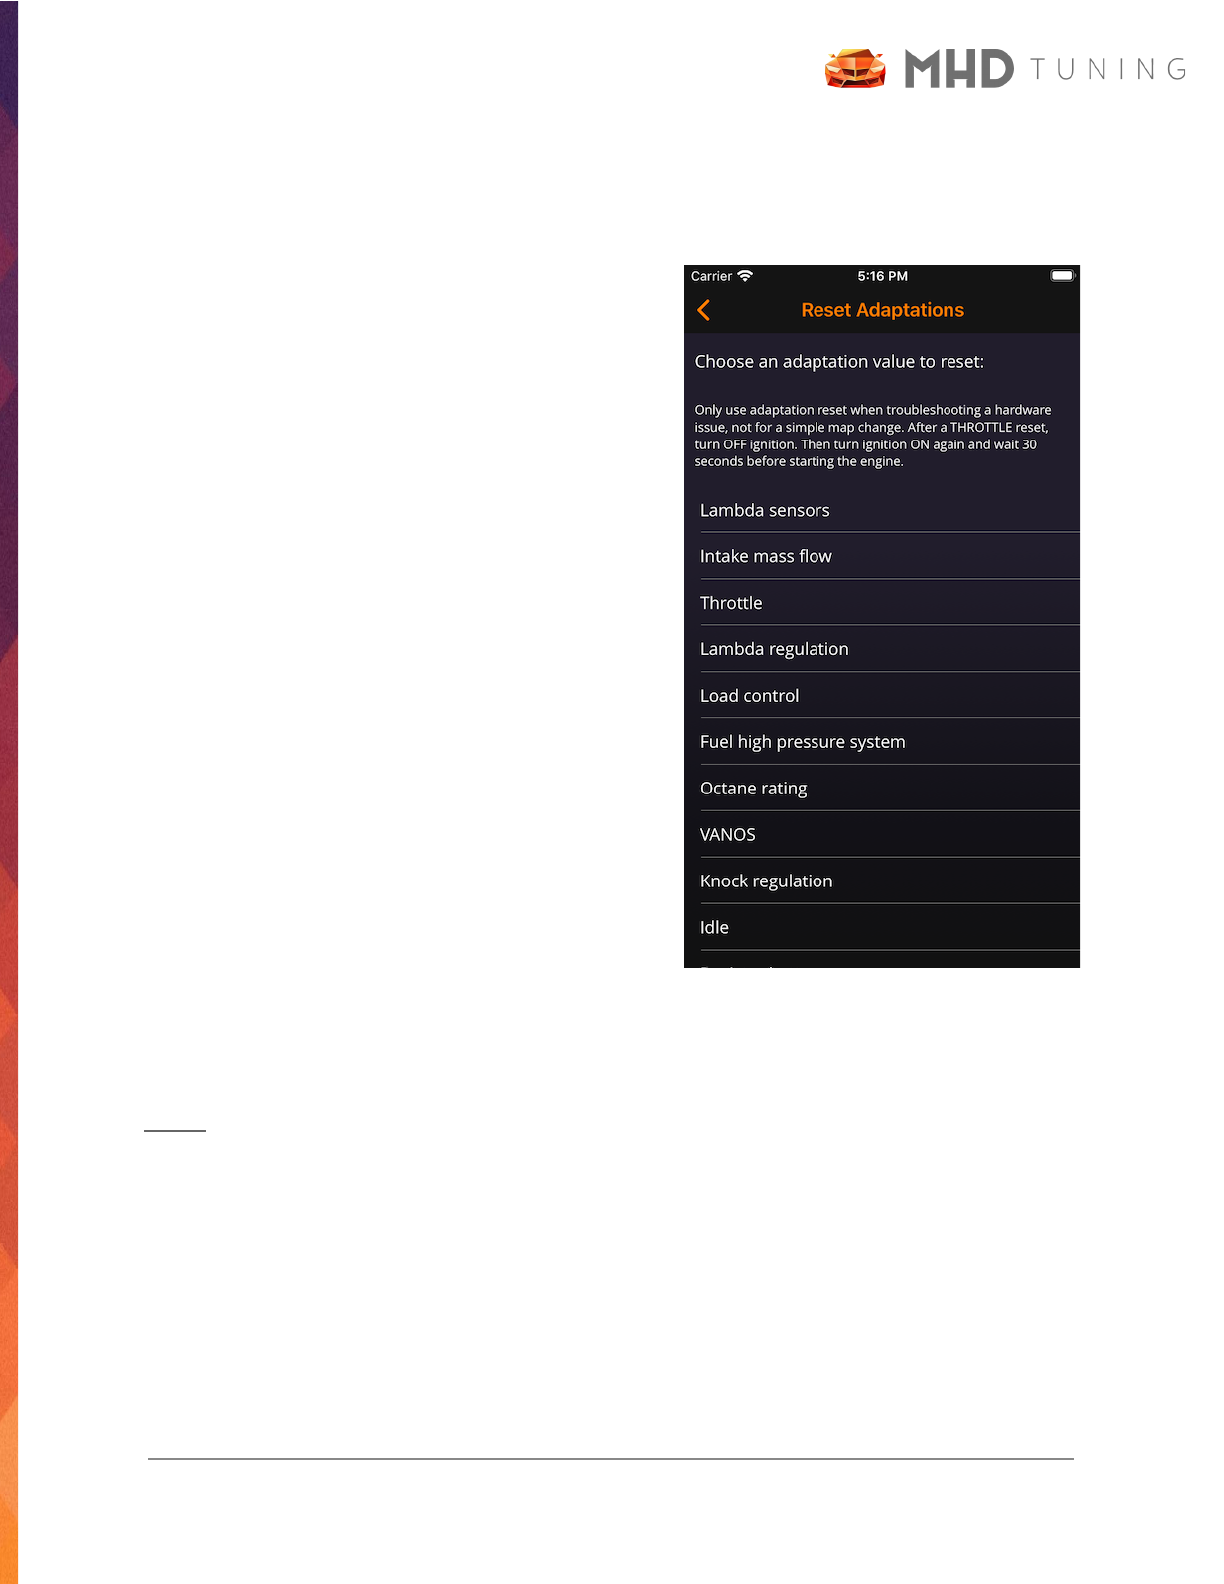
Reset Adaptations
In order to reset DME adaptations, you first must
connect to your car. Next select the tab Codes >
Reset Adaptations. Adaptation resets should only be
performed if you are troubleshooting a particular
issue and you want to eliminate a learned behavior /
value from the list of possible causes. The following
adaptations can be reset:
● Lambda sensors
● Intake mass flow
● Throttle: after reset, turn ignition off and then
back on, wait for 30 seconds before starting
the engine!
● Lambda regulation (learned lambda/ltft)
● Load control
● HPFP system
● Octane rating
● VANOS
● Knock regulation (learned knock control)
● Idle
● Register Battery (only if new battery is same size / type as previous)
NOTE: when resetting adaptations, ensure the engine remains off but ignition is on.
© 2022 MHD Tuning
41

MHD+ Suite
MHD+ is the overall encompassing name of our suite of custom features we have added to the
DME in order to improve and expand upon its functionality. Currently we offer MHD+ support for
the following vehicles:
● E-Series (MSD8x DME): N54
● F-Series (MEVD DME): N13, N55 (PWG and EWG), S55
● F/G-Series (MG1 DME): B58 gen1
Our main custom MHD+ features include Antilag, Map Switching, and FlexFuel. Information on
how to use each feature (and what is required) can be found in their respective sections below.
Antilag
Antilag can be baked into your custom tuned file by your tuner, or you can use our built-in Antilag
flash time option with an OTS map or a custom tuned file. Here are step-by-step instructions on
how to best use the feature!
Rolling Start
1. Ensure the vehicle is up to operating temperature.
a. E-Series also requires DSC one press off or fully off.
2. Select the appropriate gear for your given speed / racing condition.
a. For AT or DCT transmissions, make sure you are in manual mode so that it does
not kick down to a lower gear.
3. E-Series: pull cruise control stalk in TOWARD you, or hold steering wheel VOL DOWN
F/G-Series: hold either the cruise control RES button, or the cruise control DOWN rocker
switch (both first and second indent work)
a. NOTE: some early F/G-Series 5/6 series cars are limited to only using cruise
control DOWN rocker switch to active antilag.
4. While continuing to hold the button, gradually fully depress the accelerator pedal.
5. Wait 1-2 seconds for boost to build and then release the button / stalk!
© 2022 MHD Tuning
42
DCT Launch Control Start
1. Ensure the vehicle is up to operating temperature.
2. Engage LC like you normally would.
3. Once RPMs rise, press and hold either the cruise control RES button or DOWN rocker
switch (both first and second indent work) on F/G-Series, or on E-Series, pull the cruise
control stalk in TOWARD you, or hold the steering wheel VOL DOWN button.
4. Wait 1-2 seconds for boost to build and then release the button / stalk at the same time
you release the brake pedal to launch.
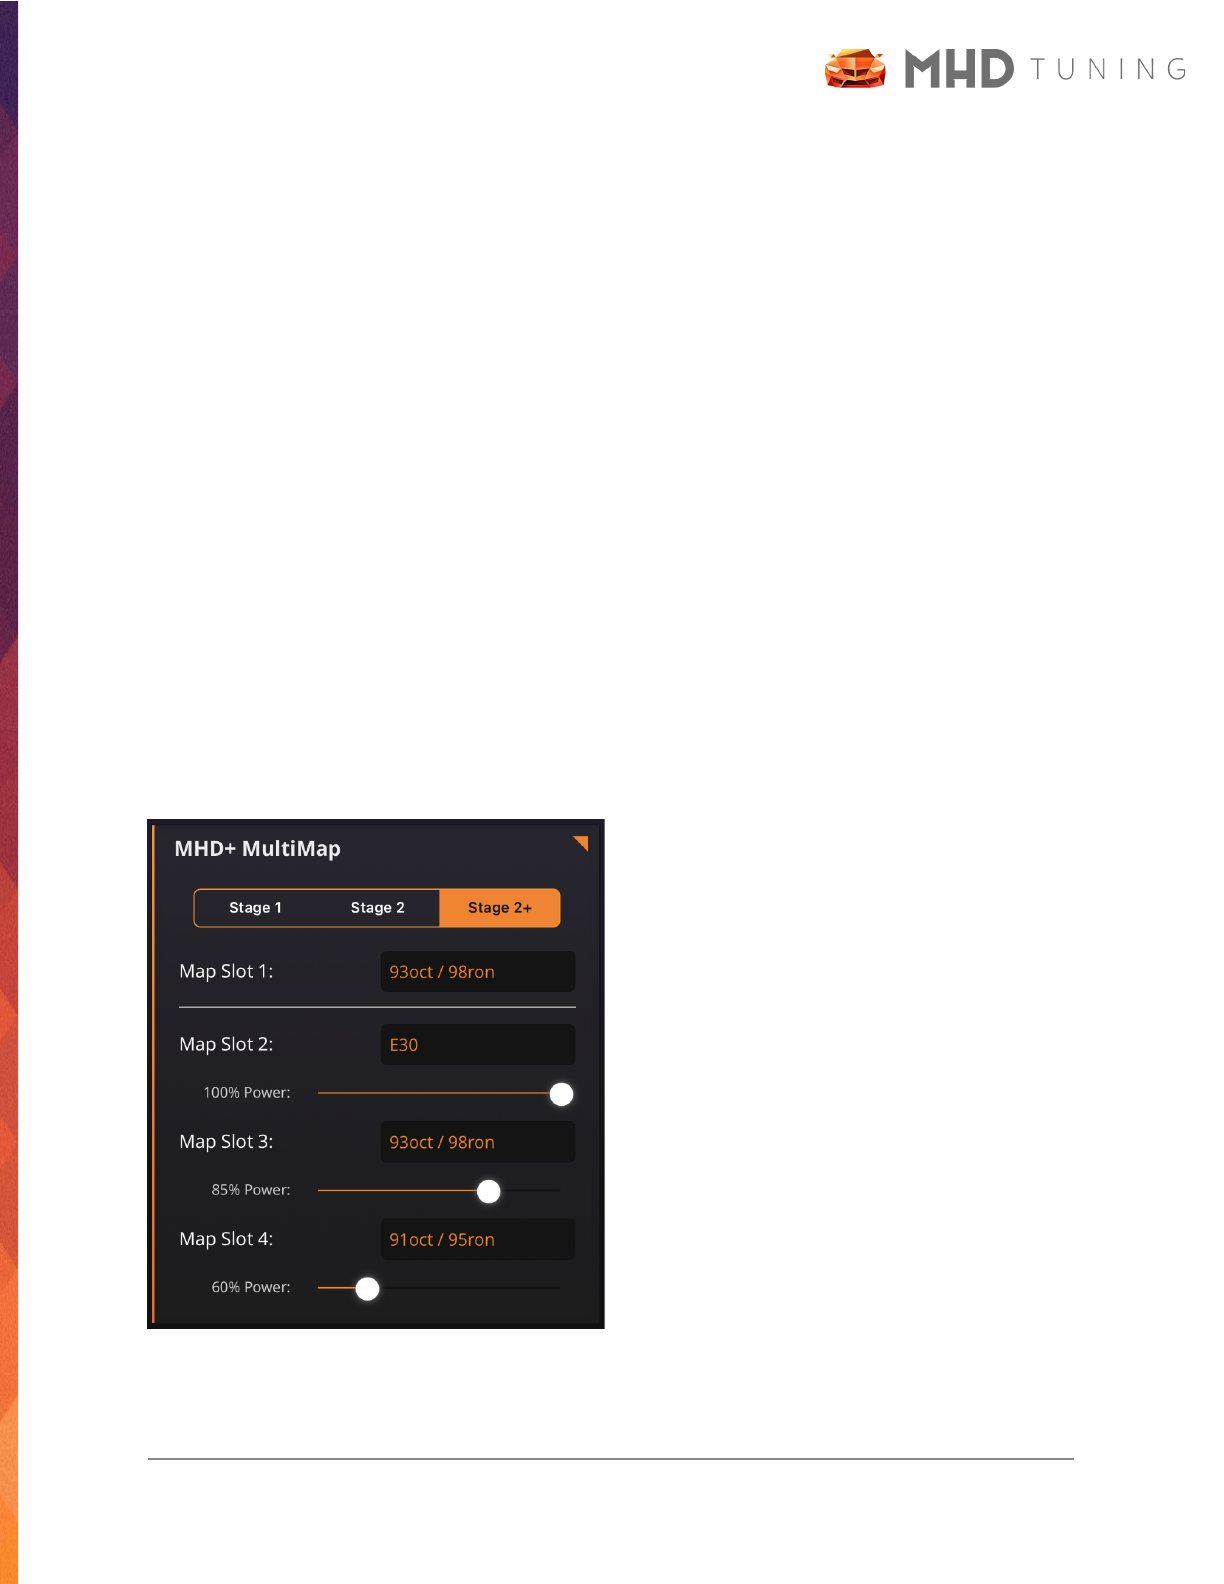
Map Switching
Map switching can be added to custom tunes by your tuner, or configured using our new OTS
MultiMap capability. This allows you to have up to 4 switchable maps that can be changed on
the fly in a few seconds without having to reflash the vehicle! This allows you to quickly change
between a daily map, race gas map, FlexFuel map (see below section) etc.
For OTS map switching, on the stage / octane selection screen you will see the following new
MultiMap section we’ve added:
First select which stage of modification is
appropriate for your vehicle. Then you are free
to select whichever octane variants you would
like per map slot.
In addition to the octane selections, you can
also use the slider to reduce the HP that each
map will make. This is very useful if you would
like to make your own valet map, lower power
map for cruising, etc.
NOTE: If you plan on using FlexFuel (on the
flash options screen, details in the FlexFuel
section below), all map slots should be filled
with non-ethanol, pump gas selections.
© 2022 MHD Tuning
43

Instructions
First, ensure your current tune has been set up for map switching, or you have flashed an OTS
MultiMap. Map switching is then performed in the car by the following steps:
● E-Series: press and hold the TIP button on the cruise control stalk for 2 seconds, or
pressing VOL DOWN and CH DOWN on the wheel at the same time.
● F/G-Series: press and hold either the cruise control SET/LIM button or the BC button for
2 seconds.
You will see the RPM needle jump to whichever map slot number you have currently selected
and the CEL will start blinking slowly.
Now to adjust the desired map selection you will:
● E-Series: use the cruise control stalk UP/DOWN, or CH UP/DOWN on the wheel
● F/G-Series: use the cruise control UP/DOWN rocker
To apply the selection (after which RPM needle will return to normal operation and the CEL will
stop blinking):
● E-Series: press and hold the TIP button on the cruise control stalk for 2 seconds, or
pressing VOL DOWN.
● F/G-Series: press and hold either the cruise control SET/LIM button or the BC button for
2 seconds.
General Info
● You can switch maps on the fly at any time: car running, driving, etc
● Your currently selected map is saved when the car is shut off and will be restored the
next time you start the car.
● Reflashing the car will reset the currently selected map back to slot 1.
● The currently selected map can be logged via our new Current Map parameter.
© 2022 MHD Tuning
44

FlexFuel
FlexFuel can be added to custom tunes by your tuner, or added as a flash option for a valid OTS
MultiMap (or single map on N54). This allows your tune to automatically adjust for any given
Ethanol content mix / blend you fill the car with. It is a true “set it and forget it” setup!
For OTS FlexFuel, you must first ensure you meet the requirements below. Next, you will want to
select and config a MultiMap tune (see details in section above). For FlexFuel, you should not
select an ethanol map in any map slot, as the ethanol blending is handled automatically with our
code. When you get to the flash options screen, make your ECA (ethanol content analyzer)
selection. You will see another checkbox option appear below it for FlexFuel. Check that and
then flash your map. Your car will now automatically adjust its tune based on the actual ethanol
content in your tank!
Requirements
● CANBUS based Ethanol Content Analyzer (ECA) Kit
○ We recommend our MHD Quick Install ECA
● N54 also suppor ts the traditional Motiv DMTL Wired ECA kit
● MHD Monitor License (in addition to Flasher license)
● OTS pump gas map and E85 map pack licenses (if not custom tuned)
Useful Logging Parameters
● Ethanol Content (CAN) - this is the ethanol content that is being sent to the DME from
your installed CANBUS ECA kit.
● Ethanol Content (Active) - this is the ethanol content that is currently being used in our
custom DME calculations. It will typically be equal to Ethanol Content (CAN) unless your
tuner is overriding the sensor value intentionally.
● Ethanol Content (Wired) - this is the ethanol content that is being sent to the DME from
your installed Motiv DMTL Wired ECA kit on N54
● Fuel / Load / Timing / Knock Interpolation - these values show you how the individual
categories are being blended between your pump gas and ethanol calibrations.
© 2022 MHD Tuning
45

MHD+ Menu System
On suppor ted MHD+ platforms (currently F/G-Series), entering into “mapswitch” mode is not
only just for mapswitch. It is actually a more advanced paged menu system, with 3 different
“pages” as of current release. You enter into the menu system the same way you did mapswitch
(F/G-Series: press and hold either the cruise control SET/LIM button or the BC button for 2
seconds). You will always enter on “page 1”, which is designed by a pattern of one CEL blink at
a time.
To change pages, quickly press the SET/LIM button or the BC button. The current page is always
indicated by the blink pattern of 1 / 2 / 3 blinks in a row. To exit the menu, press and hold again
like you did to enter. Page details are as follows:
Page 1 - Mapswitch
This is the normal map switch you are used to. UP/DOWN on the cruise control rocker will move
the RPM tach to your desired map selection. If you only have 1 active map slot, you will not be
able to move the tach from 1000 rpm. You will still have access to page 2 and 3 though.
Page 2 - Exhaust Flap Control
Page 2 allows you to control your vehicle’s exhaust flap on the fly. There are three settings you
can switch between (again using the UP/DOWN rocker).
● 0 rpm = OEM exhaust flap control, no forced override
● 1000 rpm = exhaust flap always forced open
● 2000 rpm = exhaust flap forced closed (note: this will only apply up until a certain load
threshold for safety)
Page 3 - Ethanol Content Quick View
Page 3 will show the current Ethanol percentage of your fuel (when using an appropriate
CANBUS ECA kit). 1000rpm = 10% Ethanol, up to 7500 rpm = 75% ethanol. If you need to see
E% greater than that, you should log it or place it on an MHD Monitor gauge.
© 2022 MHD Tuning
46
MHD Backend Flash + JB4 Flowchart
For specific information on stacking an MHD BEF with your JB4, please check the following BMS
forum links for your specific platform / engine:
● N54: https://n54tech.com/forums/showthread.php?t=29236
● N55-E: https://n54tech.com/forums/showthread.php?t=43151
● N55-F: https://n54tech.com/forums/showthread.php?t=51166
● B58: https://n54tech.com/forums/showthread.php?t=57432
● //M Models: https://n54tech.com/forums/showthread.php?t=54795
FAQ
Q. Can I test the connection before making a purchase?
A. Yes, you can test the connection by either going to the tab Codes > Read DME Codes, or
by opening the side menu and pressing My Licenses and verifying you see your VIN in
the top bar.
Q. Can I tune different cars with one license?
A. No, each license is tied specifically to a vehicle (VIN + your login method). Tuning a
different car requires purchasing new license(s).
Q. Can I tune multiple cars with one login account?
A. Yes, you can tune as many vehicles as you like with one login account. There is no limit
to the number of vehicles tied to one account.
Q. Can I transfer my licenses?
A. No, licenses are tied to your login account and VIN. They cannot be transferred to a new
login account or new vehicle.
© 2022 MHD Tuning
47

Q. Is a battery charger required?
A. A battery charger is highly recommended for Full Write (initial MHD install / uninstall). It
is also recommended Long Write (logic change) depending on your adapter speed. A
healthy battery will handle Map Write fine but a battery charger may still be needed if
flashing using a K+DCan cable.
Q. How do I take good data logs?
A. Press the tab Mon > Data Logging (ensure auto logging is checked). Stabilize around
2500 rpm / 3rd gear (4th on 8 speed AT) with DSC fully off. Quickly press the throttle to
the floor, shift at 6500rpm and 2-3 seconds after the shift release the throttle. Slow
down, stop the monitor. If you want us to review your log, then upload the log to
SpoolStreet using the in-app functionality or upload manually to www.datazap.me and
send us the link.
Q. I’m about to flash my car with an OTS or custom tune. What should I do before flashing?
A. Recommended upgrades include replacing spark plugs and ignition coils if they are old /
worn (10k miles for plugs, 30k miles for coils). If you bought the car used and it has
decent mileage and don’t know if they were changed or not, we recommend changing
them for peace of mind.
Q. I don’t have an FMIC installed on my car yet, is it safe to run one of the FMIC maps?
A. Yes, you can run one of the FMIC OTS maps, but it is recommended that you datalog,
ensure the car is not knocking, and that the IAT’s and fueling remain healthy. We advise
against using “one stage / step up” OTS Maps on cars without the recommended parts if
using for track days and sustained aggressive driving. USE AT YOUR OWN RISK. MHD
is not responsible for any damage done to your car using OTS Maps intended for
modified vehicles without the recommended upgrades.
Q. Do I lose my licenses if I delete the app or the Mobile device breaks?
A. No, the licenses are stored on our server and will always be linked to your login. You can
access your licenses on any Android or iOS device by using the same login.
© 2022 MHD Tuning
48
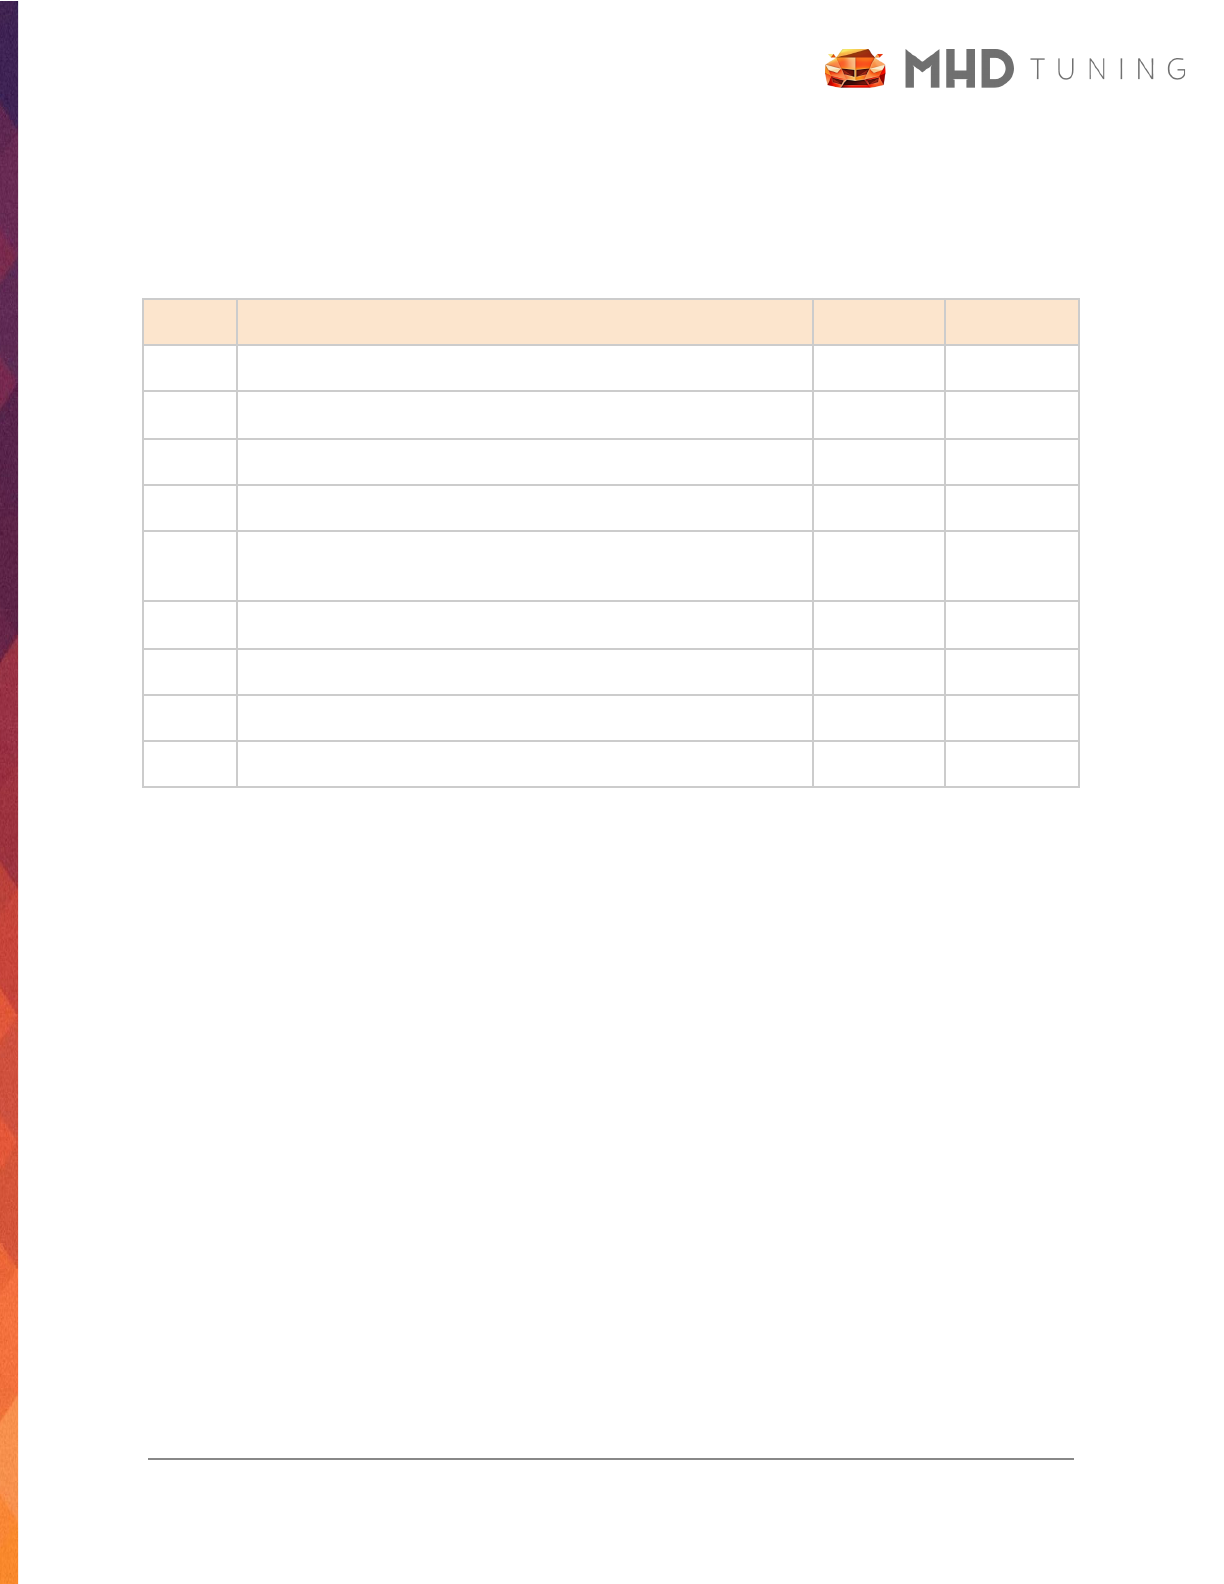
Revision History
Version
Notes
Date
Updated By
8.0
Initial creation of new user guide for 2.x apps
6/14/2020
Jake Y
8.01
Added details for new burble customization options
6/29/2020
Jake Y
8.02
Added S63 Supported list, iOS14 connection permission.
10/23/2020
Levan
8.10
Added MHD+ feature information, flash options
6/16/2021
Jake Y
8.11
Added N54 flash option “Adjust Throttle Sensitivity”
information
9/27/2021
Jake Y
8.12
Removed B58 support for CAN WIFI/Cable
1/07/2022
Levan
8.20
Expanded MHD+ information for all supported E/F/G vehicles
6/29/2022
Jake Y
8.21
Android Version 6, S58 Section
7/27
Levan
© 2022 MHD Tuning
49
