A Best Practices Manual for Using
Compressed Earth Blocks in Sustainable
Home Construction in Indian Country
U.S. Department of Housing and Urban Development | Office of Policy Development and Research

A Best Practices Manual for Using Compressed Earth Blocks in
Sustainable Home Construction in Indian Country
Prepared for
U.S. Department of Housing and Urban Development
Office of Policy, Development and Research
Prepared by
Thomas Bowen
University of Colorado, Boulder
May 2017
ii
Acknowledgments
The author thanks Mike Blanford at the U.S. Department of Housing and Urban Development,
Office of Policy Development and Research for the opportunity to contribute to the necessary
and expanding collection of information available to aid tribes in alleviating their troubling
housing circumstances. Mike was also instrumental in providing direct assistance with review
and editing of this manual’s contents, while maintaining a steady and encouraging demeanor.
The author also thanks JoAnn Silverstein and Rob Pyatt at the University of Colorado and the
native people of North America.
Disclaimer
The contents of this report are the views of the contractor and do not necessarily reflect the views
or policies of the U.S. Department of Housing and Urban Development or the U.S. government.
iii
Preface
Introducing innovative building products and processes is an important endeavor in all
communities. Combining that with the incorporation of housing sustainability, culturally relevant
values, and tribal collaboration with builders in Native American communities was the overall
goal of this project. The development and use of compressed earth blocks in the construction of
Indian housing provided an alternative to conventional construction materials and methods, and
provided culturally relevant materials to address community values for tradition.
This work was funded through a grant from the U.S. Department of Housing and Urban
Development (HUD), Office of Policy Development and Research. In recent years, HUD, along
with other federal agencies, has employed various approaches to provide resources and engage
tribes in community-driven solutions to address Native American housing issues. Innovative
building products aimed to be relevant to cultural values, on the one hand, may challenge the
traditions and cultural practices historically employed by the tribes’ housing leadership but can
also provide an opportunity to develop a construction process with increased resident
participation and communitywide engagement often associated with economic benefits for the
tribe.
This manual provides examples of community-driven processes used to incorporate traditional
tribal values while addressing both the immediate and future housing needs of tribal residents
and their neighbors. The manual demonstrates the use of compressed earth blocks as a local,
largely ubiquitous, and tribally manufactured resource for achieving quality, healthy, and
affordable housing, while also advancing the parallel goals of self-sufficiency, sustainability,
and energy independence.
iv
Contents
Historical Context ............................................................................................................................1
Mission and Vision ..........................................................................................................................2
Strategy ............................................................................................................................................5
Tactics and Logistics ........................................................................................................................6
Developing the Soil Resource ..........................................................................................................6
Technical Support and Funding .......................................................................................................9
Soil Testing ..................................................................................................................................9
Excavation and Hauling of Soil .................................................................................................10
Production of CEBs .......................................................................................................................12
The Crew ....................................................................................................................................12
Production Site ...........................................................................................................................13
Equipment ..................................................................................................................................14
CEB Curing and Inventory Control ...........................................................................................16
Design and Construction ........................................................................................................................ 18
Design Considerations for Building With CEBs ...........................................................................18
Overview of the CEB Construction Practice .................................................................................20
Foundation ..................................................................................................................................20
Building Up the Walls ................................................................................................................21
General Business Guidelines ........................................................................................................25
References ......................................................................................................................................26
Appendix ........................................................................................................................................27
v
List of Figures
Figure 1. The Risks to Human Life Captured by Current Building Codes ............................................ 3
Figure 2. Risks That Eisenberg Contends Should Be Incorporated Into Building Codes ...................... 4
Figure 3. Pinoleville Pomo Nation Identified Additional Risks Absent Current Codes ........................ 4
Figure 4. The Hydrated Lime Cycle ........................................................................................................ 8
Figure 5. Truck and Pup ......................................................................................................................... 11
Figure 6. Advanced Earthen Construction Technologies (AECT) MX20 CEB Mixer ....................... 15
Figure 7. AECT 3500 CEB Machine ..................................................................................................... 16
Figure 8. Showing Double Wythe Wall Diagram With Insulation Chase ............................................ 19
Figure 9. Overexcavated, Compacted, Filled, and Shaped Subfoundation .......................................... 20
Figure 10. Window Bucks Installed ....................................................................................................... 22
Figure 11. Orange Story Pole at Corner Bolted and Braced to Foundation ......................................... 23
Figure 12. Finished Bond Beam With Shed Roof Framing .................................................................. 24
Figure G-1. Scope (PTC) Triangle Showing Dependent Linkage of Project Management Factors ... 38

1
Historical Context
Compressed earth blocks (CEBs) are a natural infusion of modern technology with one of the
earliest elements of manmade structures: the mud brick or adobe block. CEBs are essentially
molded adobe blocks produced using mechanical compaction. Shaped and compacted earth was
used as early as 8300 B.C. as a construction material for the ancient city of Jericho, near what is
now Jordan.
1
Taos Pueblo in northern New Mexico is the largest surviving multistoried adobe
structure and the oldest continuously inhabited adobe site in the United States.
Historical construction practices, as with these two examples, were to use the best materials that
were available close at hand. People built their own homes as efficiently as possible.
Transporting substantial construction materials long distances or relying on sophisticated tools to
manipulate these materials was not practical. Earth or dirt, is both abundant and easily
manipulated into suitable structures. Current construction techniques and building materials
show little resemblance to those ancient practices. Nowadays, building products are often either
harvested elsewhere and trucked in from long distances or manufactured from materials that
would have been unrecognizable to our ancestors. “Technological advancements” remove the
local influence on what and how to build while adding significant costs to the bottom line of
projects. Developers, who build most houses today, maximize their profits by using and reusing
designs similar to one another and purchasing building materials in huge quantities. The new
building process has eliminated much of the regional diversity in housing types that had been
borne of a healthy reliance on locally abundant natural materials and designs that uniquely
equipped structures to respond to regional climate and other environmental influences.
Unfortunately for tribes, the drastic changes in housing production in the United States coincided
with increasing federal efforts to standardize housing across the tribal reservation system. During
the 1960s and 1970s, the U.S. Department of Housing and Urban Development (HUD)
sponsored a housing construction boom in Indian Country moving many tribal members into
culturally irrelevant subdivisions of carbon-copy tract homes. By 1996, the federal government
had criticized the outcome of their effort in a study.
2
In response, Congress authorized HUD to administer and provide housing assistance to Native
American tribes through a block grant program under the Native American Housing
Assistance and Self Determination Act of 1996 (NAHASDA).
3
This drastically changed how
housing was created and managed in Indian Country, with HUD now providing tribes with the
necessary funding and the tribes determining the means and methods of providing housing for
their members. Using NAHASDA and its subsequent amendments, tribes are able to consider
alternatives to conventional construction methods and respond to culturally relevant
community-driven needs and values in their own traditional and historic ways. In the years
since NAHASDA went into effect, the partnership between HUD and Native American
housing authorities has been strengthened, due to many successes at the tribal level and grant
1
http://www.astm.org/Standards/E2392.htm.
2
http://www.gpo.gov/fdsys/pkg/GAOREPORTS-T-RCED-97-105/pdf/GAOREPORTS-T-RCED-97-105.pdf.
3
http://www.portal.hud.gov/hudportal/HUD?src=/program_offices/public_indian_housing/ih/codetalk/nahasda.

2
allocations to tribes. In 2014, Indian Housing Block Grants (IHBGs) and Indian Community
Development Block Grants (ICDBGs) combined for more than $725 million of assistance.
4
HUD is also expanding opportunities for tribes by actively partnering with other federal agencies
on behalf of tribal housing interests. In 2014, HUD’s Office of Native American Programs
collaborated with the Bureau of Indian Affairs (BIA), the Indian Health Service, the U.S.
Departments of Agriculture and Energy, the Federal Emergency Management Agency, and the
Environmental Protection Agency to promote healthy, sustainable solutions for the housing
issues in Indian Country.
5
The changes in how federal agencies interact with tribes offer tribes
the opportunity to explore the best options in housing design and construction and develop their
own housing programs. Such programs can expand the self-sufficiency and sustainability of the
tribes while honoring the unique values and cultural traditions that secure their identity.
This manual is a product of HUD’s Sustainable Construction in Indian Country Small Grant
Program and presents information and guidance for the production, design, and construction use
of CEBs as a viable solution for the long-term housing needs on Native American reservations. It
is intended for tribal organizations familiar with home construction on reservations, but less
familiar with the process of creating a tribally run home construction enterprise. It advocates
sustainable construction practices that leverage the benefits of available local resources and labor
while inviting broad community participation in the process.
Mission and Vision
Sustainable building practice requires the consideration of factors that go beyond the traditional
meanings of safe and healthy construction. Such an approach demands a commitment to
internalizing the intended and unintended effects of a construction project and using them to
inform the decisionmaking process for what, where, and how to build. First, however, builders
should address the question of why to build by enlisting the input of the community and
discussing the specific influence that home construction projects can have on the local economy,
infrastructure, transportation, and surrounding area. Incorporating the opinions of the whole
community ensures that the project can reflect the culture, tradition, norms, and values that are
the core of the tribe’s identity. The outcome of this effort should yield more than just a home
design—that work comes at a later time. The output of guiding principles, standards, and codes
will govern the way in which homes are designed and constructed and should speak to the ideals
that preserve the integrity and values of the tribe.
Tribes are uniquely positioned to leverage their sovereignty to develop building codes that are
more reflective of who they are and what they wish to become, while integrating consideration
for current and future residents and their neighbors. Tribes, through a sustainable housing
project, can seize the opportunity to address the larger issues that are at the core of many of their
population’s struggles. Whether the inherent issues are underemployment because of lack of
4
$650 million for IHBG and $77 million for ICDBG grants in 2014. See
http://www.portal.hud.gov/hudportal/documents/huddoc?id=NAHSINGBLOCKGRANTS.pdf and
http://www.portal.hud.gov/hudportal/HUD?src=/program_offices/administration/grants/fundsavail/nofa14/icdbg.
5
http://www.portal.hud.gov/hudportal/documents/huddoc?id=NAHSINGBLOCKGRANTS.pdf.
3
industry, a population scattered across a large reservation, or a combination of influences not yet
defined, the reality is that the imperative and solutions to correct the housing problem in Indian
Country rest with the tribes rather than with the agencies that dispense federal funds.
In 2011, the Pinoleville Pomo Nation (PPN) partnered with the Developmental Center for
Appropriate Technology (DCAT) to create their own building code by rewriting existing
building codes. PPN enacted a community-oriented review process to engage the broadest
possible representation of tribal values. An excerpt from the draft reveals a strong emphasis on a
pragmatic interpretation of sustainability:
This approach is an effort for the tribe to create its own standards that permit the highest
degree of design freedom, while also protecting health, safety and well-being of its
multiple constituencies: current residents and neighbors, to be sure, but also future
generations of people and nonhumans that share local ecosystems with us. We realize that
tensions may arise between the comfort and security of present residents and our
commitment to leaving a healthy and sustaining world to future generations of people and
nonhumans. We embrace these tensions and seek ways to balance fairly the burdens and
opportunities associated with design choices. We also believe many design elements—
old and new—can reduce the tension to near zero. That is, we can have safe, healthy,
environmentally sustainable, culturally appealing buildings now and preserve the same
opportunity for future generations, if we design thoughtfully.
6
DCAT is a nonprofit organization based in Tucson, Arizona dedicated, in short, to promoting
sustainable construction. In 2010, DCAT Director David Eisenberg gave a presentation
highlighting the limited scope of current building codes at an International Code Council
workshop in Boston, Massachusetts.
7
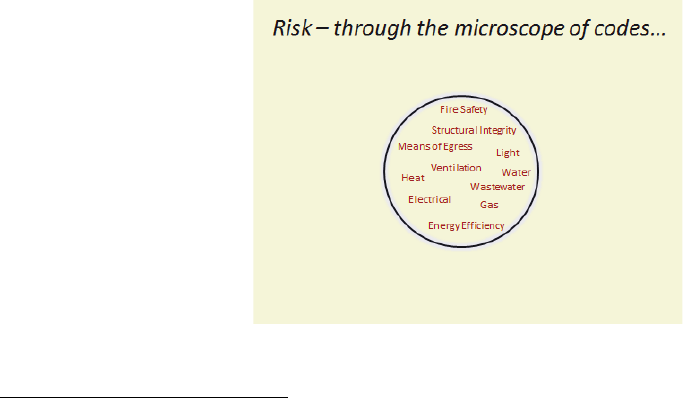
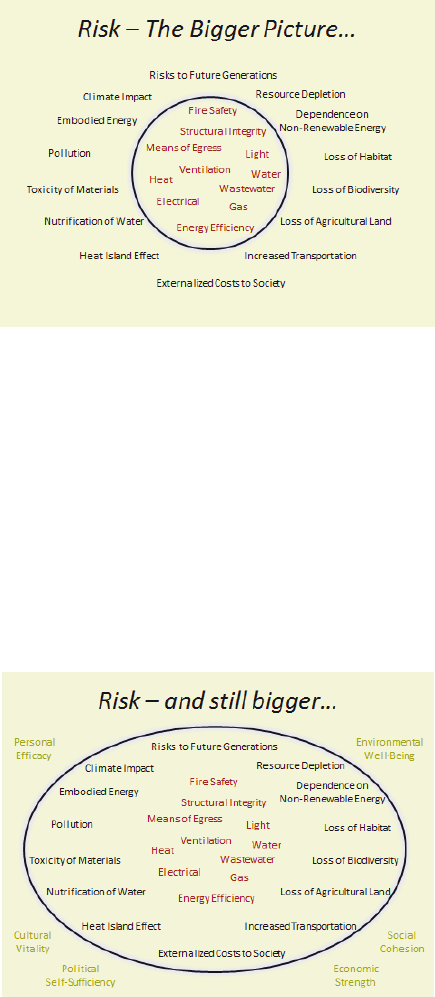
The images that follow, shown as figures 1 and 2, are
drawn from the material in that presentation.
Figure 1. The Risks to Human Life Captured by Current Building Codes
6
http://www.epa.gov/region9/greenbuilding/codes/pdfs/pinoleville-green-building-code-draft.pdf.
7
http://www.dcat.net/about_dcat/announcements.php.
4
Figure 2. Risks That Eisenberg Contends Should Be Incorporated Into Building Codes
These representations illustrate the disconnect between the risks managed by currently accepted
building codes, like the Uniform Building Code (UBC) and International Residential Code
(IRC), and the larger, externalized, and hidden risks inherent in typical construction practices. As
Eisenberg relates it, the first image depicts all the risks the building may pose to the occupants
and others nearby. The current building codes are designed to mitigate these risks. The second
image (figure 2) illustrates the impacts the building has on the larger community, the
environment, and future generations that current codes do not cover. The PPN added to the
image by including aspects of their tribe’s welfare that were put at risk by the limitations of
current codes, shown in green in figure 3.
Figure 3. Pinoleville Pomo Nation Identified Additional Risks Absent Current Codes
How does this concept fit within a vision of a self-sustaining tribal construction enterprise? Until
very recently, the IRC or UBC did not include CEBs and other earthen building materials (such as
straw bale and cob) and techniques. These construction materials and methods, however, are
perfectly capable not only of meeting or exceeding those codes, but (more importantly) any possible
codes that could be implemented to incorporate the broader risks identified in figures 2 and 3. For
many years, tribes either received or were forced to construct houses conforming to conventional
building codes (for example, UBC and IRC.). More recently, the urgent need for shelter, coupled
with limited funding, has manifested in a pick-and-choose approach to the application of building

5
codes on reservations. This approach has not resulted in better quality homes. Resulting structures
often have reduced functionality, present a higher risk to the occupants, and deteriorate at an
accelerated rate. Fortunately, major code authorities, like the New Mexico Earthen Building
Materials Code,
8
have now adopted standards for earthen construction practice, and many architects
and engineers are familiar with the appropriate design requirements that facilitate speedy code
approval and a smooth construction schedule. Before undertaking the creation of a housing
construction entity or just contracting for home building services, the tribe will better serve its long-
term interests by contemplating how such efforts fit into the vision of their future and how choices
made today could sustain them.
9
Strategy
More directly, you should focus your early strategy on identifying the list of specific project
deliverables within the scope and assessing your internal capacity to meet them. Any and all gaps
can be met by renting expertise. For any housing project, you will need design and engineering
expertise, project management, and the usual construction trades, such as excavation,
framing/masonry, electrical, and plumbing. Hiring the competency within your tribe is the best
solution. Absent that opportunity, you can leverage contracting services from outside to further
support the tribe through an apprenticeship or internship agreement with the suppliers of these
services; however, outsourcing should only be a temporary solution. You can incentivize
contractor cooperation with any mentorship program through reduced Tribal Employment Rights
Ordinance fees or by citing it as a hiring preference within the procurement process. The entire
process is intended to require less specialization and technology than other building practices
(because the focus is particularly on using CEBs) and is therefore more conducive to experiential
(on-the-job) learning and training.
When starting a new CEB housing project, it is important to follow a manageable strategy,
working on one house at a time. It is ill-advised to seek initial funding to build 8 or 10 CEB
houses before you have built 1. This concept relates to the part on measuring success. The
project sponsor will measure your success on how many of homes you have completed, though
you might measure your success on a more intrinsic level. For example, you might feel
successful having just figured out the optimal crew composition during construction on your
third house.
I advise completing one CEB house before starting or even anticipating another. Then you
should assess how much that first house really cost, how long it actually took, which design and
field modifications you will keep, which contractors you will retain, and what else you would
change for the future. The next project will need a new plan that incorporates the knowledge
gained from reviewing the first.
8
http://164.64.110.239/nmac/parts/title14/14.007.0004.htm.
9
http://www.epa.gov/Region9/greenbuilding/codes/pdfs/tribal-green-building-code-template-draft-admin-code.pdf.

6
Tactics and Logistics
When building with CEBs, clear advantages exist to also producing the CEBs as part of a cost-
reduction, benefit-enhancement approach. The tribally produced CEBs could then be sold to the
tribal construction entity (provided tribes follow federal procurement rules if using those funds).
In such a case, it would be necessary to separate the CEB production and CEB construction
entities operationally and fiscally, while also ensuring that pricing is reasonable and negotiated
ethically and transparently. The following list contains many of the benefits to producing and
building with CEBs simultaneously.
• The main ingredients of CEBs—sand and clayey soil—are often readily available on or
near your project site, significantly reducing transportation costs.
• You have control of the supply of raw materials and the manufactured CEB products.
• Sand and soil are nontoxic elements, which produce healthier homes.
• CEBs are mold, insect, fire, and rodent resistant, unlike hollow-wall constructed homes.
• CEBs have a low rate of thermal conductivity, meaning they are generally warmer in the
winter and cooler in the summer, reducing the energy needed to control the indoor
temperature.
• CEB houses are sturdier and lower maintenance than most other homes, which is also
true compared with adobe homes. The uniform compaction and dimension of CEBs
improves durability and flexibility of use over adobe blocks.
• CEBs are generally more energy efficient to manufacture than cement-based concrete
materials.
• Construction with CEBs requires minimal skill and few tools, and masonry is an ancient
and relatively common building technique; this makes CEB construction suited for do-it-
yourself builders and self-help construction projects.
• Producing CEBs creates local jobs and increases money circulation on the reservation.
Walls are one of the most expensive parts of the home, accounting for 20 percent or more
of the total home cost.
10
Insourcing critical infrastructure builds capacity and spurs
additional economic growth.
• These economic and environmental sustainability advantages make CEB projects more
attractive for funding agencies to sponsor.
Developing the Soil Resource
Typically, workers form CEBs by combining angular sand aggregate (40 to 70 percent), clay soil
(15 to 60 percent), and water (8 to 12 percent). They then mix the dry components, add water,
and thoroughly remix before putting the contents into a mold. Workers then compressed the
mold either manually or hydraulically to form a block. In wetter climates, adding a mix
proportion of cement of lime at 4 to 6 percent stabilizes the CEBs; adding Portland cement or
hydrated lime reduces the capacity of the CEBs to absorb moisture, which in turn reduces their
vulnerability to deterioration (Minke, 2000).
10
http://www.nahb.org/generic.aspx?genericContentID=169974.

7
The internal mechanics of the block, without going into too much technical detail, rely on the
binding performance of the clay for the form and structural integrity of the block. Structural
integrity is not to be confused with the strength of the block—sand largely provides the CEB’s
strength. The grains of the two different materials, each of varying sizes, mixed to a wet (damp,
not dripping) oatmeal consistency cling together in a slightly sticky bond. This mix is essentially
the same as adobe. Compression at 1,200 psi or so in a mold shapes the block and tightens the
interior binding between the clay and sand grains at a microscopic level—this turns adobe into a
CEB. The CEB cures in a moist climate for 28 days (to encourage a more gradual rate), allowing
the excess water from the original mix to evaporate, which leaves behind tiny air pockets.
In dry climates (with low relative humidity or minimal rain or snowfall), unstabilized CEBs will
likely perform well with minimal regular maintenance, required at roughly the same frequency as
house painting. In more humid or frequently wet climates, these same blocks will absorb surface
and ambient moisture. This will cause the block to swell slightly (it is a good general rule to
assume all clay swells) and subsequently shrink upon drying, potentially increasing the size of the
voids in the block. Repeated often enough, the pattern will eventually lead to cracking, spalling,
and deterioration of the block and the building structure. In the case of a wetter climate, stabilizing
the blocks with lime or cement is mandatory. At 4 to 6 percent by weight, the added hydrated lime,
for example, initiates a chemical reaction with the clay and water that significantly reduces the
short- and long-term moisture absorbing and retention capacity of the soil. With stabilized CEBs
(SCEBs) it is very important to slow the curing process by maintaining a moist environment, either
in a controlled climate space or by misting them with water multiple times daily and keeping them
covered with waterproof material. The stabilization process may produce CEBs that work even
with highly expansive clays. You will need to include hydrated lime in selection of the soil, but the
increased durability of the CEBs should balance the cost.
Cement is a popular choice for the stabilization of clay soils, particularly in the United States
where lime is less familiar to the building trades, and as such, is not as readily available.
Unfortunately, cement production (actually its precursor, clinker) is responsible for significant
global carbon dioxide (CO
2
) emissions, and therefore, is not considered an environmentally
sustainable product.
Alternatively, hydrated lime, while emitting CO
2
during the burning phase of its production,
reabsorbs equivalent amounts of CO
2
from the atmosphere during carbonation, resulting in a
carbon-neutral lifecycle. Figure 4 depicts the typical hydrated lime cycle process.
11
11
http://www.naturalhydrauliclime.com/customer/main/what_is_lime.php?display=what_is_lime.

8
Figure 4. The Hydrated Lime Cycle
Sand and clayey soils are generally abundant throughout the United States. The tribal offices of
natural and cultural resources may have information on locating a sufficient resource of these
materials on the reservation. Some sites may be off-limits for historic preservation or other
reasons. When determining locations for preliminary soil sampling, I advise considering the
proximity to roads suitable for transporting frequent heavy loads (avoid hospital and school
zones and high traffic areas) and proximity to active floodplains for the obvious reasons, but also
because these areas tend to have high levels of silty soil and organic materials that are not
suitable for CEBs. When you have a choice of location for your mining operation, consider
aesthetics, possible impact to neighbors, and future use or value of the site. From an economic
perspective, locating the mine site close to your CEB production facility could save substantial
transportation costs. It may be important to consider the color of the local clay for the CEBs you
plan to use in your project. The list of variables influencing selection of a primary site warrants
multiple sampling sites, and it is necessary to have a costly closure and reclamation plan for each
potential site. A minimum of five initial soil sample locations is advised.
It is possible to make CEBs at the construction site. Proximal production would save
significant transport costs, but depending on the size of the project and site, it may also have
disadvantages. The footprint for a block-making operation, even on a single house scale, is
substantial. Depending on the design, a 1,200-square-foot house can require 4,500 to 5,000
CEBs, 90 cubic yards of material (clay and sand), storage and handling space, plus mixing
space, block-making space, and a manufactured CEB curing area (60 to 90 pallets depending
on pallet quality). The soil excavated for the house’s foundation may be suitable for CEB
production, which strengthens the argument for onsite manufacture. Consider other factors
like shelter from weather so the mix does not get wet, possible delays in other onsite
construction because of limited space, security fencing of the production yard, and
reclamation of the production and soil “mining” area if the soil is not from the foundation.
Give due attention to quality and inventory control. Deviation from proper mix ratios to
“stretch” the available quantities further, due to limits to the volume of site-based material, is
ill advised. This warning is not intended to discourage onsite production of CEBs, but to

9
serve as a guide when considering the various factors and to avoid reducing the overall
feasibility of the block-making approach selected and the progress of the home-building
project.
Technical Support and Funding
Using a skilled geologist to study maps of the reservation’s geography and topography and
previous studies or current large-scale excavation work saves significant time and money.
Fortunately, tribes already have a federal partner that will provide preliminary site identification
and initial soil classification at no cost.
The Division of Energy and Mineral Development (DEMD), based in Denver, Colorado, is a
specialty branch of the office of the U.S. Assistant Secretary of Indian Affairs.
12
DEMD’s
mission is to assist tribes with development of their mineral and energy resources by providing
evaluation, business planning, and marketing expertise to advance tribal goals. More specifically
related to CEBs, DEMD offers the use of experienced geologists to locate the clay and sand
resources on reservations and provides estimates on extraction costs and mining plans for further
development. In addition to these free services, DEMD offers a broader project development
funding opportunity through its Energy and Mineral Development Program (EMDP) grant.
DEMD experts will assist the tribes in attaining these funds to develop clay and sand resources to
sustain long-term production of CEBs. The EMDP is relatively straightforward; many of the
technical justifications are usually detailed in the preliminary mineral study provided by DEMD.
As a direct technical resource for mineral, oil and gas, and alternative energy exploration,
DEMD personnel are both familiar with and comfortable funding expert consultants through
their grant vehicles to ensure tribes have access to the highest quality assistance available.
DEMD personnel have many years of experience with all phases of CEB housing projects, and
any tribe considering CEBs as a solution to their housing issues should contact the department.
Soil Testing
A synopsis of the recommended soil identification and testing process follows:
• Contact DEMD to perform preliminary materials evaluation at multiple locations—
recall that soil properties will vary from site to site as will extraction costs related to
access, reclamation, and transportation. So the number of different sites sampled should
be roughly equivalent to the number of these significant variables influencing the final
selection.
• A geologist will extract about 200 pounds of clayey soil from minimum five sites for
further laboratory testing. Many of the soil tests and subsequent experiments on sample
CEBs are destructive and soil materials cannot be reused. Provide sufficient material to
the lab so the testing process is not interrupted and the sampling integrity (site specific)
is not compromised.
12
http://www.bia.gov/WhoWeAre/AS-IA/IEED/DEMD/.

10
• A qualified laboratory will perform systematic soil analysis on all samples determining
initial moisture content, classification, plasticity index, and hydrometer tests for finer
grained soils (clay content).
• Using samples from the remaining viable sites, the laboratory will produce CEBs with
varying ratios of clay soil, sand, and water,
13
with some samples including lime or
cement as stabilizers. These samples are cured and performance tested at predetermined
intervals over the course of 28 days (usually after 7, 21, and 28 days).
• Approximately 250 to 350 CEBs will be made and tested for wet and dry compressive
strength, freeze/thaw durability, moisture absorption capacity, and modulus of rupture,
along with others depending on the analysis of specific sample performance.
• Using preliminary laboratory results, the geologist will then develop and implement a
more comprehensive subsurface sample collection plan, which will include preliminary
mine planning, permitting, and extraction/excavation site layout.
• The conclusion of the analysis of the test data will include a ranking of the sites based on the
quality of the material and the preliminary cost to produce stabilized or unstabilized CEBs
from each site. The economic assessment at this phase is limited to the information from the
test data. Subsequent economic analysis (typically performed by DEMD) will incorporate
specific mining, hauling, reclamation, and yield estimates from each suitable site.
A testing matrix developed by researchers at the University of Colorado is provided in appendix A
(Krosnowski, 2011). Sand generally requires less rigorous testing, although knowledge gained
from visual inspection should be supplemented with a simple grain size sieve analysis to
determine its grade. Sand that is too fine, too coarse, or too similar in grain size throughout the
sample is unsuitable for CEB production.
Excavation and Hauling of Soil
In most cases it will be necessary to retain a contractor to perform the mining of the soil and
subsequent reclamation of the pit. Before that, you must obtain a bulk sample permit through the
regional BIA office following a National Environmental Policy Act
14
review of the site for
environmental compliance and also, appropriately, a tribal archaeological review. To justify the
extent of paperwork, 1,000 cubic yards is a reasonable minimum sample, although the upper
limit is 5,000 cubic yards. Depending on the ratio of clay soil to sand you determined for your
CEBs, this volume of material, combined with the proportional amounts of the other ingredients,
will yield about 20 houses worth of CEBs.
13
A note on water content of CEBs: Water is a critical factor affecting the long-term performance of CEBs. A mix
too wet will leave excessive void spaces with evaporation increasing the potential for moisture absorption at a later
time and weakening the compressive strength of the block. Too little water inhibits the binding competency of the
clay and may result in poor internal cohesion and block density. The lab tests will identify optimal water content for
manufactured CEBs. In the field, outside the controlled climate of the lab, water ratios must be adjusted based on
production site characteristics such as relative humidity, dry soil storage wind and sun exposure of the mix, and
quality of mixing equipment because poorly kept equipment can influence volume calculations.
14
http://www.bia.gov/cs/groups/xraca/documents/text/idc009157.pdf.
11
Although this permit process follows its bureaucratic course, you should then seek a qualified
mining contractor and define the SOW. The contractor’s SOW should essentially follow the
14-point Bulk Material Sampling Process Guide found in appendix B. Define the SOW to
address specific conditions relating to material locations, transport routes, and other local
concerns and considerations. It is important to insist on performing any soil and sand screening
at the mine site, thus paying only to transport the useable material to the CEB production plant
and reserving the “waste” for later use as mine fill and reclamation material. (Both soil and sand
should be screened to 1/4 inch minus for optimal mixing and binding, and sand should be of
fractured face rather than rounded aggregate for CEBs.) In addition, qualifying the contractor
selection by their experience in onsite material separation is a great benefit. A skilled excavator
can significantly limit the waste material being removed, focusing only on the soils valuable to
your project, thereby reducing the amount of time and expense in the screening process. Include
specific language related to experience and capability that help achieve your efficiency goals in
the scope for bid documents included in the procurement process. By the same token, it may be
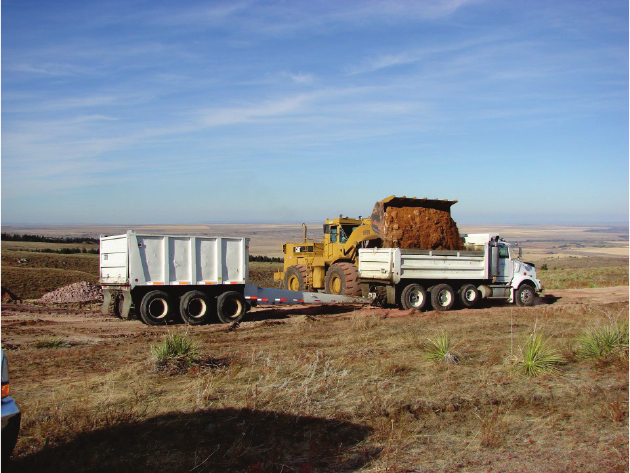
worth requiring the use of a pup trailer as shown in figure 5 or identifying a minimum haulage,
consistent with roadway or bridge capacity, to reduce the number of trips from mine site to plant.
Mileage charges are often the bulk of the costs for hauling. Alternatively, if storage space at the
plant is limited, leaving the soil secured at the mine site and arranging for loading and delivery
through the Tribal Roads Department or another local contractor interested in “fill-in” work
during slow periods might serve you well. Determining your requirements during this stage of
the process with the contractor providing the services will make managing your project budget
less stressful.
Figure 5. Truck and Pup
12
Production of CEBs
The Crew
Having found the right soil and determined the best mix or recipe, you will then need to
develop the production facility, train the crew, and acquire the equipment. The crew is the
most important piece, so this is the logical starting point. The production lead should be hired
first, as that position requires specific experience with machinery, crew supervision, and
ideally, working with production schedules and budgets. The background and work history of
the production lead will help with the recruitment and hiring of the remainder of the crew. In
general, a competent, well-organized, and motivated crew of six can produce between 1,500
and 2,000 CEBs per day using a single hydraulic block-making machine. Although this level of
efficiency is achievable and economically desirable, the more important objective is quality,
rather than quantity. In masonry, a wall is only as good as its weakest brick (or CEB, in this
case)—a block will perform only as well as the block it is stacked on permits. The process of
making CEBs is simple, but not easy; the hardest part is not permitting small errors to
compound into larger, more serious ones. For this reason, it is important to invest the
appropriate time and energy into selecting the project’s labor resource, on a similar scale to the
facilities and equipment. Recall that one of the goals of the project is to expand employment
opportunities on the reservation when making your selections.
Although CEB manufacture is a labor-intensive job, brute force alone will not produce a quality
product. Following a structured process, taking all the steps in the right order, and insisting on
quality control at each stage of the operation is the safest way to ensure that the CEBs produced
belong in tribal homes. Consistency in the mix is one of the most crucial elements in maintaining
the high quality of CEBs produced. The ratios of the mix components and the thoroughness of
the mixing should be double-checked as a matter of procedure. A poorly mixed block can look
just like a good block coming out of the machine—problems may not show up until the CEB has
been used in a home’s wall. Responsibility for CEB production oversight is best assigned to
someone not prone to seeking shortcuts in their work. Appendixes D and E include a list of
recommended roles and responsibilities for a CEB manufacturing team.
An optimal production crew size is six to seven people: three people on the CEB maker; two
people performing the bulk mixing and loading of the batch mixer (where final water and lime
or cement is added); and one person wrapping, labeling, and recording batch numbers, dates,
and additional information for inventory control, and moving pallets to the curing location. An
optional seventh crewmember could be responsible for quality assurance by testing blocks
from random batches, ordering supplies, and filing in if production levels justify the added
expense. While one of the goals of the materials manufacturing/construction project is to
increase employment on the reservation, overstaffing with the sole purpose of employing
more workers is counterproductive to this objective and the larger mission of sustainability
and self-reliance. Operational efficiency will ultimately lead to greater employment, but this
can only be accomplished if the project output (benefits) matches or exceeds the project
costs. You should achieve these employment goals through long-term job security and career
opportunity rather than by providing temporary pay to more workers. In addition,
overstaffing can result in reduced individual performance and increased downtime,
negatively affecting crew morale. If the CEB plant is perceived as providing only temporary

13
jobs with few future prospects or hope for advancement, the project will attract only
applicants seeking that type of work. This approach is not the foundation of a sustainable
business enterprise.
Cross training, interning, and apprenticeship should be the centerpiece of your human resources
investment plan. It is far cheaper to keep current staff than it is to hire and train new employees.
Turnover in a workforce is inevitable. Rotating the crew through all work facets and providing
instruction and opportunity for them to use and to become proficient with all the equipment can
minimize the cost of attrition.
Expanding the skill set of your crew and encouraging them to teach and train others through
internships and apprenticeships improves their own knowledge, competency, and value, while
increasing their loyalty and commitment to the project. At the same time, you will be identifying
future crew prospects and spreading the benefits of the project more widely throughout the
community. The most successful profit-oriented businesses recognize that it is far cheaper to
retain quality employees through benefits, perks, and incentives than to recruit, hire, and train
new ones. Though the budget may not be able to support increased wages, ensuring a safe
working environment with acceptable facilities and conditions and offering increased
involvement in achieving the broader objectives of the project are indications to the crew of how
valuable it is to the overall mission. In essence, your projects goals should align with those of
your employees and vice versa.
Production Site
When selecting a site for CEB production, it is important to consider the effect of distance on the
cost of transporting both of the raw soil materials to the facility and the final product to the home
sites. Consider the quality of nearby roads and their predominant use (it may be better not to
locate in a school or hospital zone, for example) and access to sufficient power and water to
support both the CEB production and the maintenance of the equipment and facility. An office
area equipped with a small lab and typical business supplies for coordinating and tracking
payroll, reporting, and inventory control on the production site keeps the management and crew
working together. Nothing seems to poison a crew’s moral faster than the idea that management
has substantially better working conditions than they do. By the same token, demonstrating
solidarity and a commitment to working beside a crew, and getting your hands dirty, can inspire
peak production. It enables better monitoring and adjustment toward improved efficiency.
The production yard will function much like a traditional brickyard or timber mill.
15
An ideal
yard would be 300 by 300 feet, leaving plenty of room for a circular unloading and loading
corridor around the perimeter of the production and handling area. If possible, the design should
include a dedicated entrance and a separate exit. It is better to off-load and store raw material
close to the entrance and to store finished CEBs toward the exit, with a loading platform in place
to expedite the transfer. Loading CEBs will take longer than the dumping of the soil and sand, so
set up an area outside the traffic flow in the yard. Your onsite capacity to store material and
finished CEBs is vital for managing site access and traffic pattern. An important material storage
concern is sheltering the soil, in particular, from excess water. Store only the material you are
15
http://makebricks.blogspot.com/2012/11/brick-making-yard-layouts.html.

14
capable of keeping covered, otherwise, too much time and (paid) effort will be spent trying to
dry out the soil to the proper water content for the mix. In addition, the mixing area and CEB
production machines should be near the end of the site where your material is stored, and
finished product should flow toward the other end of the site. You should cover this area as well
to protect the machine, the mix, and to minimize inefficiencies due to adverse weather effects on
the crew. Laying out the yard carefully in advance of material delivery and equipment setup will
prevent moving material within the site more than necessary, saving time and money.
Equipment
The process of making CEBs is essentially manipulating loose soil into compacted blocks. This
process, of course, has been done by hand for millennia. Alternatively, using the advantages
gained through hydraulic power and diesel-fueled machinery can dramatically increase the
production rate. It is a safe bet that most U.S. funding agencies support a more modern pace of
manufacturing to supply an equivalent pace of home construction. A group of 20 houses require
about 100,000 CEBs. At a conservative estimate of 1,500 CEBs per day and accounting for
downtime of equipment and crew and setup you will need nearly 4 months of steady efficient
production to achieve this rate of production. If you have experience with similar endeavors, you
might anticipate the unknown but all-too-likely unscheduled interruption, and thus, may choose
to temper your performance commitment. A reasonably robust production schedule warrants
taking advantage of modern material handling equipment and higher yield CEB machinery.
Handling the soil is best achieved using common landscaping and excavation equipment like
Bobcats and small tractor loaders. The Bobcats can be accessorized with removable forks for use
with pallets also, which reduces the initial investment burden. A robust production scale will still
require two Bobcats, with one supporting the mixing and loading of raw soil and the other
moving pallets of manufactured CEBs from the machine and loading CEBs for homesite
delivery. You will need a lift at the home site to unload also. If transporting a forked Bobcat
from the plant to do this work, consider timing the delivery so no interruption in production
occurs. I advise that the course dry mixing of clayey soil and sand with the Bobcat take place in
an area near the block-making equipment, preferably on a slab rather than dirt ground to avoid
scraping organics into your mix. Proportional mix ratios should be checked frequently as using
Bobcat buckets (that is, three Bobcat buckets clay to one Bobcat bucket sand) invites potential
error —the mix design is based on weight ratios rather than volume. It will be important to verify
the relative yard weights of Bobcat buckets of clay and sand.
16
CEB manufacture at production scale does require some specialized equipment. After combining
the dry clayey soil and sand, this mix should be loaded into a mechanical mixer to which the
machine or workers can add the proper ratios of lime or cement and water. Quality mixers have
direct water feeds and a meter to measure the volume. See figure 6 for an example. Typical CEB
mixers will have a built-in auger that evenly distributes the ingredients and then expels the mix
through a chute at or near the bottom. Modifying the positioning of the mixer by elevating it or
16
Yard weight refers to the material weight in the storage location, which includes the material’s capacity to store
ambient water. Clay will store substantially more water than sand, and will absorb and desorb water during the
course of the day. The step does not only add the water weight variable to the volume, but may also result in gravity
compaction within the bucket as well. The concern is obviously greater in higher humidity areas. Still, weight to
volume ratios, and soil moisture content should be checked frequently as part of a good quality control regimen.

15
by locating it near a drop-off or collection trench can increase efficiency; the Bobcat can scoop
the mix and load the block compression machine. Choose your mixer and compression machine
for compatibility, as one should not significantly outpace the other. In particular, the mix should
not sit while waiting for the compression machine to catch up as moisture may evaporate and, if
using lime or cement, the curing process will have already begun. Similarly, the CEB crew
should not be standing around waiting on a mix. The crew should clean the mixer daily,
particularly if using lime or cement. Ideally, a worker uses an air compressor and sparingly, with
water to accomplish this task. Any residual cement will harden if water is left in the mixer to
activate it. It is advisable to charge the two of most responsible crewmembers with maintaining
the safe and efficient functioning of the mixer and the block maker. One lost day of production
because of malfunctioning equipment will quickly justify this additional attention.
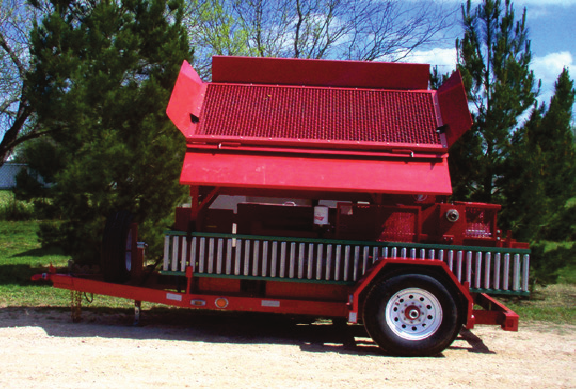
Figure 6. Advanced Earthen Construction Technologies (AECT) MX20 CEB Mixer
Many types of CEB production machines exist. The cost of labor and the number of CEBs
needed often determine the maximum feasible investment in the equipment. A large hydraulic
press machine is best suited for a multiple home construction enterprise. During efficient
operations, a quality CEB machine will not be the limiting factor in the production rate. Many
newer machines can produce six to seven CEBs per minute depending on size. In general, the
crew’s inability to keep up with the mixing, loading, handling, and storing of the CEBs will
restrict the output. This result is as it should be. The crewmembers should concern themselves
with quality before quantity and should be sized to slightly underperform the equipment so that
the likelihood and thus cost of idle time is minimized. Figure 7 shows a transportable model
CEB machine made by Advanced Earthen Construction Technologies.
16
Figure 7. AECT 3500 CEB Machine
The CEB machine should have a top feed hopper large enough to accept a full Bobcat payload of
the soil mix. It should be capable of applying a minimum ram (compressive) force of 1,200 psi
with rapid cycle recovery. Many models are built on a trailer chassis for easy transport, which
can be particularly advantageous if you are considering making CEBs at the home site. In
general, like other machinery, the model should be industry hardened through years of
production and use. It will be a significant investment in the range of tens of thousands of dollars
for a high capacity production unit.
Other valuable features you should consider when buying a CEB machine include simple
electronic controls and servo valves for the hydraulic operation, easily calibrated electronic eyes
for setting block thickness, multiple dies for producing different size blocks, and accessible
components for easy cleanup and maintenance.
Most large CEB machines come with at least 10 feet of nonmotorized rollers moving the blocks
away from possible congestion. It is advisable to orient the blockmaker so that CEBs can be
loaded onto pallets with minimal handling and in the direction of the curing area. Stack pallets
on makeshift CEB walls so workers will not have to bend over to load them—the forklift can
pick the pallet up without suffering a sore back. Weight limits on the pallet should reflect the
handling capacity of the lift rather than the rating for the pallet. The CEBs can handle being
stacked. Consider this attribute when selecting an area for curing and storing. A larger footprint
will be required if vertical stacking is not feasible.
CEB Curing and Inventory Control
Before initiating the CEB production process, identify a location for block storage that is easily
accessible by forklift and accommodates stacking and rotation of stock. Make sure to keep this
space above freezing temperatures. Following the practice of first in, first out is sensible,
although it is of more importance to keep accurate records of batch numbers and production
dates should problems arise at a later time. Early in the production cycle you will want to rotate
the stock, moving to the newest product to the rear and the oldest forward. CEBs can be used in

17
construction as soon as 7 days after manufacture, but will continue to cure to their ultimate
strength for about another 21 days. If you plan to start construction inside this timeline, minimize
downtime with careful tracking and stock rotation while the CEBs cure. It is advisable to
perform thorough testing on fully cured CEBs (minimum of 28 days) and with a proven mix and
manufacture process before using any CEBs in construction. Partially cured CEBs should only
be used when the site manager has absolute certainty in the quality output of production and in
response to an urgent situation that does not permit time for the product to fully cure.
Develop and use an inventory tracking method—the less complicated, the better. The goal is to
distinguish poorly made CEBs from quality ones at the smallest possible scale to save time and
money. In the midst of steady production, it is always possible that a step in the process might be
skipped or a calculation error made. The purpose of quality control tracking is to catch these
errors before the resulting problems compound. Track inventory on a scale refined to the finest
point of significant influence on quality. For CEBs, this point may be at the batch mixer where
cement or lime and water are added. Label palleted CEB bundles with the date of production,
mix ratio, lot number that corresponds to course dry mix of clay and sand, and a batch number
that identifies the exact mix proportions of cement or lime and amount of water added. Record
these notations in a production log that is updated as the product cures and then leaves the
warehouse for the home site.
Testing of CEBs is required by various code agencies like the New Mexico Building Code,
17
the
first code authority to incorporate CEBs. The New Mexico Building Code requires testing at the
rate of every 5,000 CEBs produced. In the early stages of production when the learning curve for
the crew remains steep, it is advisable to test more frequently, perhaps every 500 CEBs, or more
often if quality is inconsistent. This approach to testing will also inform you on the influences of
each of the various factors that go into the specific production process for your CEBs and help
you identify the best scale for tracking your inventory. A failed test occurs when the blocks
cannot sustain compression greater than 300psi. At that point all blocks within the finest scale of
tracking should be destroyed and sample blocks from every batch within the next recorded level
up must be tested. Having to discard a significant number of CEBs that underperform the
standard will fine-tune the crew’s attention to detail and focus everyone on the importance of
quality control and consistent recordkeeping. If you are making SCEBs, you should fully
submerge five of them in a bucket of water after they have cured for 7 to 14 days and monitor
any deterioration (melting). If melting is evident, similarly test SCEBs that have cured for 28
days and monitor them. A testing sample matrix is included as appendix f.
As CEBs leave the production facility, make sure the inventory log includes an update that
reflects in which home they will be used. Include any comments on their arrival condition or
performance at the jobsite in the notes section within the log. The log itself should be the
responsibility of the production supervisor with loss reports provided to the PM at regular
intervals. Inventory and quality control are crucial steps in ensuring a sustainable manufacturing
enterprise. The investment in this aspect of the production process should reflect the commitment
to the success of the larger project.
17
http://164.64.110.239/nmac/parts/title14/14.007.0004.htm.
18
Also consider the management of waste byproduct generated during production and security of
the facility, equipment, and successful or failed inventory. CEBs that fail structural testing
should be destroyed and removed from the production site immediately. These rejected CEBs
can be used productively as a clean, nontoxic landscaping fill to control onsite drainage. Be sure
they do not reenter the inventory stream.
Design and Construction
From an architectural perspective CEBs offer similar form and functional qualities as brick,
stone, and other masonry units. CEBs are more easily cut than stone and are more durable and
stable than adobe and wood. They offer nearly limitless functional design possibilities for home
construction. The many enduring ancient earthen structures around the world today speak to the
lasting structural integrity that earth blocks can achieve while simultaneously showcasing the
wide varieties of form and the artful grace they can provide. The structural integrity of the CEBs
allows us to use them as a structural wall system that requires minimal reinforcement or
additional framing.
I will address some design advantages and specific construction practices for CEBs in the
sections to follow. These recommendations are general principles and guidance for using CEBs.
It is advisable to engage professional architects and structural engineers, and to understand and
design to all applicable building codes before initiating construction.
Design Considerations for Building With CEBs
A number of aspects particular to CEBs influence both the practical and aesthetic design of a
house. The capacity of CEBs to absorb and radiate solar energy as heat is one of its great
advantages. First, I recommend siting or orienting a house on its lot (as well as coupling this with
energy efficient design elements) to take greatest advantage of passive solar energy. Using the
seasonal pattern of the sun’s trajectory, a CEB house could have large south-facing windows or
sliding doors that enable sunrays to penetrate the house interior. You can use passive solar
energy in a CEB trombe wall and a thermal mass floor during the winter months when the sun is
lower on the horizon. The trombe wall and floor will radiate this energy as heat long after the sun
has set. A long sloping roof overhang will shade these same windows in the summer months
when the sun is more directly overhead. An exterior wall of CEBs will absorb and reradiate
energy as well. The local climate and lot conditions should instruct the design characteristics of
each CEB home. Custom design and construction is probably not economically feasible for most
tribal housing projects. Mirror image layout of similar designs and modifying each house
orientation on different lots can often resolve property configuration and siting challenges while
still achieving the goal of energy efficiency. Considering the energy-storing capacity of CEBs is
crucial to maximizing their value in home construction.
In colder climates, CEB and other masonry structures are often built with two parallel interior
and exterior walls separated by a sealed air or insulation chase (see figure 8). This double-wythe
wall system is designed to create a full thermal divide between the outside and inside walls to
keep the cold out and the warmth in. This system results in a thick wall that requires twice as
many CEBs and results in reduced interior living space for a given foundation footprint. Building
19
with CEBs in cold climates will require a design that balances the local code-based insulating
requirements for homes with the comfort and aesthetic preferences of the occupants. A single-
wythe wall would require insulation on either the outside or the inside of the wall. In each case,
losses of other performance or aesthetic characteristics of the CEB wall may occur. If one of the
goals of the construction project is to unburden homeowners of high-cost energy bills, preventing
heat loss or cold intrusion through adequate insulation is likely the best means of reducing the
need for mechanical conditioning of the indoor living space. The additional capital investment in
CEBs for a double-wythe wall system may pay for itself in the savings earned by lowering
energy demand.
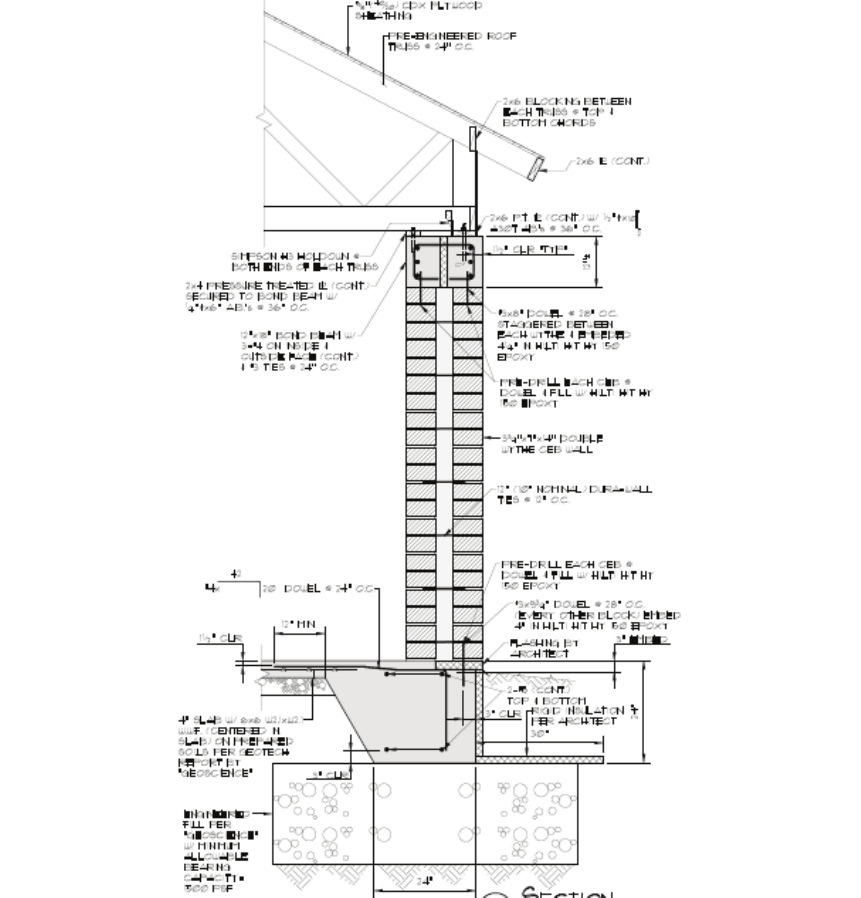
Figure 8. Showing Double Wythe Wall Diagram With Insulation Chase
20
Overview of the CEB Construction Practice
Foundation
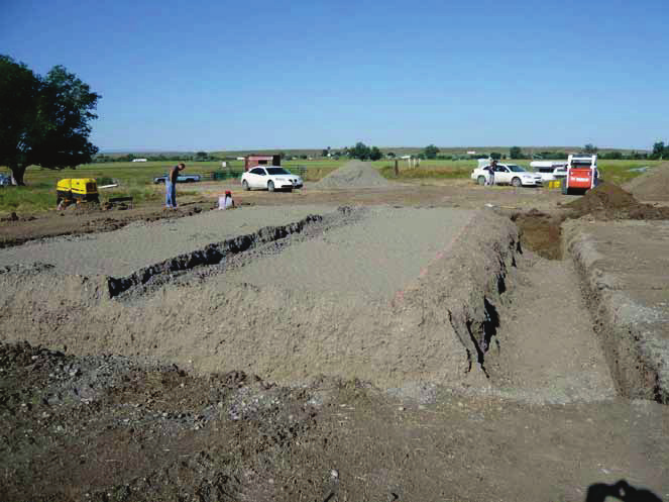
The heavy CEB house will likely require overexcavation of the foundation site. This hole will
then be filled with free-draining material and compacted based on the material’s proctor value to
form a subfoundation (figure 9). The finished elevation of the home’s floor should be well above
the grade of the rest of the lot. Even stabilized CEBs are susceptible to some moisture intrusion.
Any water from rain, snow, or irrigation should move quickly away from the house by gravity
force alone. After the final backfill, make sure subsequent grading around the house is strongly
positive. Poor grading of the lot resulting in negative drainage may undermine the foundation by
washing away portions of this subfoundation soil. Any settling of the foundation in excess of one
inch of relative displacement can cause structural failure in the CEB masonry, with other issues
compounding from that point. It is thus a good idea to retain a geotechnical engineer to sample
the soil conditions at the site and make recommendations relating to the foundation and area
drainage.
Figure 9. Over-Excavated, Compacted, Filled, and Shaped Subfoundation
Working now from the ground up, the foundation must be designed and built to support a heavy
house. A single 4-x-10-x-14-inch CEB will weigh about 45 pounds. The foundation or footer and
stem wall must be stout enough support a stack of 20 or more of these for the exterior wall. If
building interior walls of CEBs, the slab must be thickened at each wall location or a grade beam
used to properly distribute the load throughout the foundation structure. A structural engineer
should review drawings or plans as wind loads, seismic zones, and other considerations influence
the bearing capacity and foundation design.
In areas susceptible to heavy snowfall or drifting, be sure to use concrete masonry unit (CMU) or
a similar material in the first vertical foot of exterior wall. In the Rocky Mountain West, it is not

21
uncommon to have drifting snow accumulating against houses during a storm one day, and the
brightest sunny day the next. The sun will heat the exterior CEB wall, melting the snow and
exposing the CEBs to significant surface moisture, with some of this water being absorbed by the
block. At night, colder temperatures may cause this water to freeze and expand, causing typically
minor, but notable issues. Repetitive cycles of this scenario are cause for concern and will
necessitate a design solution. Obviously, the lower courses are more vulnerable to this scenario.
Generally, using CMU for the first vertical foot is adequate protection. Although stabilized CEB
walls can withstand nominal moisture exposure, plastering the walls with a coating or two of
similar material is advisable. One can easily make any subsequent repairs, as the mix is available
locally. For higher moisture climates, a three-coat cementitious plaster layer affords more than
adequate protection from the elements.
CEBs are, by design, dense and hard to penetrate with standard construction tools, unlike the
more common wood frame hollow-wall houses. Therefore, integrate the foundation plan with the
electrical, plumbing, and mechanical detail so that, if desired, service supply lines can be brought
into the house under or through the foundation and floor. If pouring a slab, setting the interior
stubs with precision beforehand will save a small fortune in expense and anxiety if relocating is
otherwise required.
Building Up the Walls
After the foundation has been completed, layout for doors and windows, and block walls can
begin. Proper procedure requires that the foundation be checked for square first. A square or
rectangular foundation can be verified as true by simply measuring the diagonal length from
opposing corners. For foundations with more than four straight sides, use the longest 3, 4, 5 right
triangle multiplier possible.
18
From each square foundation corner measure 3 feet along the edge
and make a mark. From the same starting point, measure 4 feet along the other axis and mark the
foundation edge again. Now, carefully measure the diagonal distance between those two marks.
Any length other than exactly 5 feet means the foundation is out of square and you will need to
adjust the alignment of your blocks in reference to the foundation line to compensate. Use a
multiple of the 3, 4, 5 triangle for longer walls. For example, try 6, 8, 10 or 9, 12, 15, if the space
exists. If adjustments are needed, choose a single reference point that is easily observed and
accessed and pull all measurements from that location. Where possible, snap chalk lines to
indicate the first course layout location. Consult with the project architect or engineer for ways to
compensate for out-of-square issues before laying block.
Marking the location of exterior doors on the foundation is the next step. Door and window
openings are framed with “bucks” that act as a form for the rough opening (RO) of blocks
(figure 10). Install door bucks before laying your blocks. Bucks can be made of welded steel that
will provide a sturdy reusable frame. Wooden bucks perform equally well as the steel for shorter
term and one-time use or they can be left in place to serve as nailing points for door or window
frames and trim. Determine the intent to either leave the bucks or remove them before sizing the
RO for your doors and windows. The bucks will need to be diagonally braced to keep them square
18
The method is based on Pythagoras’ geometric theorem that the square of the length of the hypotenuse of a right
triangle is equal to the sum of the squares of the lengths of the other two sides. In equation form: 3
2
+ 4
2
= 5
2
, or 9 +
16 = 25. It is true for the multiples of the two sides that make up the right angle also. 6
2
+ 8
2
= 10
2
, or 36 + 64 = 100.
22
and prevent them from bowing during block setting. After the walls start rising, the doorway will
be the main access into and out of the interior of the house. Consider this aspect when setting and
bracing the bucks. Follow the door manufacturer’s guidance on the RO dimension.
Figure 10. Window Bucks Installed
After the door bucks are set, the first course of CMU blocks or CEBs, based on the design for the
area climate, can be laid directly on the foundation. For CMUs, this step is usually done with
cement or mortar. For CEBs, a contractor grade construction adhesive affords the best bond
between the concrete foundation and the CEB. Cement adhesive will work as well. Most
traditional masonry techniques, like staggered joints and woven corners, are applicable to CEB
construction. One specific variation from typical masonry practice however, is how CEBs are
bonded together. Rather than using a traditional cement mortar, CEBs adhere using wet slurry of
the same mixture they are made of, creating a monolithic wall after they have cured. It is very
important that the block surfaces to be bonded are moist during curing of the slurry. This
approach ensures a firm, lasting bond. The slurry should be made with finer grained sand than
the CEBs themselves, with particle size no larger than 1/8 inch. A 1/4-inch stone in thin slurry
joint may cause a point load on the blocks as more courses are added, potentially resulting in
cracking and spalling. A nominal 4-inch CEB should have a net thickness of 3 3/4 inches. With a
slurry mortar joint of 1/4 inch, three courses should raise the wall 1 vertical foot.
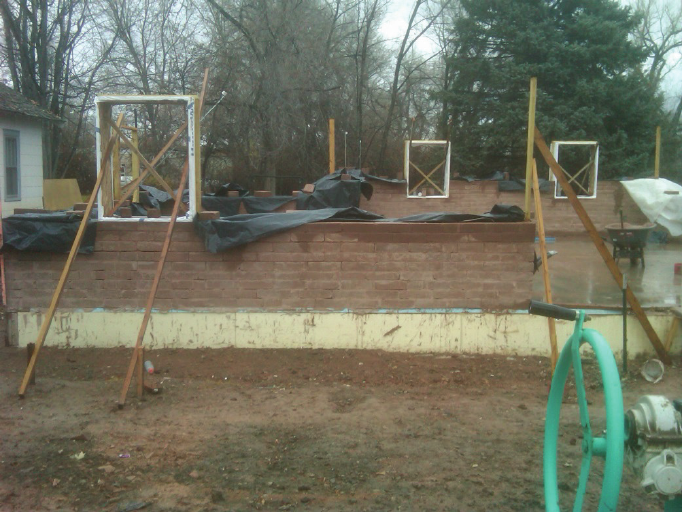
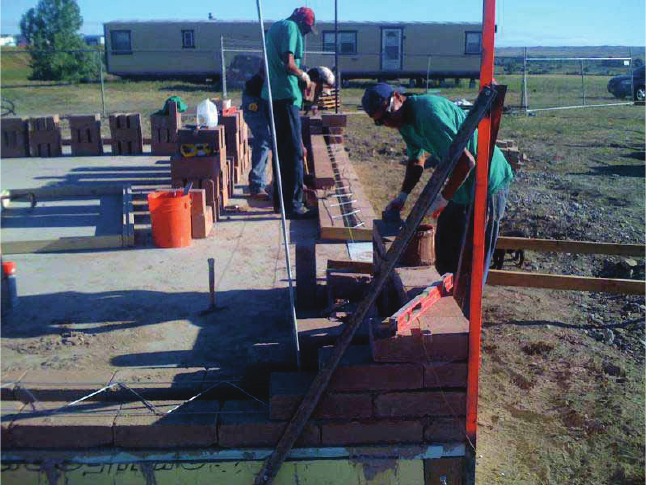
Story poles (figure 11) are used to keep the block courses level and the wall plumb. An 8-foot
length of 1/4-x-2-x-2-inch steel angle-fastened and braced at the foundation corners is marked
for each course and a mason’s line is stretched tight and level between the two poles. Working
out of the corners toward the midpoint of the two sides, two, three-person crews can have the
exterior walls of an average size house up in 2 or 3 days. Stacking CEBs and mixing the slurry
requires minimal technical skill, which makes this type of construction well suited for self-help,
23
sweat equity homebuilding projects. Like all construction projects, masonry practice and
building with CEBs have their challenges and issues. For this primary reason, among others,
it is advisable to have an experienced mason oversee this aspect of the project. Temperature,
humidity, wind, and sun affect the water proportion and curing rate of the slurry. A skilled
mason will know how to adjust and fine tune the slurry to ensure a quality bond in most weather
conditions. CEB masonry is not well suited for work in temperatures less than 30 °F. In some
cold weather cases, the slurry water can be heated to compensate for low ambient temperatures,
but this approach is risky, particularly if the CEBs are stored outside as well. In these instances,
an experienced mason makes the decision as to the prudence of continuing or delaying the work.
Figure 11. Orange Story Pole at Corner Bolted and Braced to Foundation
After reaching the final course, install window bucks up to the bottom sill. Unless the openings for
the windows and doors are structurally arched, span them with a solid lintel header like in
traditional masonry practice. The sill can be made of stone, steel, wood, or another suitable
material. The thickness and the acceptable span length are based on the choice of material, its load
bearing capacity, and the required performance of the wall itself as part of the larger structure.
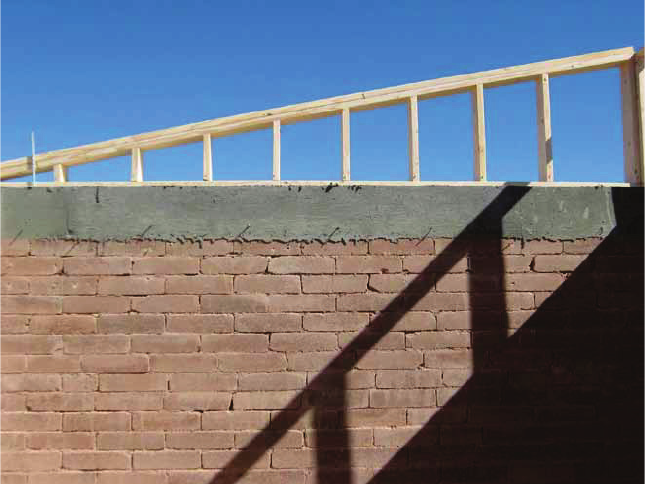
A bond beam is typically used at the top of CEB walls, including interior walls, to tie them
together for stability, while also providing a leveled surface to which the next floor, roof rafters,
or trusses to attach (figure 12). Concrete or wood beams can be used for this purpose. A concrete
bond beam is typically poured in place after a somewhat complicated formwork and rebar
installation process has been completed. This process has the benefit of creating a single beam
without any separate segments that essentially envelopes and secures the entire wall system into
one piece. A properly sized wood beam can achieve sufficient wall stability, but will require
angle and gusset plates to join the segments together. Wood may be preferred if the bond beam
will be exposed as an architectural feature or if a companion goal of the project is a reduction in
the use of concrete.
24
Figure 12. Finished Bond Beam With Shed Roof Framing
In general, building codes and structural engineers will require that any forces imposed on a
building (wind, seismic, live and dead loads) must be transferred to the foundation through a
direct connection. Currently, CEBs are code approved as elements of compression resistance, but
do not provide shear resistance to lateral loading. To address this issue, structural engineers often
design a system of vertical rods poured in place at the interface of the foundation and the interior
side of the exterior wall. Engineers size and space these rods at intervals along the wall based on
wind and seismic ratings for the geographic location of the house. If bond beam is poured
concrete, these rods can be made of rebar and tied into the reinforcement within the bond beam.
For a wooden bond beam, all-thread rods that extend through the beam and are fastened down
with nuts will probably work best. If the house is of double-wythe construction, these tension
rods will be hidden in the chase between the two walls. If you are using a single-wythe wall,
locating these rods to engage a structural bond beam will require creative design to avoid
significant construction challenges and aesthetic impacts.
CEB construction is easily integrated into traditional housing design and construction methods.
Wood plates attached to the top of a concrete bond beam with adhesive and embedded j-bolts
enable the gable framing and rafter or truss to be attached. “Gringo blocks,” usually 2-x-4 lumber
inserted strategically during block laying, accommodate the fastening of interior frame walls,
kitchen cabinets, and electrical and plumbing lines and fixtures.
Most common roof styles work well with CEB home designs also. Some specific performance
considerations must be made for roofs that shelter a CEB house, however. As mentioned earlier,
it is important to include a long sloping overhang on the south face of the roof of a CEB house
built to capture passive solar energy to shade the many windows there during summer months. In
25
addition, extend the other roof(s) beyond the walls by at least 1 foot to move water away from
the walls and foundation. Install gutters, downspouts, or rainwater catchments immediately
following the roof decking, and if you do not intend to store rainwater, add flexible pipe
extensions to protect against local ponding of water. In the southwestern United States, where
flat roofs on homes are common, one can build scuppers similar to the design and function as
existing adobe houses to move water away. Timber vigas are heavy rough-hewn rafters that are
ornamental and typically support the structure for flat roofs. CEBs, like their earthen wall
predecessor, adobe block, are naturally suited for this traditional construction style.
The mechanical components of the home (plumbing, electrical, and air handling) may require the
designers and relevant tradesmen to have some familiarity with CEB or masonry construction. In
the attic space, you can run ducting for heating/cooling, as well as the leads or “homerun” wires
from the panel for lighting and outlets. Interior walls, other than a trombe wall, are often
constructed of conventional dimensional framing lumber that accommodates both the electrical
and plumbing rough-ins. If the intent is to frame the interior walls exclusively with CEBs, it is
best to do the rough wiring with Electric Metallic Tubing conduit and plumbing while the blocks
are being set, rather than attempting to cut in a chase afterwards. Make the decisions regarding
these installation requirements before construction is initiated as the result of a discussion of the
alternatives and their implications with the architect and tribal code committee.
This first house will serve multiple purposes for all the project stakeholders. It will be used as a
demonstration to the community and future funding sponsors of the intent and capacity of the
tribe to build houses practically, sustainably, and suited to their values and ideals. It will be a
training and proving ground for the crew and management team, revealing the strengths on
which they build and challenges they should try to overcome. It will provide the designers direct
feedback through the field modification/redline process and expand their understanding of the
application of the architectural features they proposed. It will determine the course of action and
future investment of tribal leadership on behalf of the project. This first house will define the
best practices of CEB construction, specifically as it relates to the unique circumstances of each
tribe. The first house is proof of tribal self-determination and self-sufficiency.
The guidance offered here is conceptual and generalized to be broadly applicable across the
climatic and geographic breadth of tribal reservations. Hopefully this manual will serve as a
practical and motivational foundation from which to rebuild and sustain tribal communities.
General Business Guidelines
As noted earlier, although the CEB production and construction entities may be subsidiary
operations under one parent tribal economic development corporation, they are organized as
two independent businesses. The justifications for this arrangement are borne out by federal
procurement rules governing the use of federal funds for the purchase of commodities and
services between corporate subsidiaries, the potential expansion of each business beyond the
reservation boundaries, and to mitigate the risk of mutual liability for each enterprise. For the
sake of the tribal housing project, the businesses should collaborate to the best of their
capabilities. All business transactions should adhere to ethical financial standards, however, and
be capable of withstanding outside scrutiny. In addition, each enterprise should be operated to

26
achieve the greatest possible return for their tribal member shareholders while ensuring sufficient
revenue to maintain a self-supporting operation. The Harvard Project on Economic Development
provides a successful enterprise model that can be used to guide tribal business operations to
ensure that tribal assets are protected.
19
Essentially, the standard approach is a holding company model. The holding company uses a
corporate structure that is typically either a tribally chartered corporation under tribal code or a
federally chartered corporation under Section 17 of the Indian Reorganization Act.
20
This
corporation oversees smaller companies, often called subsidiaries, which carry out distinct
business operations, like CEB production. The corporation is independently managed by a board
of directors but reports to the Tribal Council or other governing entity, which isolates it from
political turnover (elections). Many tribes successfully use these business models to manage a
wide array of business operations; CEB production enterprises and CEB home construction
entities can fit into these models well.
References
Krosnowski, Adam Davis. 2011. “A Proposed Best Practice Method of Defining a Standard of
Care for Stabilized Compressed Earthen Block Production.” Master’s thesis. Boulder: University
of Colorado, Boulder.
Lewis, James P. 2007. Fundamentals of Project Management. New York: AMACOM.
Minke, Gernot. 2000. Earth Construction Handbook: The Building Material Earth in Modern
Architecture. Southampton, United Kingdom: WIT Press.
19
http://www.hpaied.org/images/resources/publibrary/PRS90-2.pdf.
20
http://www.irs.gov/pub/irs-tege/tribal_business_structure_handbook.pdf.
27
Appendix
Appendix A— CEB Soil Analysis Matrix .....................................................................................28
Appendix B—Bulk Material Sampling Process Guide .................................................................29
Appendix C1—Production Process Plan: General Guidelines ......................................................30
Appendix C2—Production Process Plan: Step-by-Step Procedure ...............................................31
Appendix D—Staff Management and Oversight Recommendations ............................................33
Appendix E—Recommendations for Current Staff Structuring ....................................................35
Appendix F—Recommended Laboratory Tests for Soils/CEB Qualification ...............................37
Appendix G—Project Planning .....................................................................................................38
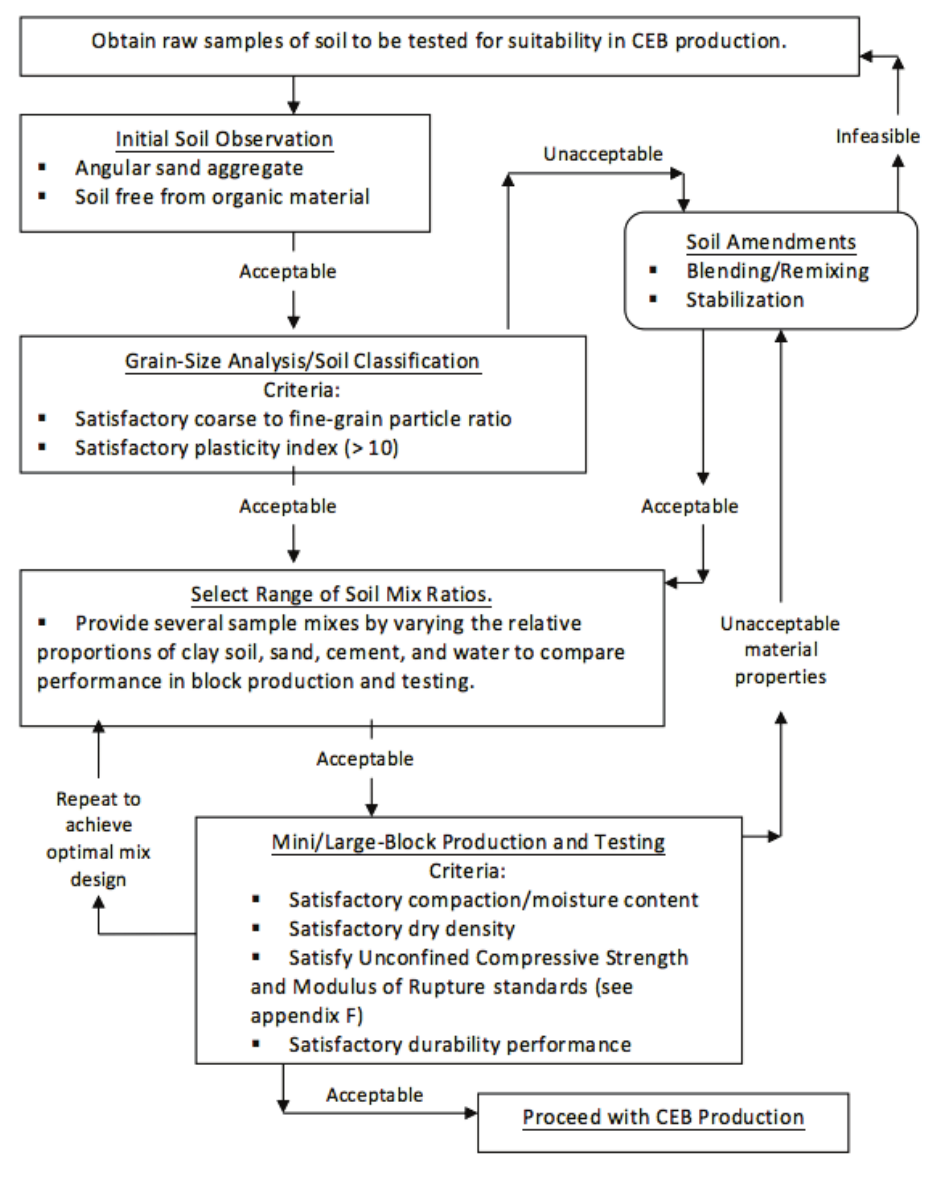
28
Appendix A—CEB Soil Analysis Matrix
CEB = compressed earth block.

29
Appendix B—Bulk Material Sampling Process Guide
Assumptions
• Amount of screened clay to be mined from site: 1,000 cubic yards.
• Weight of cubic yard of clay: 1.15 tons.
• Weight of clay to be transported to plant: 1,150 tons.
• Haulage distance one-way to block plant: 10 miles.
• Raw clay material will have approximately 33 percent oversize waste material.
• Pit size: 6 feet deep by 60 feet wide by 100 feet long = 1,333 cubic yards in place not
including overburden.
Equipment
• 1 front end loader, 4-cubic-yard bucket.
• 1 dump truck, 20-ton capacity.
• 1 portable screening plant.
• 1 lowboy truck (to transport loader and screening plant).
Unit Operations
1. Transport equipment to site (mobilization).
2. Make access road to site (assume 500 feet) and stockpile topsoil.
3. Remove and stockpile topsoil at mine site.
4. Mine and transport clay are moved to a screening plant bin using a front-end loader.
5. Screen material.
6. Move screened clay and oversize waste to stockpiles with front-end loader.
7. Load clay into truck with front-end loader.
8. Haul clay to block plant.
9. After mining is complete, place waste material in pit.
10. Contour pit slopes 4 to 1 and make drainage ditch if necessary.
11. Spread topsoil over mine pit.
12. Remove equipment (demobilization).
13. Scarify road and spread topsoil.
14. Seed with native plant seed as required.
30
Appendix C1—Production Process Plan: General Guidelines
General approach—everything goes into written plan.
1. Consistency and repeatability of process is critical to maintaining quality of product.
2. Break process down into discrete operational segments or specific functions/tasks.
3. Assign manpower to each numbered and ordered function.
4. Time each operational segment.
5. Establish output quality for each segment.
6. Assign critical component number on 1 to 10 scale to each segment (that is, most
important/most critical step in process has highest rank—10).
a. This assignment is likely a function of a number of things.
i. Time lost in production from error (liability).
ii. Difficulty of particular task.
iii. Probability of error.
7. Align appropriate staff to level of criticality of task.
8. Each staff member is directly responsible for his or her own operation segment.
a. Achieves stakeholder buy-in (each job is critically important).
b. Expertise developed by staff in critical tasks.
c. Certainty in responsibility boundaries for each staff member.
d. Identifies job descriptions for staff.
9. Initiate redundant training beginning with most critical tasks first.
10. Review and revise as needed weekly.
31
Appendix C2—Production Process Plan: Step-by-Step Procedure
Specifics—this list is a projection (supervisor should amend as needed).
1. Raw materials stage.
a. Receive new sand, soil, and Portland.
i. Assess and segregate as needed.
ii. Rotate as needed.
iii. Cover and secure.
iv. Modify inventory per par sheet.
b. Screen to appropriate size.
i. Setup grizzly.
ii. Operate Bobcat to load raw stock.
iii. Screen volume needed for production schedule.
iv. Transfer screened raw materials to appropriate location.
v. Modify inventory per par sheet.
2. Mixing stage.
a. Confirm mix design with production lead.
i. Check sand and soil size, quality, and purity.
ii. At least two staff should confirm all mix ratios.
b. Adjust the set belt and hopper speeds.
c. Operate mixer and manage output.
i. Moisture content, mix quality.
ii. Confirmed by two staff members.
d. Record mix ratios, date, time, and mixing time in the production book.
i. Note ambient temperature and other tangible influences.
ii. Assign lot number to mix and record.
3. Block-making stage.
a. Confirm lot number of mix and record with time, etc., in the product log.
b. Review machine settings, sensors, conveyor slope, etc.
c. Prepare pallets, plastic, and shrink wrap for block storage.
d. Initiate block-making by running test block.
i. Measure size of test block—adjust settings if needed.
ii. Record dimensions with lot number, time and date, operator name.
iii. Perform drop test, review with production lead.
NOTE: If drop test indicates poor quality block review procedures at each previous stage.
iv. Initiate block production.
v. Remove block from conveyor and stack.
vi. Complete load run before prepping pallets for curing.
vii. Set aside minimum three blocks for quality control (QC) testing.
4. Curing stage.
a. Seal blocks with black plastic cap and shrink wrap for slow cure.
i. Label black plastic in marker with lot number, date, time, and operator
initials.
ii. Do the same for QC blocks—label appropriately.
32
b. Transport to curing room.
i. Add curing room temp to black plastic on QC block package.
ii. Rotate stock as necessary.
c. Note inventory addition to production log.

33
Appendix D—Staff Management and Oversight Recommendations
General
• The crewmembers (not the soil or machinery) are the most critical resource of this
project. Invest time, energy, and money to appropriately reflect their importance.
• Set teamwide achievable targets and goals. These items should be easier to reach at first
to build individual confidence and team morale.
• Preach the importance of working and achieving as a team. This concept strengthens the
commitment of each staff member to the larger/greater goal.
• Establish SMART goals.
21
o Specific.
o Measurable.
o Attainable.
o Realistic.
o Timely.
• Involve staff in identifying these goals and encourage them to challenge themselves.
• Post a measure of achievement—something like the charity thermometer used to
illustrate fundraising progress toward goal.
• Celebrate small and large achievements with entire staff.
o For example: “great week everyone, we exceeded our target for the week and the
plant looks great, everyone come in at 9:00 a.m. on Monday instead of 8:00 a.m.
…but, we are increasing our target by 10 percent because we are getting better at
this. What does everyone think?”
o It sounds touchy feely in the example, but remember that you are their boss and
they need your appreciation, which will help them to receive any future (or
perhaps past) criticism constructively.
• Build and review weekly goals and targets with staff in mind.
o Preview general targets on Friday.
o Revisit Monday and identify specific individual assignments.
• Always have and identify “extra” work and tasks available for staff to step up to in
daily/weekly plan.
o This approach offers an opportunity for them to take initiative.
o Identifies overachievers.
o Prevents idle time.
21
Available at http://www.topachievement.com/smart.html.
34
• Create and maintain a professional work environment.
o Communicate, communicate, and communicate.
Make sure they tell you they understood your instructions and
expectations.
Assuming too much leaves you and the project vulnerable to
disappointment.
o Consider providing coffee maker, refrigerator, or grill as added amenities.
Demonstrates your value for staff.
Keeps staff onsite for lunch—reduces chances for late return.
More coffee is always better.
• Conduct interviews for additional staff at regular intervals.
o Look to upgrade and expand staff.
o Measuring demand for this job indicates how you are doing as employer and
perspective of the project within community.
o Improves interview and hiring skills.
Never hire friends.
Always conduct at least two interviews before hiring.
Do not hire until you have interviewed at least three applicants for the
position.
35
Appendix E—Recommendations for Current Staff Structuring
• Establish specific roles and responsibilities for each staff member.
o Properly delegating responsibility unburdens management.
o Builds project ownership by staff.
o Tie ownership to the production process plan.
o Rotate to create redundancy and broaden staff knowledge base.
o Expand to wider operation; examples follow.
o Safety Lead.
Regulation and compliance.
• Identify hazards, risk levels.
• Identify mitigation procedures.
• Ensure compliance with establish policies.
Safety supplies.
• Ensure adequate inventory of Personal Protective Equipment (PPE),
First Aid, and eye wash.
• Identify budget line item for supplies.
Maintain safe facility and operation.
• Keeps exit pathways clear.
• Checks fire extinguishers for functionality and signage.
Reviews facility monthly and recommends safety improvements.
• Eye wash station?
• Fire-proof cabinet for hydraulic oil storage?
• Oil rag storage and disposal?
• Pest control measures?
• General hygiene improvements.
o Physical plant/Facility Lead.
Water, lighting, power availability and function.
• Limitations.
• Improvements.
• Inventory of consumables.
Access.
• Key control.
• Buildings and yards security.
o Exterior lighting.
o Fencing?
Facility management.
• Identify improvements.
• Estimate expense.
• Meet/work with vendors.
• Cleanliness and work pathways kept clear.
36
o Quartermaster.
Manage equipment, tools, and consumables.
• Maintain equipment in operable condition.
o Schedule and perform routine maintenance.
o Track usage time on all machines.
o Maintain log of equipment warranties and maintenance and
downtime records.
• Maintain tools in operable condition.
o Ensure small parts inventory is adequate.
Blades, drill bits, shovels, etc.
o Check and repair as needed electrical cords on tools and
extension cords.
o Perform regular inspection of tools that pose safety risk to
users.
Ladders.
Saws.
Hot work tools.
• Materials and consumable supplies.
o Ensure appropriate tools available for work with given
materials.
o Maintain and manage inventory/par of “shop” materials.
Coordinate with Production Lead on material ordering,
delivery receiving and storage.
o Production Lead.
Production coordinator.
• Organize and manage team during block production.
• Develop and implement ordered process plan for daily production.
• Ensure proper mix design is used in block manufacture.
• Ensure proper handling, curing, and storage of blocks occurs.
• Ensure all staff are adequately trained and performing to their training
standards at each stage of production.
Verify inventory record and update target and goals charts.
• Stick to update timeline and frequency (no more or less often than
planned).
• Verify recorded lot number for block packages.
Production planning.
• Work with supervisor to plan daily/weekly production schedule.
• Ensure available material and supplies to meet production plan.

37
Appendix F—Recommended Laboratory Tests for Soils/CEB Qualification
For more information, see https://www.yumpu.com/en/document/view/17885682/scebs-university-of-
colorado-boulder/3.
Testing/Analysis Soils
ASTM D-1557 (Moisture—Density Relation Test).
ASTM D-4318 (Plasticity Index—Atterberg Limits).
ASTM D-422 (Hydrometer Analysis).
ASTM C-136 (Sieve Analysis).
Testing/Analysis CEBs
These tests are used to identify the optimal mix design ratio of clay to sand by subjecting full-
size compressed earth block specimens to simulated climate conditions and then performing
compressive strength testing. Typical clay-to-sand rations are 1:1, 2:1, 2.5:1, 1:2, 1:2.5 and then
adjusted based on laboratory performance.
ASTM C-666 Freeze/Thaw Durability
ASTM C-952 Mortar Bond Strength
ASTM C-1072 Mortar Shear Strength
ASTM C-1314 Aspect Ratio Prism Test
ASTM D-2166 Unconfined Compressive Strength (UCS test)
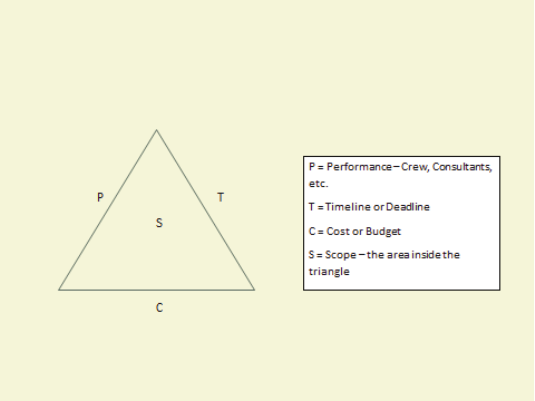
38
Appendix G—Project Planning
The path toward a successful project is best guided by a well-thought, concise, and
comprehensive strategic plan. Structuring such a plan is a project in itself, but the payoff comes
quickly in the form of more confident decisionmaking, significant risk reduction to the project,
and stress reduction for the Project Manager (PM). The plan should address the three
fundamental components of every project: (1) cost or budget, (2) timeline (often aptly called
deadline for PMs), and (3) performance, referring generally to who will perform what work and
how it will be carried out. These three dependent factors make up the project scope. The diagram
in figure G-1 is an essential guide for every PM.
Figure G-1. Scope (PTC) Triangle Showing Dependent Linkage of Project Management Factors
Source: Lewis (2007)
The PTC triangle—which stands for performance-timeline-cost/budget—illustrates the
connection between the factors, with the area of the triangle representing the full project scope.
The boundaries, or constraints, of the triangle are critical. If the scope of the project starts to
grow, or creep, you can visualize in the diagram that as one side lengthens at least one of the
other sides must as well. The third side may lengthen also, shrink, or stay the same in an effort to
keep costs under control, for example. Scope creep is nearly always the greatest risk to every
project. Similarly, for the same (fixed) scope, if the timeline is shortened, the performance and
the cost must increase. The constraints of each of these three factors pressure the likelihood of
project success; hiring and retaining a crew within a limited budget challenges the delivery
schedule. A well-defined scope, along with a strategic plan to manage the constraints of
performance, time, and cost are crucial to the success of the project. In addition, Lewis
emphasizes that a (funding) sponsor should be permitted to determine the values of up to three of
the four factors, with the PM deciding the fourth. For example, if the funding agent determines
the cost, timeline, and scope of the project, the PM must have the flexibility to control the
performance. The PM is on the ground orchestrating the day-to-day work of the crew and
requires the authority to increase or decrease staffing based on the daily circumstances.
39
Attempting to manage a project without the capacity to make adjustments is a recipe for failure.
Negotiating these four project components with all the stakeholders before starting any of the
work or the flow of funds is paramount to reducing the constraint risk to the project.
Uncertainty, another risk to projects, is less easily managed but still requires a plan to mitigate its
effects. Many influences on project success are beyond the control of the PM. An extreme
weather event is a good example. Planning for seasonal changes in weather is not beyond a PM’s
control, however. A good plan should anticipate predictable, although uncertain, occurrences that
might otherwise hinder progress and identify a response that avoids unnecessary delays.
A potentially more damaging uncertainty that can and should be mitigated is how and when
project success will be measured. A performance plan should incorporate the timeline and budget
and be resolved to each task and responsibility level of the project. Both a site laborer and the
PM should understand how their work will be evaluated and be assured that success looks the
same to their superiors as it does to them. In other words, the scope of work (SOW) and
responsibility for all project personnel should be as clearly defined as the overall project scope.
In particular, the project sponsor must view success exactly the same way the implementer (PM)
and the recipient (that is, the Tribal Authority or the homeowner) do. Otherwise, each and every
variation will be a source of dissatisfaction and likely, criticism.
